> For the complete documentation index, see [llms.txt](https://docs.shoppego.my/tutorials/llms.txt). Markdown versions of documentation pages are available by appending `.md` to page URLs; this page is available as [Markdown](https://docs.shoppego.my/tutorials/en/forms.md).

# Forms

At Shoppego you can now create your page and have a form element for collecting your customer information.

**To enable you to use this function, you&#x20;**<mark style="color:red;">**must also set Captcha**</mark>**&#x20;in your Shoppego store. For examples of setting Captcha, you can refer to this link:**

**For an example setting, you can go to the section:**

{% content-ref url="/pages/YP7EqhmfL8YMwa1YeO27" %}
[Google reCAPTCHA V3](/tutorials/en/settings/captcha-providers/google-recaptcha-v3.md)
{% endcontent-ref %}

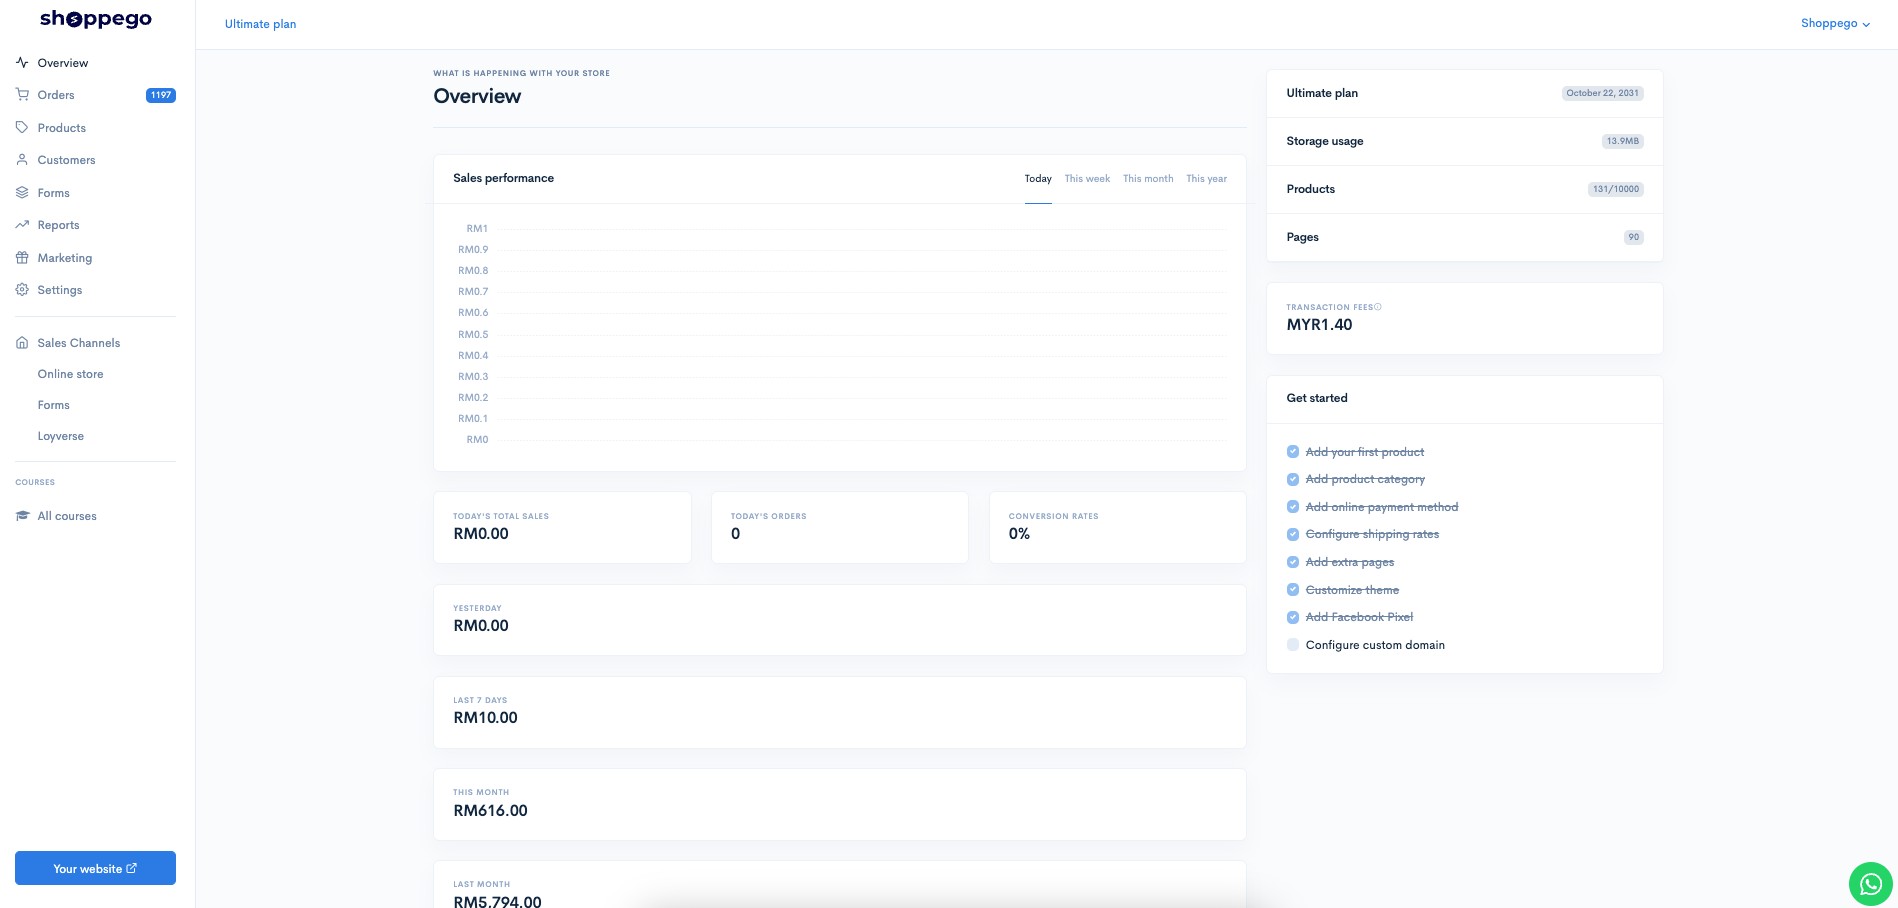
1. Log in to your Shoppego account

<figure><img src="https://3359028955-files.gitbook.io/~/files/v0/b/gitbook-x-prod.appspot.com/o/spaces%2F-Lh09fNwqqta5Vj6Wr8p%2Fuploads%2Fgit-blob-b853fc0189b34fb1d3990f5b1f53fa71deb9d384%2FlCN7aw3FznaFFoOAyya2.jpg?alt=media" alt=""><figcaption></figcaption></figure>

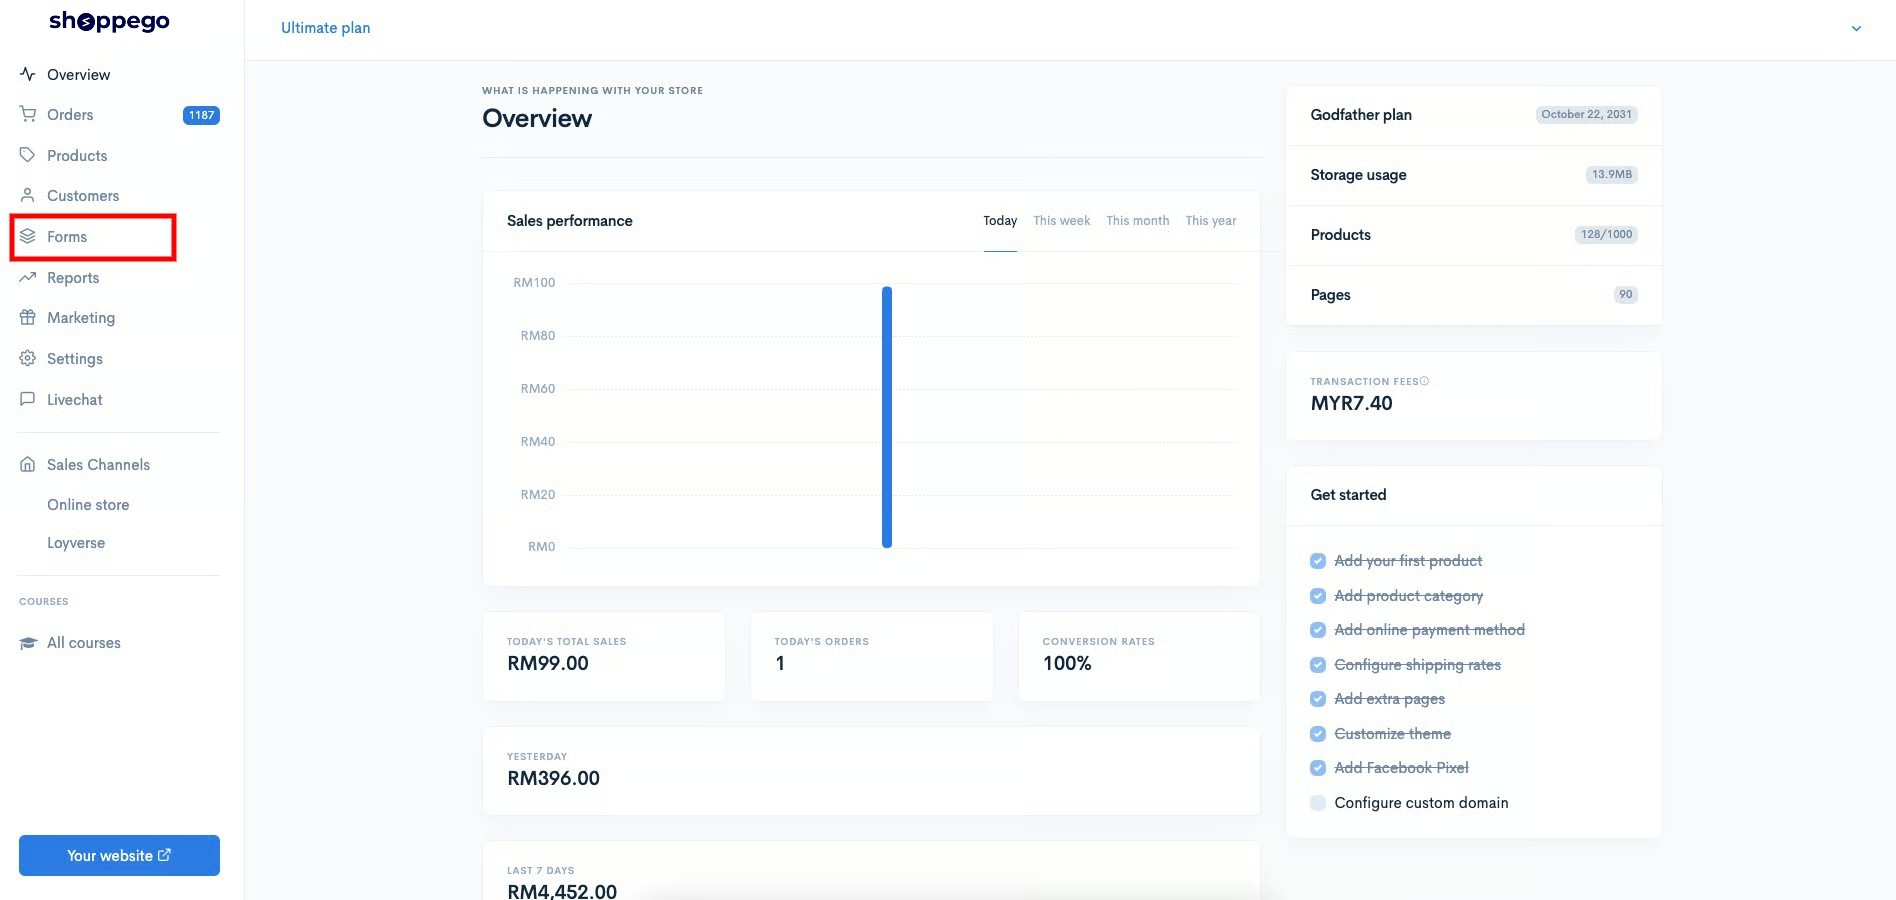
2. Click on **Forms**

<figure><img src="https://3359028955-files.gitbook.io/~/files/v0/b/gitbook-x-prod.appspot.com/o/spaces%2F-Lh09fNwqqta5Vj6Wr8p%2Fuploads%2Fgit-blob-96a27d886ba4de1d650e3c4a7b1af996e25c678d%2FRFWjewuqo8zmMwOSQoR7.jpg?alt=media" alt=""><figcaption></figcaption></figure>

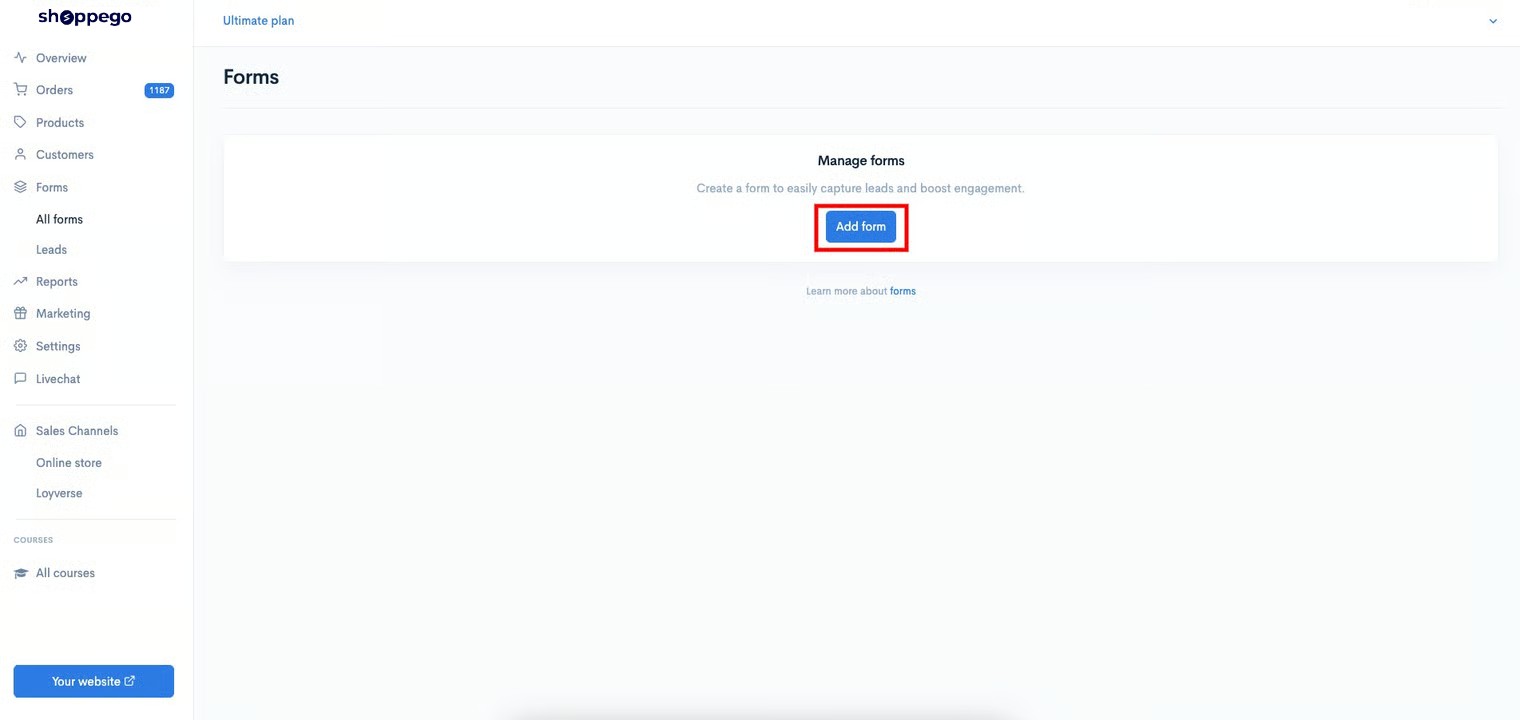
3. Click on the **Add form** button

<figure><img src="https://3359028955-files.gitbook.io/~/files/v0/b/gitbook-x-prod.appspot.com/o/spaces%2F-Lh09fNwqqta5Vj6Wr8p%2Fuploads%2Fgit-blob-4552a5f19287e936bc45a452999e202acc953664%2FXZmUFXeTcbu0epXLdn7d.jpg?alt=media" alt=""><figcaption></figcaption></figure>

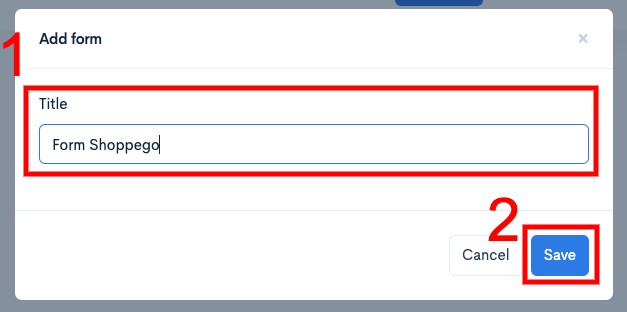
4. Then, **enter your Title page** that has the form and click **Save**

<figure><img src="https://3359028955-files.gitbook.io/~/files/v0/b/gitbook-x-prod.appspot.com/o/spaces%2F-Lh09fNwqqta5Vj6Wr8p%2Fuploads%2Fgit-blob-1f4b6a771918875594b3f0a962738c6a88c900f2%2FokeMKnvETOfnWV3yzQL2.jpg?alt=media" alt=""><figcaption></figcaption></figure>

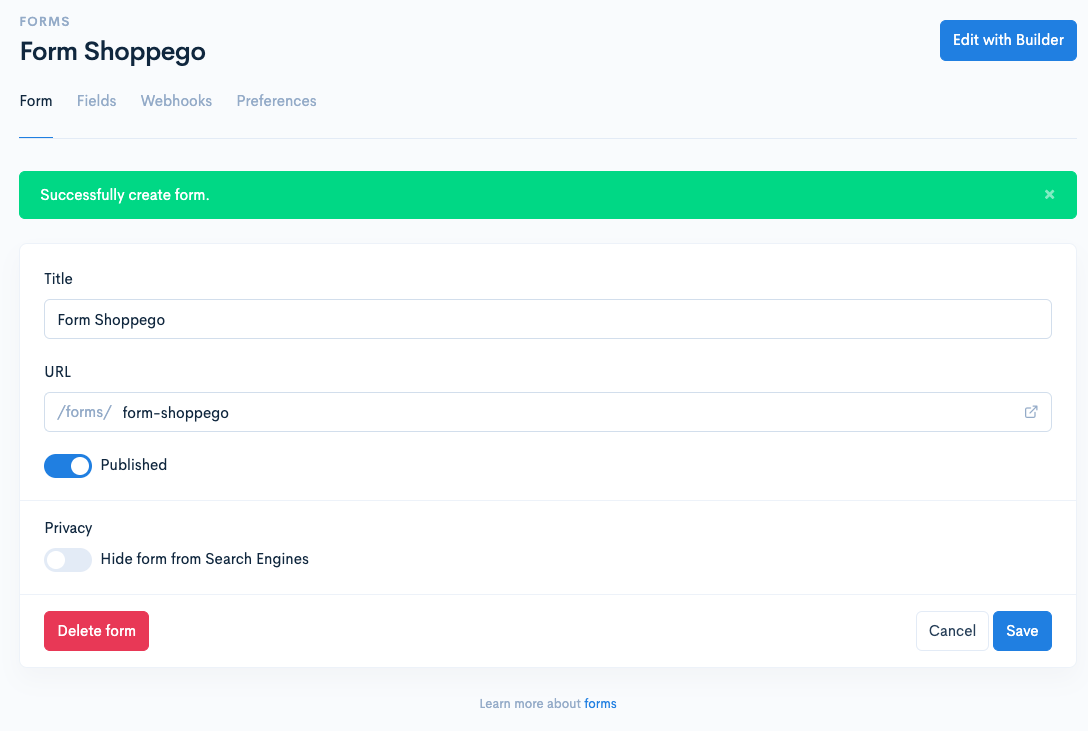
5. Now, your special page with the form element has been successfully created.

<figure><img src="https://3359028955-files.gitbook.io/~/files/v0/b/gitbook-x-prod.appspot.com/o/spaces%2F-Lh09fNwqqta5Vj6Wr8p%2Fuploads%2Fgit-blob-2cb9617668e747e550492147745f2c67e0420616%2FTnXfVXrWEZWccbZo72gg.png?alt=media" alt=""><figcaption></figcaption></figure>

Next, you can continue with the settings for your page design.

## Page Settings

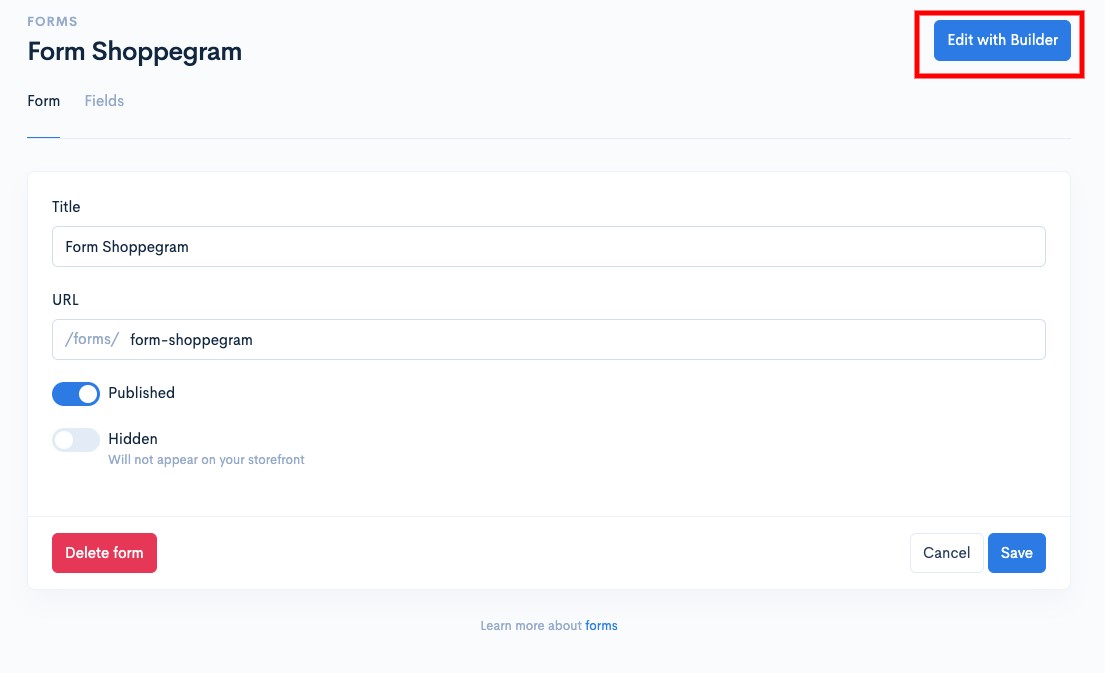
1. You can click on the **Edit with Builder** button

<figure><img src="https://3359028955-files.gitbook.io/~/files/v0/b/gitbook-x-prod.appspot.com/o/spaces%2F-Lh09fNwqqta5Vj6Wr8p%2Fuploads%2Fgit-blob-be088a8742d8934d04c8b9562a9d0952e4304a1a%2F56o99ZcvgH4fNjkDsUVN.jpg?alt=media" alt=""><figcaption></figcaption></figure>

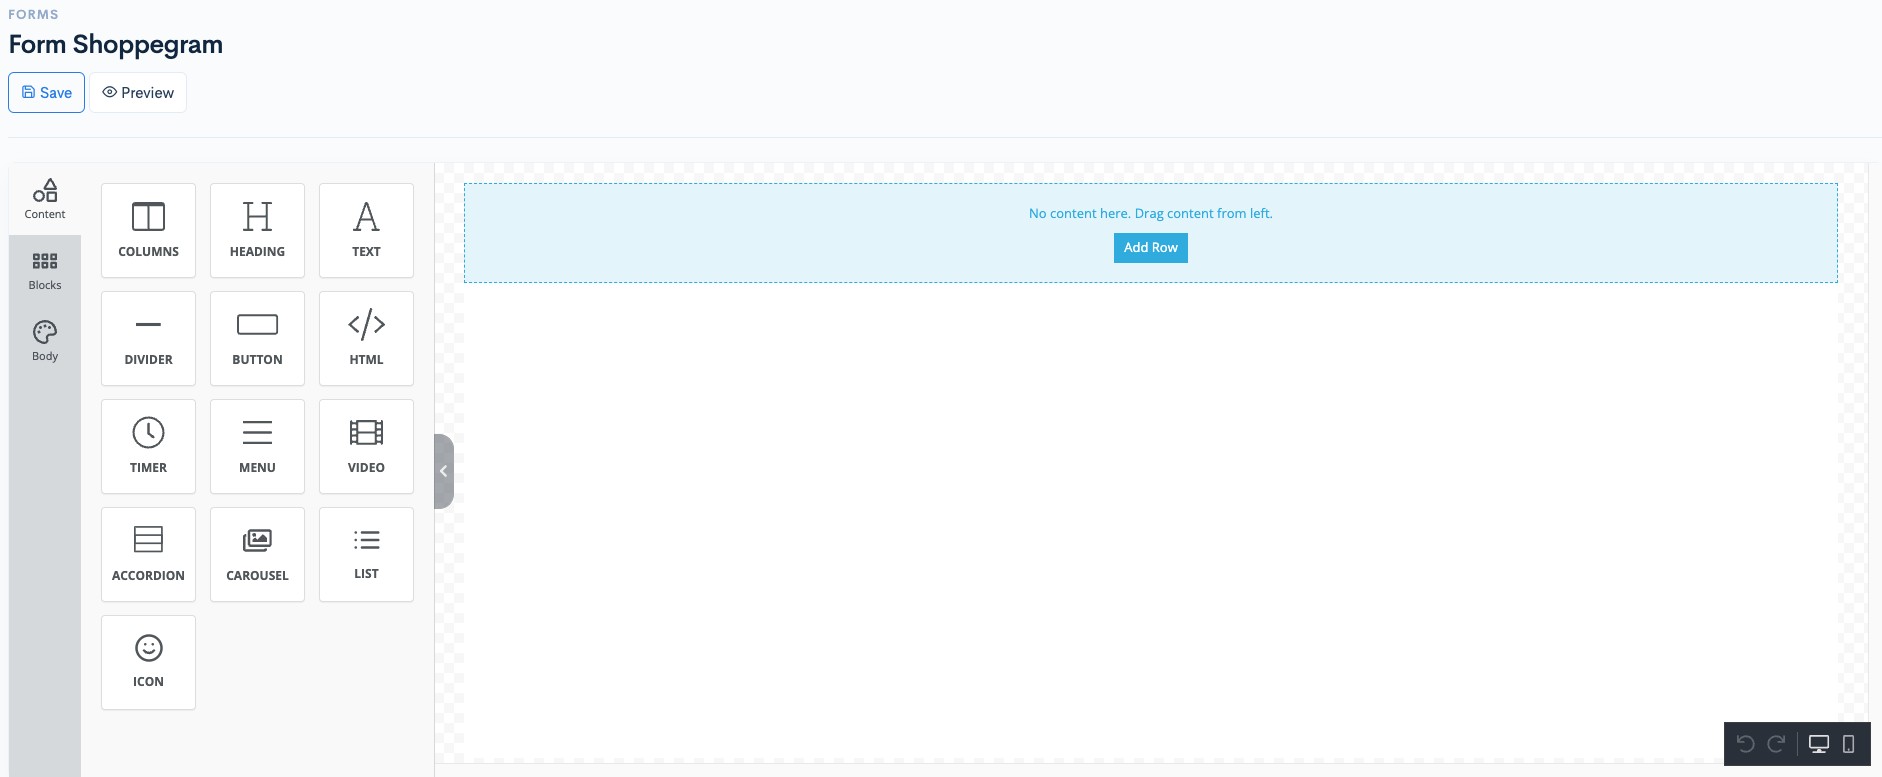
2. Later, you will be taken to our builder editor page and design your page as usual using our builder editor.

<figure><img src="https://3359028955-files.gitbook.io/~/files/v0/b/gitbook-x-prod.appspot.com/o/spaces%2F-Lh09fNwqqta5Vj6Wr8p%2Fuploads%2Fgit-blob-476a01b8f529083b0c93c156f7cc942f9c86e9ce%2FXMBeJruOmHIPaQRRrRKD.jpg?alt=media" alt=""><figcaption></figcaption></figure>

### Preview Form

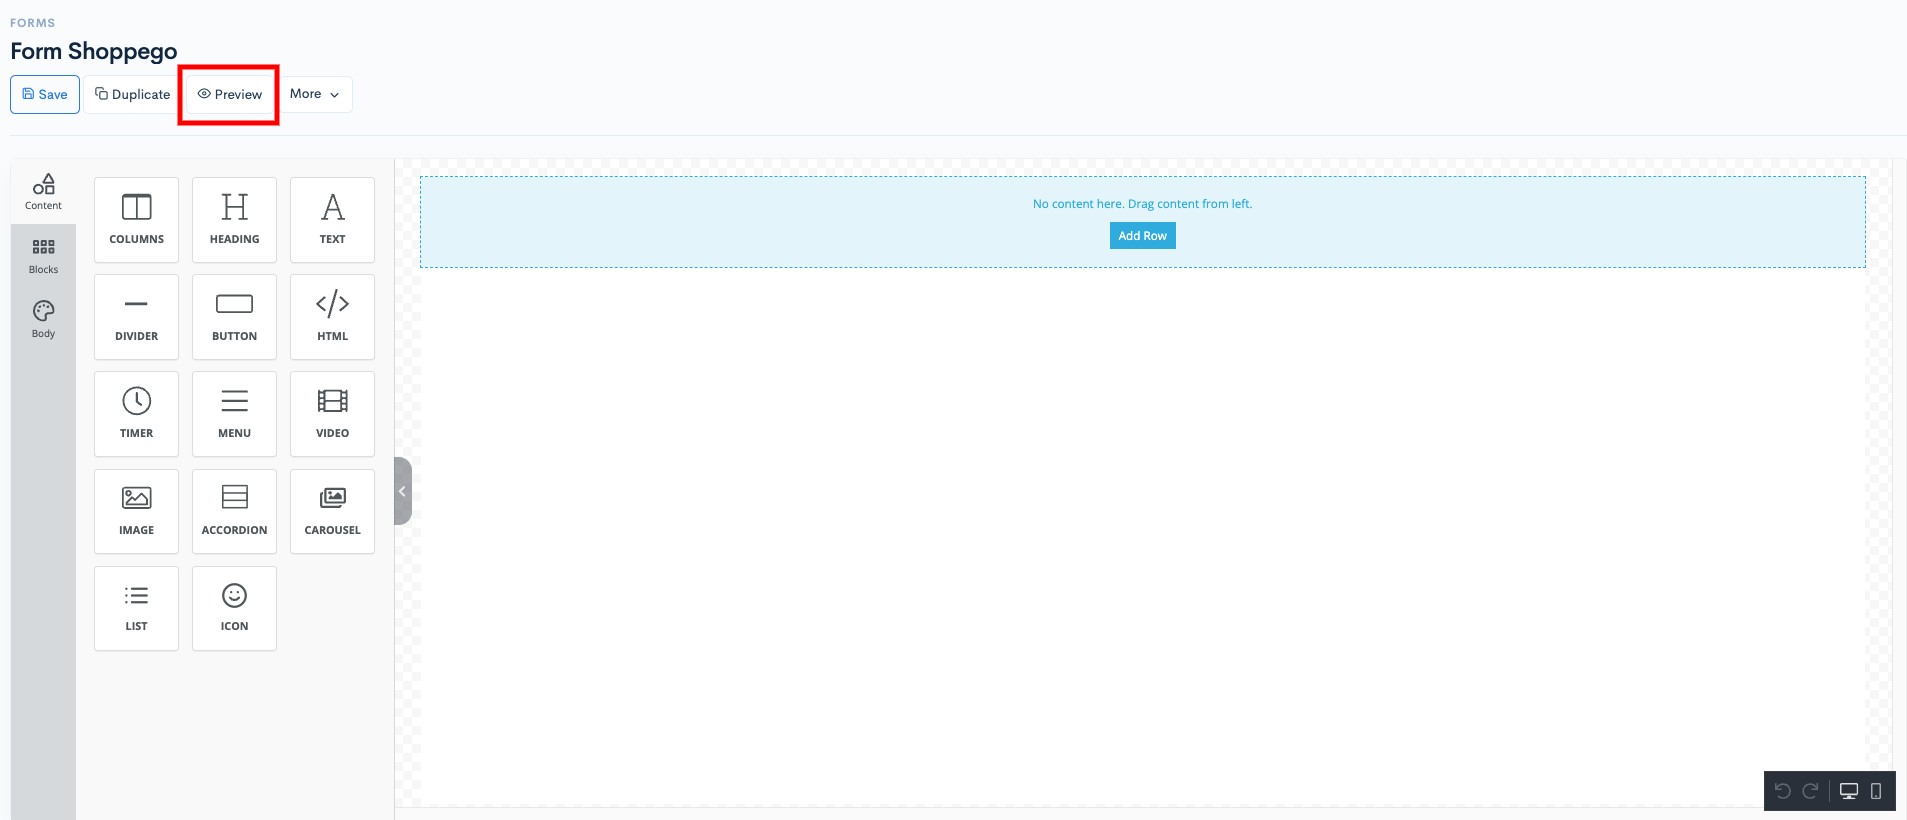
1. To see your page on the live website, you can click on the **Preview** button

<figure><img src="https://3359028955-files.gitbook.io/~/files/v0/b/gitbook-x-prod.appspot.com/o/spaces%2F-Lh09fNwqqta5Vj6Wr8p%2Fuploads%2Fgit-blob-6724b26182bb4385549e6f4f5878ee179f4466de%2F1pR1xRpFdv9PwOK0c26l.jpg?alt=media" alt=""><figcaption></figcaption></figure>

### Duplicate Form

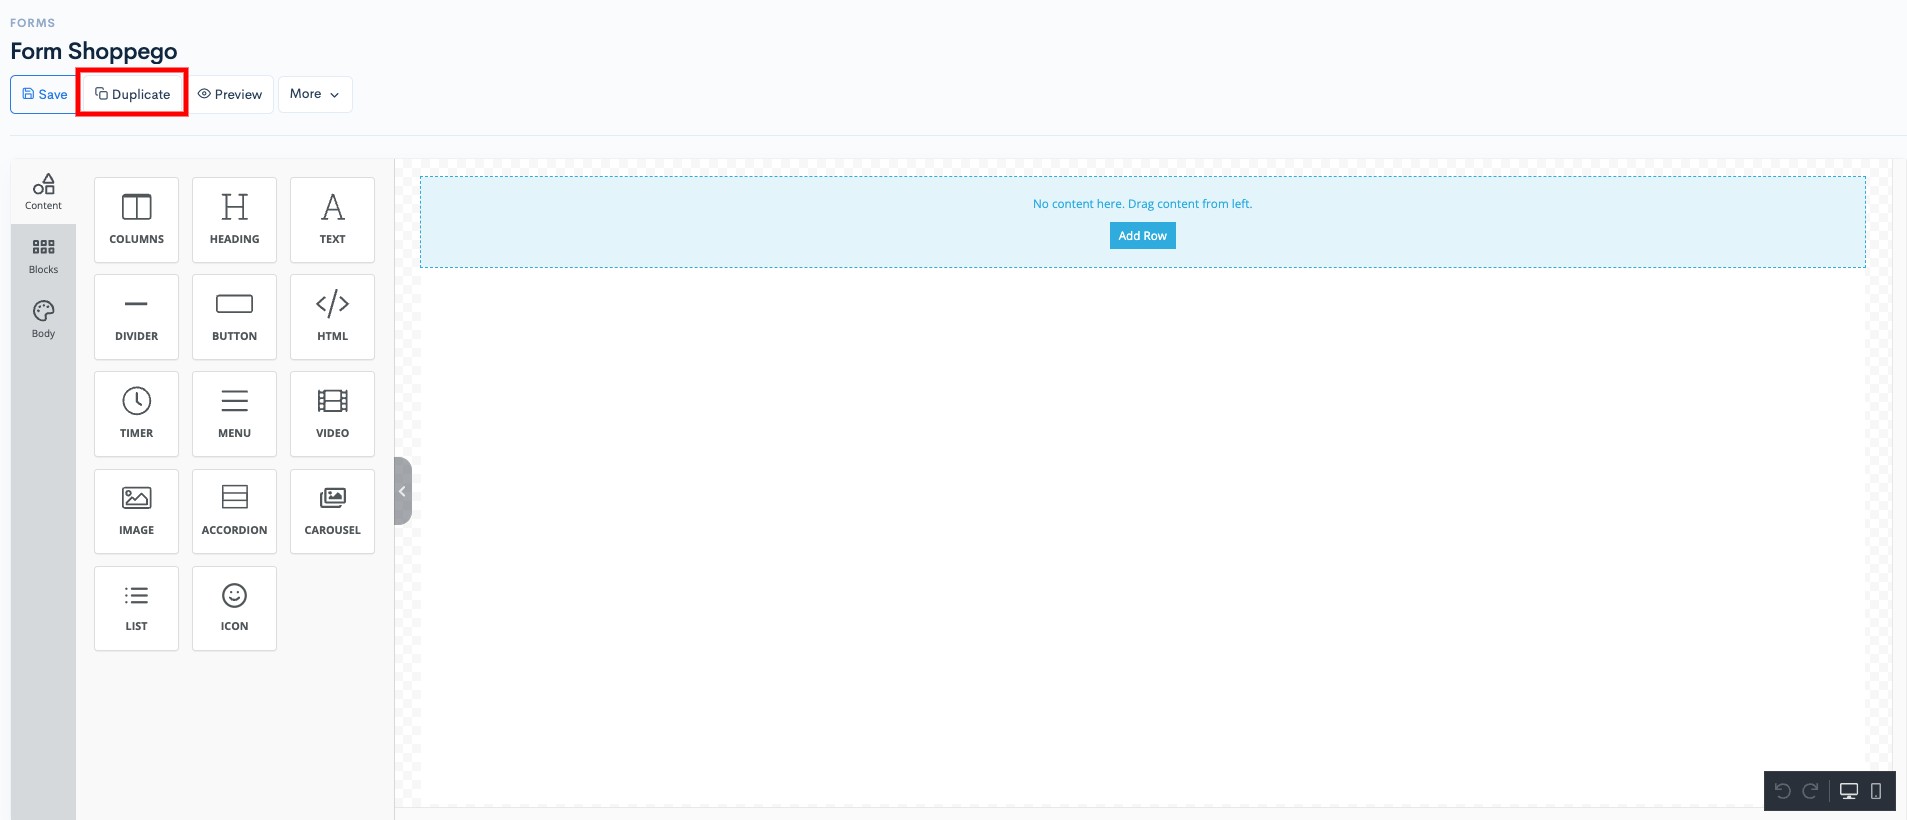
1. You can click on the **Duplicate** button to create a new form page using the design or setting of your existing form.

<figure><img src="https://3359028955-files.gitbook.io/~/files/v0/b/gitbook-x-prod.appspot.com/o/spaces%2F-Lh09fNwqqta5Vj6Wr8p%2Fuploads%2Fgit-blob-472473d29091991338121dda56e979345b04d22a%2FroznR4VMj0lAJEgsEb8q.jpg?alt=media" alt=""><figcaption></figcaption></figure>

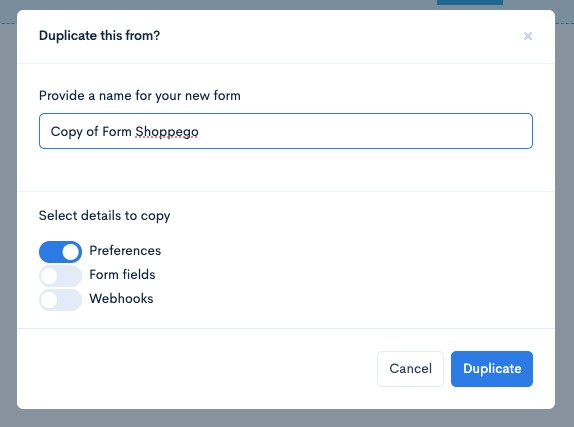
2. Then, you can enter the information for your new form and select the settings you want to bring to the new form.

| Settings                             | Description                                                                                  |
| ------------------------------------ | -------------------------------------------------------------------------------------------- |
| **Provide a name for your new form** | You can enter a new name for the form that will be created.                                  |
| **Preferences**                      | You can tick this toggle to bring your "**Preferences**" settings to the newly created form. |
| **Form fields**                      | You can tick this toggle to bring your "**Fields**" settings to the newly created form.      |
| **Webhooks**                         | You can tick this toggle to bring your "**Webhooks**" settings to the newly created form.    |

<figure><img src="https://3359028955-files.gitbook.io/~/files/v0/b/gitbook-x-prod.appspot.com/o/spaces%2F-Lh09fNwqqta5Vj6Wr8p%2Fuploads%2Fgit-blob-e7afe7c532ad322e53770c9f6b7788662918ef96%2F09S6Bz6zhvJ4gjWeeay9.jpg?alt=media" alt=""><figcaption></figcaption></figure>

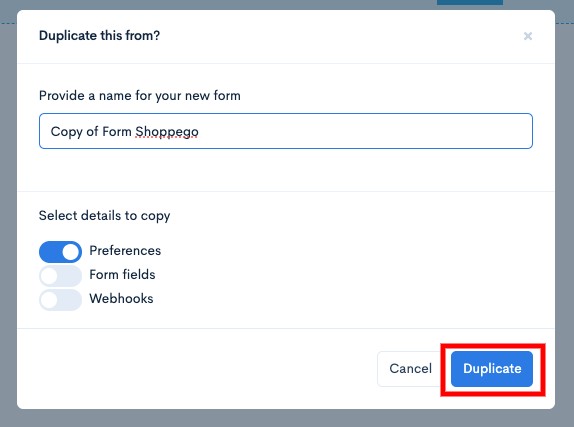
3. When finished click **Duplicate**

<figure><img src="https://3359028955-files.gitbook.io/~/files/v0/b/gitbook-x-prod.appspot.com/o/spaces%2F-Lh09fNwqqta5Vj6Wr8p%2Fuploads%2Fgit-blob-22dc28778762fd9f08f964fc6d5258435061a359%2Fh0KSH76f5vHDpjtXUI4u.jpg?alt=media" alt=""><figcaption></figcaption></figure>

### Import JSON

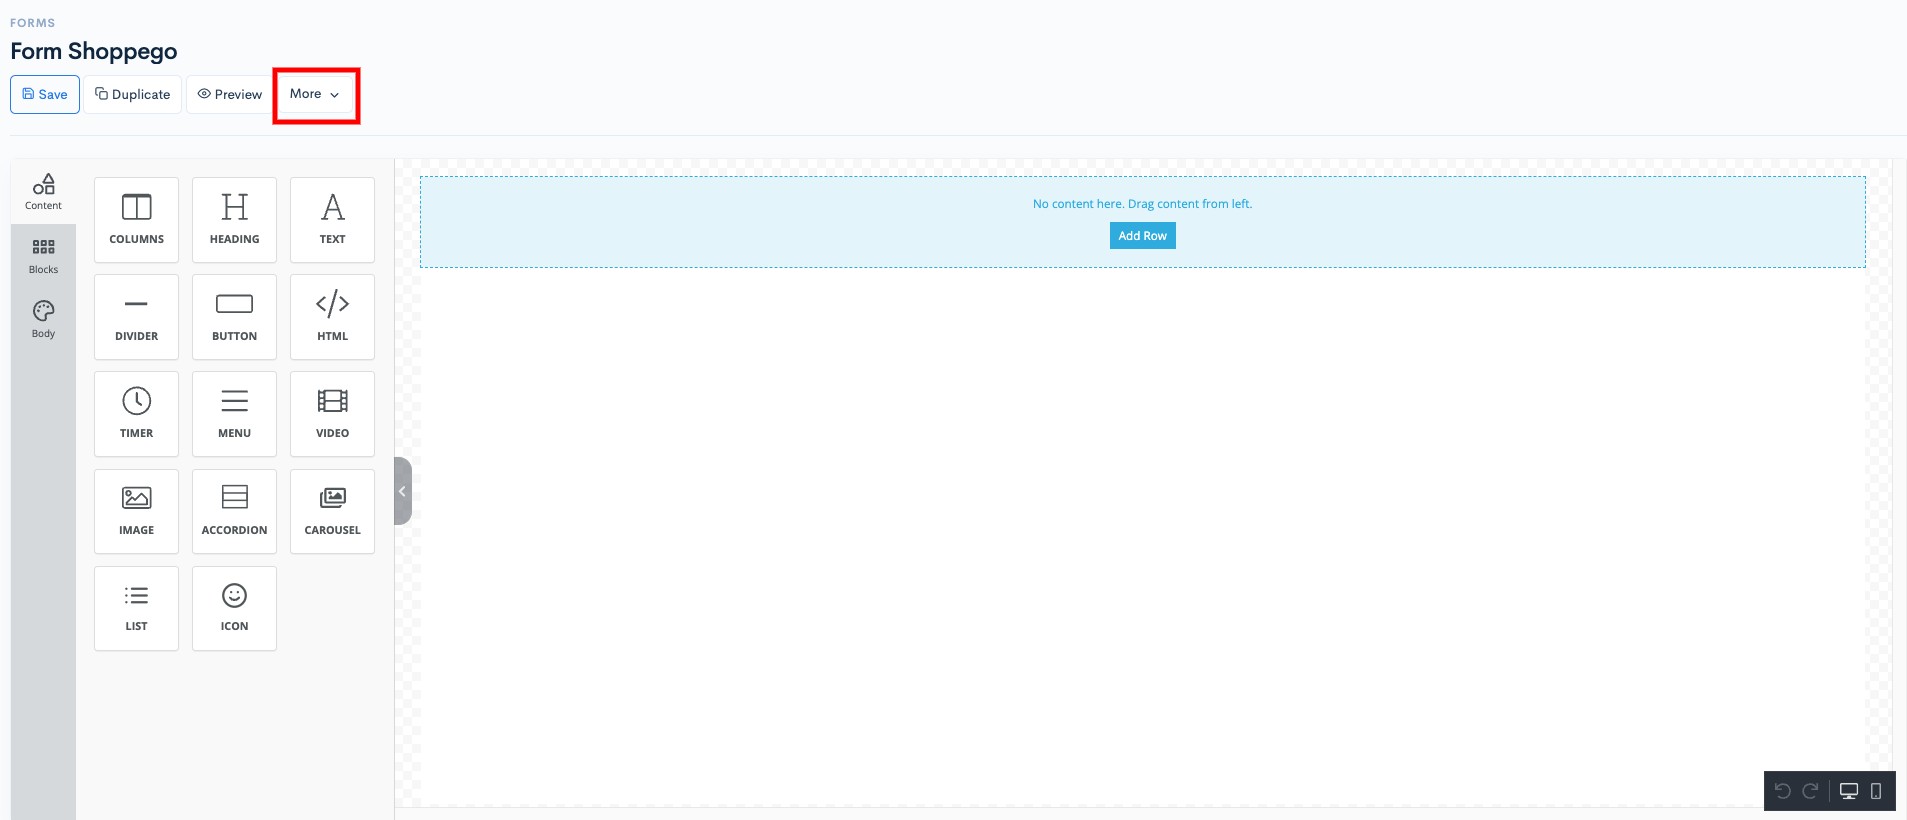
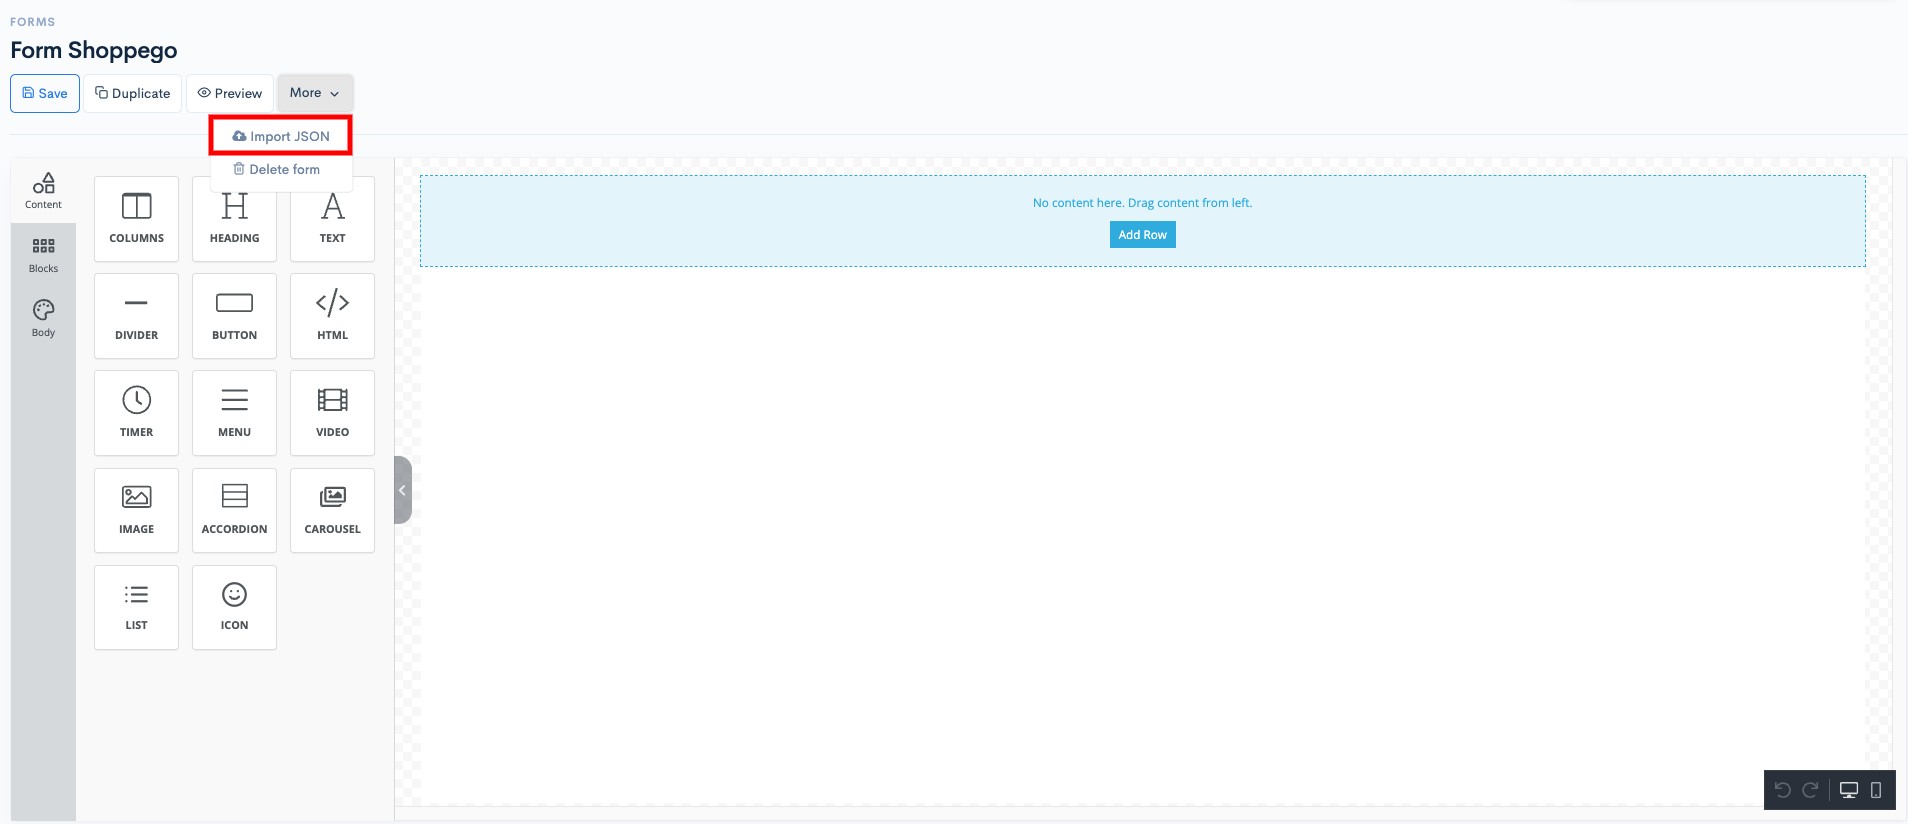
1. You can import the JSON file created using the Shoppegram system into your page form by clicking on the **More** button

<figure><img src="https://3359028955-files.gitbook.io/~/files/v0/b/gitbook-x-prod.appspot.com/o/spaces%2F-Lh09fNwqqta5Vj6Wr8p%2Fuploads%2Fgit-blob-ca1e9e15ebd8f0c919a69d486756623e464b80bf%2FN7Hhmgj7WkQloAWroc0b.jpg?alt=media" alt=""><figcaption></figcaption></figure>

2. Then, click on the **Import JSON** button and **select your file from your device**.

<figure><img src="https://3359028955-files.gitbook.io/~/files/v0/b/gitbook-x-prod.appspot.com/o/spaces%2F-Lh09fNwqqta5Vj6Wr8p%2Fuploads%2Fgit-blob-9d31428829b8f316d66a2489b8f4e6acc90e7370%2F7a671KWFb9jZXk0ES0K2.jpg?alt=media" alt=""><figcaption></figcaption></figure>

### Delete Form

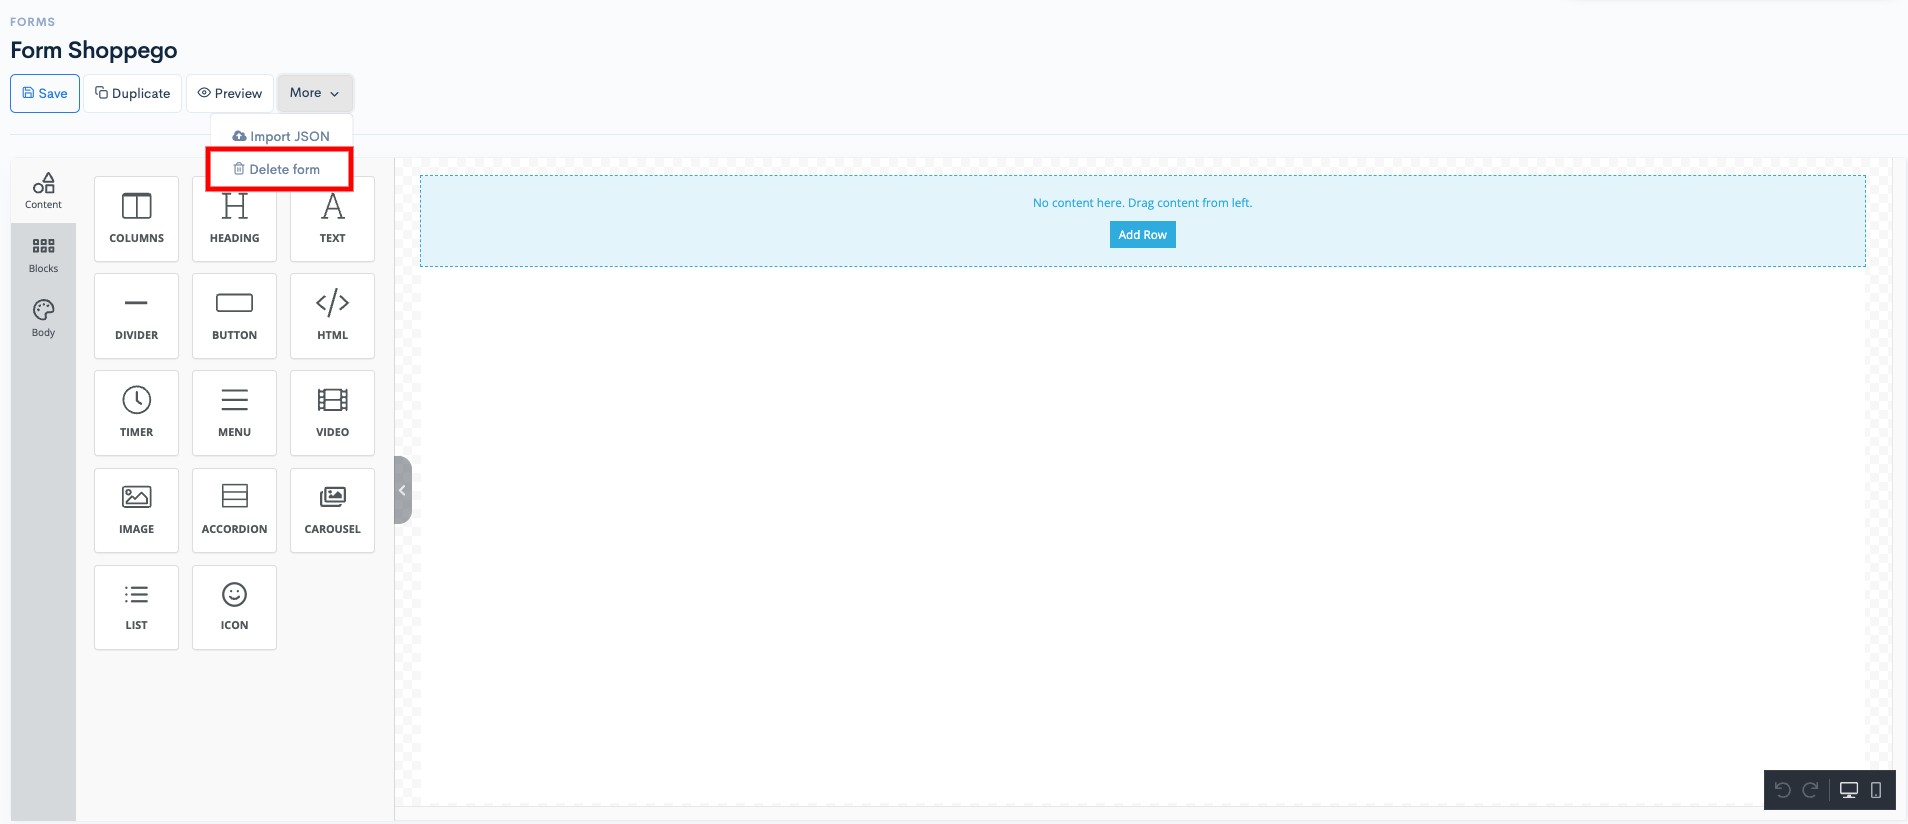
1. You can delete the form from your page by clicking on the **More** button

<figure><img src="https://3359028955-files.gitbook.io/~/files/v0/b/gitbook-x-prod.appspot.com/o/spaces%2F-Lh09fNwqqta5Vj6Wr8p%2Fuploads%2Fgit-blob-ca1e9e15ebd8f0c919a69d486756623e464b80bf%2FN7Hhmgj7WkQloAWroc0b.jpg?alt=media" alt=""><figcaption></figcaption></figure>

2. Then, select **Delete form**

<figure><img src="https://3359028955-files.gitbook.io/~/files/v0/b/gitbook-x-prod.appspot.com/o/spaces%2F-Lh09fNwqqta5Vj6Wr8p%2Fuploads%2Fgit-blob-85132ffdbfd4d9135635cec4693fef4b84d094a9%2FHlDaP5rcogU44kgOAtIT.jpg?alt=media" alt=""><figcaption></figcaption></figure>

## Form Settings

### Fields

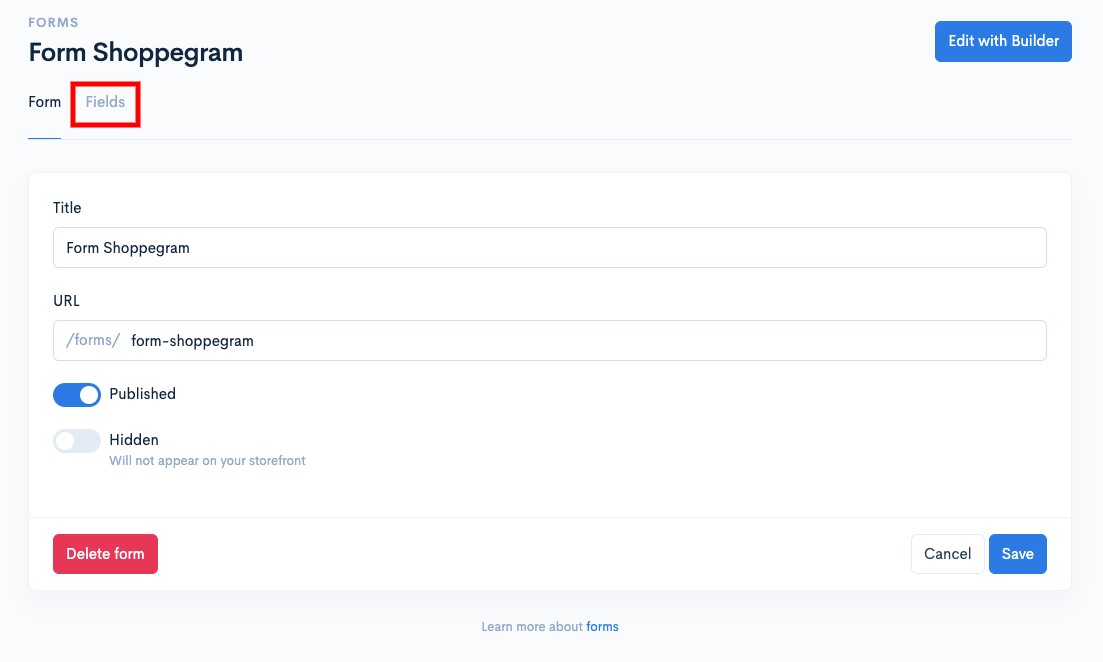
1. You can see your form field settings in the section, click on the **Fields** button

<figure><img src="https://3359028955-files.gitbook.io/~/files/v0/b/gitbook-x-prod.appspot.com/o/spaces%2F-Lh09fNwqqta5Vj6Wr8p%2Fuploads%2Fgit-blob-a5b93e2ad232516ecf40d72b0ea5dec1e2277fdb%2FU7X7wFEdJ9SZh290ffY0.jpg?alt=media" alt=""><figcaption></figcaption></figure>

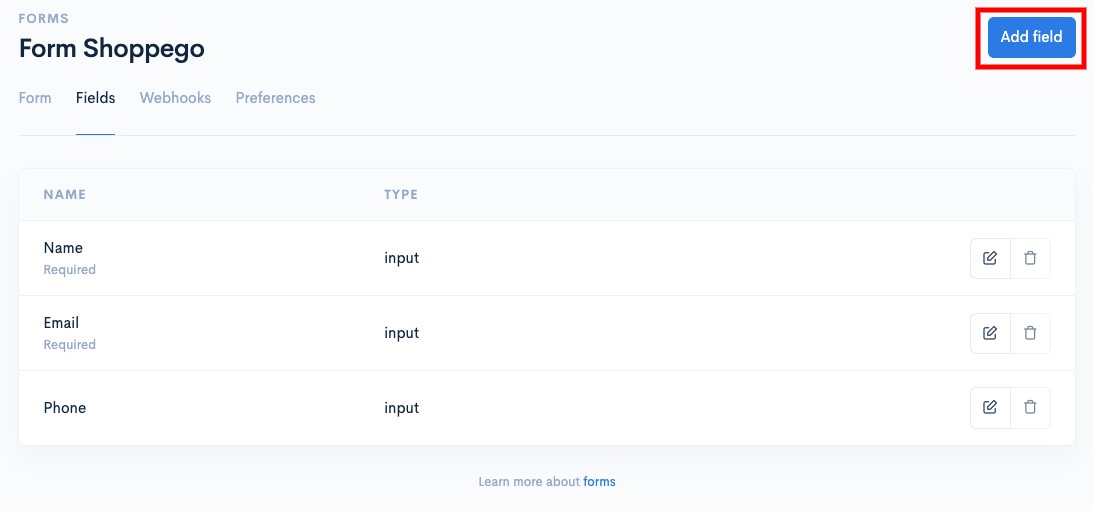
2. This page shows the fields on your form. By default, the system will automatically create 3 types of fields (Name, Email, and Phone) for you, and you cannot delete/remove the fields.

<figure><img src="https://3359028955-files.gitbook.io/~/files/v0/b/gitbook-x-prod.appspot.com/o/spaces%2F-Lh09fNwqqta5Vj6Wr8p%2Fuploads%2Fgit-blob-2921f21dfa795b9e0cc7fd0fd23da3275f640b80%2FNcPDH1BHpJQWs1ryjyPR.jpg?alt=media" alt=""><figcaption></figcaption></figure>

#### Add Field

1. You can add a new field by clicking on the **Add field** button

<figure><img src="https://3359028955-files.gitbook.io/~/files/v0/b/gitbook-x-prod.appspot.com/o/spaces%2F-Lh09fNwqqta5Vj6Wr8p%2Fuploads%2Fgit-blob-af735dc294ee8f1c874f51fc68220e5c9238470a%2F1mTZkKcysVGqkqwJJeRc.jpg?alt=media" alt=""><figcaption></figcaption></figure>

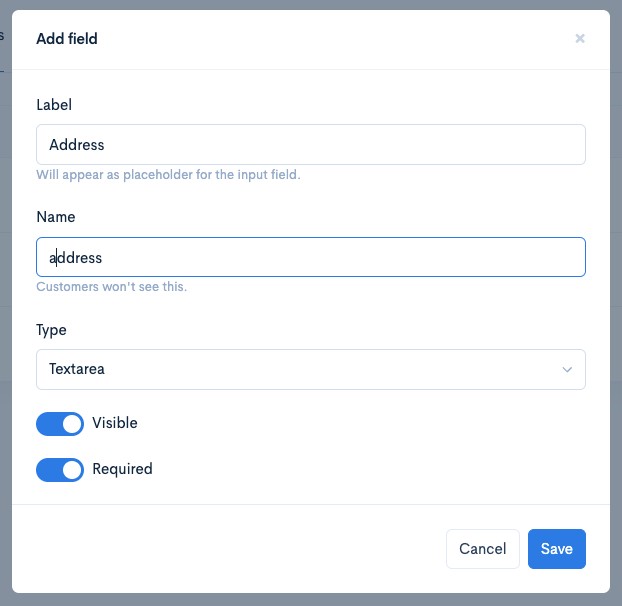
2. Then, enter the necessary information for your field:

| Settings     | Description                                                                                                                                  |
| ------------ | -------------------------------------------------------------------------------------------------------------------------------------------- |
| **Label**    | The title of your field **will be displayed to the customer.**                                                                               |
| **Name**     | The ID for your field, **it will not be displayed to the customer.**                                                                         |
| **Type**     | You can select the type of input you want to use on your form. Among the options are **Input**, **Checkbox**, **Dropdown** and **Textarea**. |
| **Visible**  | You can tick this toggle to display this field on your form.                                                                                 |
| **Required** | You can tick this toggle to ensure the must fill in this field first to allow them to submit your form.                                      |

<figure><img src="https://3359028955-files.gitbook.io/~/files/v0/b/gitbook-x-prod.appspot.com/o/spaces%2F-Lh09fNwqqta5Vj6Wr8p%2Fuploads%2Fgit-blob-33335a76aff2676f9a81291fe9ab287e4681dd49%2FJMrmidcCTRYyIdFVlvHj.jpg?alt=media" alt=""><figcaption></figcaption></figure>

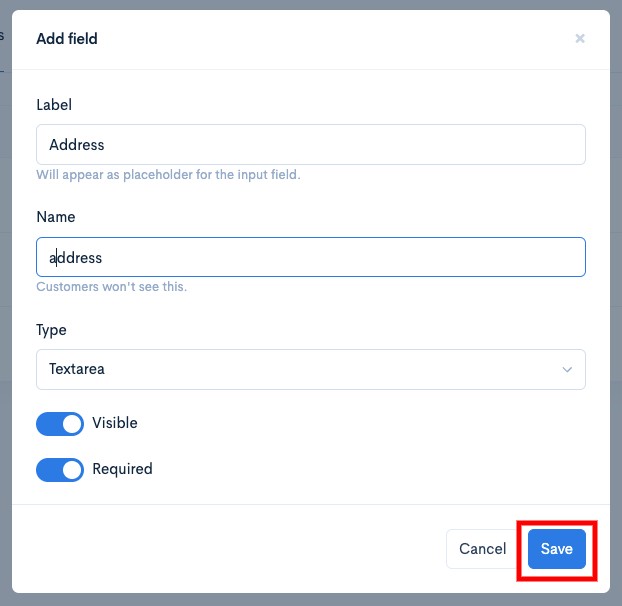
3. When finished click **Save**

<figure><img src="https://3359028955-files.gitbook.io/~/files/v0/b/gitbook-x-prod.appspot.com/o/spaces%2F-Lh09fNwqqta5Vj6Wr8p%2Fuploads%2Fgit-blob-b1e2e657527b7b2e165220fdb38ed447b713717a%2FA2AlMJtsoVCCpIkX3FbG.jpg?alt=media" alt=""><figcaption></figcaption></figure>

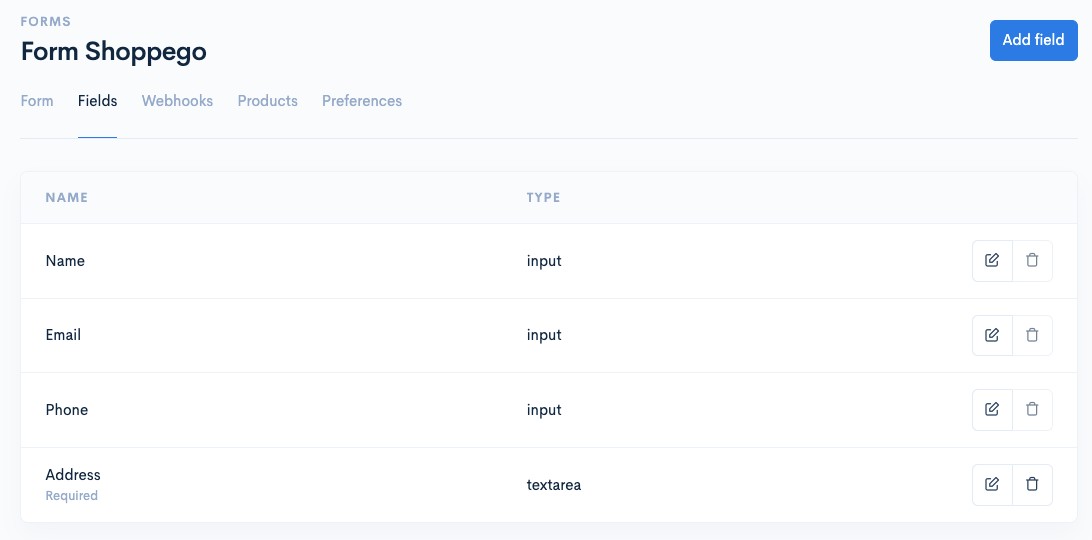
Now your Field has been successfully created.

<figure><img src="https://3359028955-files.gitbook.io/~/files/v0/b/gitbook-x-prod.appspot.com/o/spaces%2F-Lh09fNwqqta5Vj6Wr8p%2Fuploads%2Fgit-blob-223454fb13df683776f07d0b5522de0765a24c28%2F4U8vw88Cab8vSGFUpEbQ.jpg?alt=media" alt=""><figcaption></figcaption></figure>

#### Edit Field

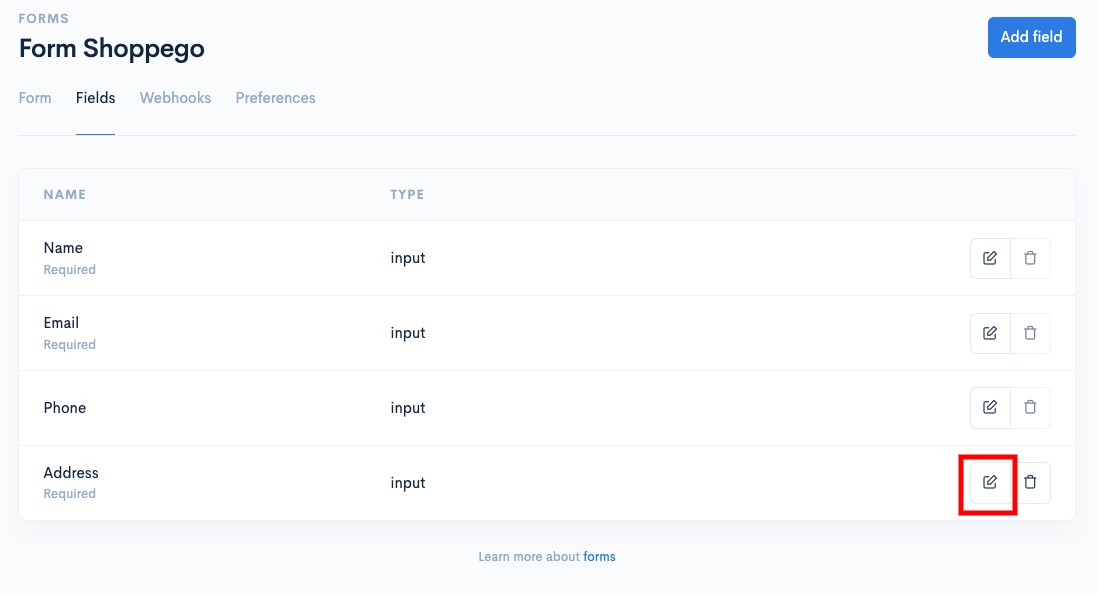
1. You can edit/change existing field settings by clicking **the pencil icon**.

<figure><img src="https://3359028955-files.gitbook.io/~/files/v0/b/gitbook-x-prod.appspot.com/o/spaces%2F-Lh09fNwqqta5Vj6Wr8p%2Fuploads%2Fgit-blob-52cdd720c679c2293327ac73f9d101148dced9b6%2FZCY2rHqWQGG1RoBnj4LU.jpg?alt=media" alt=""><figcaption></figcaption></figure>

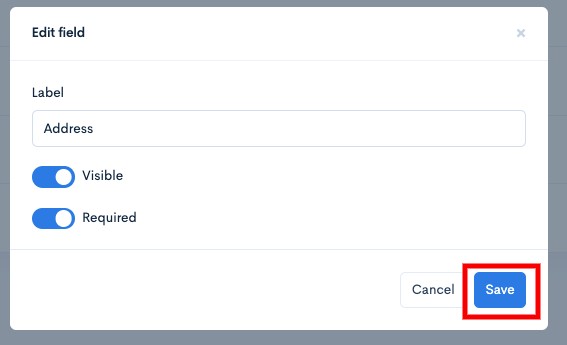
2. Then, make the changes you want and click **Save**

<figure><img src="https://3359028955-files.gitbook.io/~/files/v0/b/gitbook-x-prod.appspot.com/o/spaces%2F-Lh09fNwqqta5Vj6Wr8p%2Fuploads%2Fgit-blob-21a1bb60ce4a86633449ebc313cc14ea96636e53%2FPSsoYgd7DlozhfH24Uc6.jpg?alt=media" alt=""><figcaption></figcaption></figure>

#### Delete Field(Yang dibenarkan sahaja)

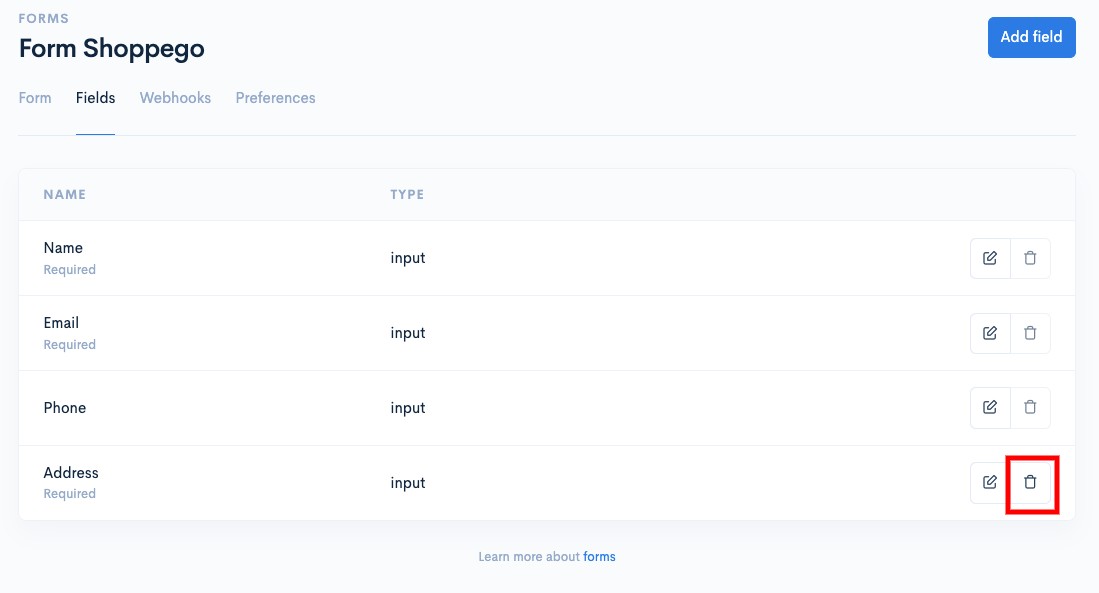
1. You can delete the field you want, by clicking on **the trash can icon button** on the field. <mark style="color:red;">**It should be remembered that you can only delete fields that are allowed.**</mark>

<figure><img src="https://3359028955-files.gitbook.io/~/files/v0/b/gitbook-x-prod.appspot.com/o/spaces%2F-Lh09fNwqqta5Vj6Wr8p%2Fuploads%2Fgit-blob-e9a4cc9058e3b9cb7d98bd1067d09cf193595e10%2FqoDkKyPV9rvoSTcDxF2b.jpg?alt=media" alt=""><figcaption></figcaption></figure>

### Webhooks

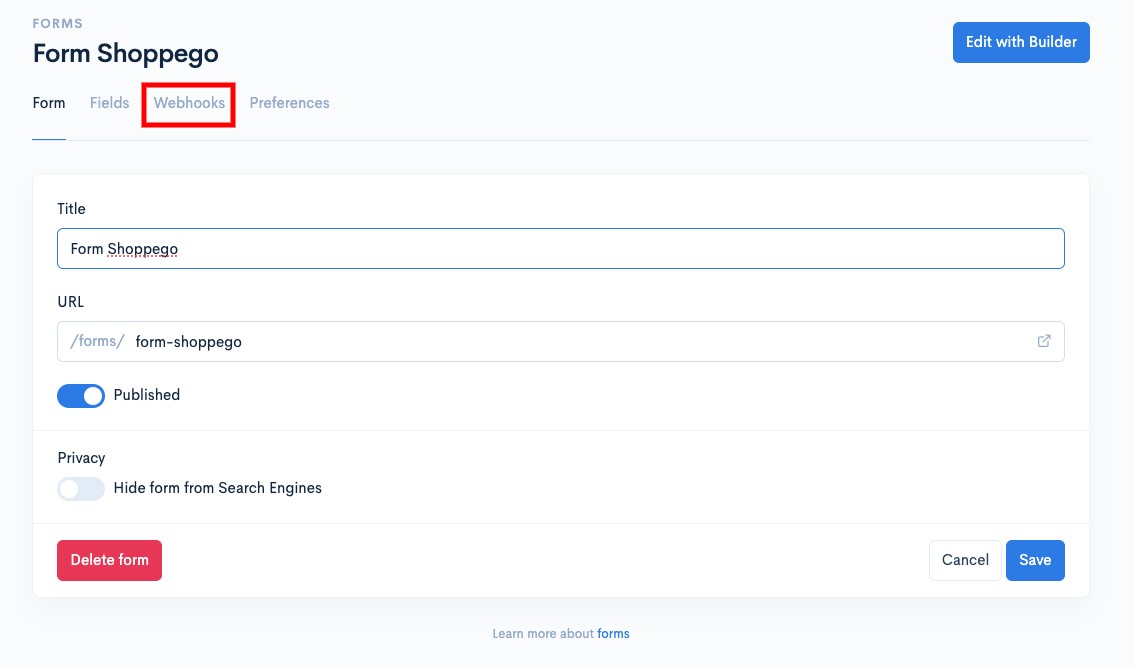
1. You can also set a special webhook to trigger from your form. To do that setting, you can click on the **Webhooks** button

<figure><img src="https://3359028955-files.gitbook.io/~/files/v0/b/gitbook-x-prod.appspot.com/o/spaces%2F-Lh09fNwqqta5Vj6Wr8p%2Fuploads%2Fgit-blob-629b09fad62c9920b4760d7667153a19bb9fa9c9%2FnUkL2r8U8N90ZkDcxQf9.jpg?alt=media" alt=""><figcaption></figcaption></figure>

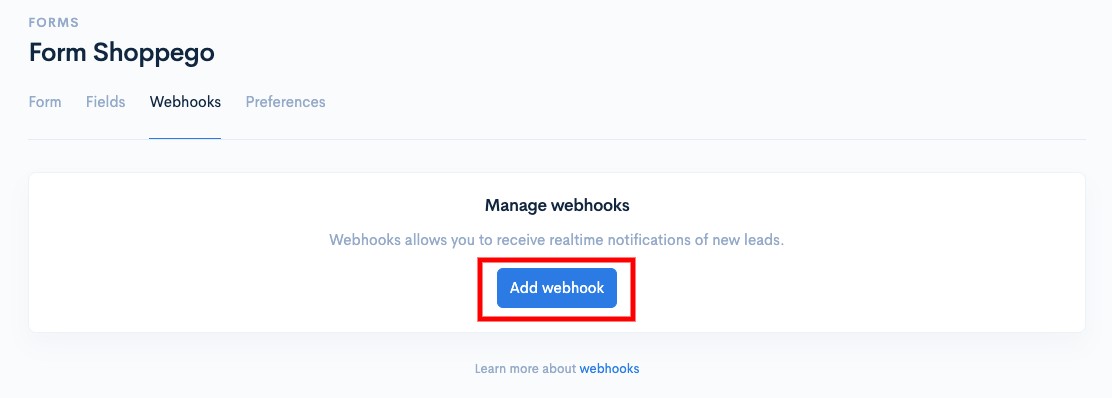
2. Then, click on the **Add webhook** button

<figure><img src="https://3359028955-files.gitbook.io/~/files/v0/b/gitbook-x-prod.appspot.com/o/spaces%2F-Lh09fNwqqta5Vj6Wr8p%2Fuploads%2Fgit-blob-265fd8efe45aae14f13007c49f894153caf0014b%2FJvarmL3Z7trqxN3Ji8Ea.jpg?alt=media" alt=""><figcaption></figcaption></figure>

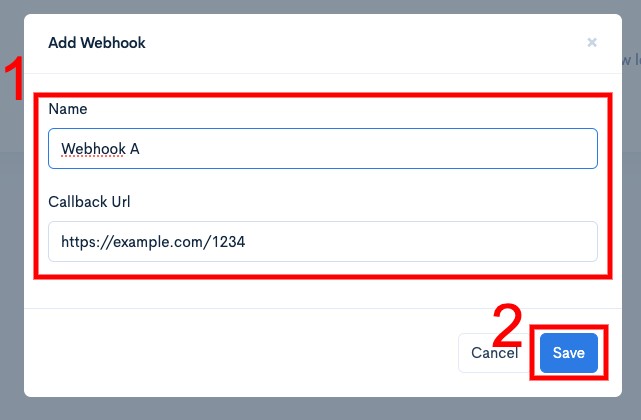
3. Once you have **entered your webhook setting info**, you can click **Save**

<figure><img src="https://3359028955-files.gitbook.io/~/files/v0/b/gitbook-x-prod.appspot.com/o/spaces%2F-Lh09fNwqqta5Vj6Wr8p%2Fuploads%2Fgit-blob-59565a488ffa8a9486c467b44929c11bd5e89c69%2FYUHnDtuwfeAxv8h4DQLe.jpg?alt=media" alt=""><figcaption></figcaption></figure>

4. Once finished, you can try to submit your form to trigger the webhook on the platform you are using.

<figure><img src="https://3359028955-files.gitbook.io/~/files/v0/b/gitbook-x-prod.appspot.com/o/spaces%2F-Lh09fNwqqta5Vj6Wr8p%2Fuploads%2Fgit-blob-b07b5b2832c9da5b540aa4ec21cdc6a85231aed0%2FPT63yb3Ocb8X5Tp6vMgB.jpg?alt=media" alt=""><figcaption></figcaption></figure>

#### Delete Webhook

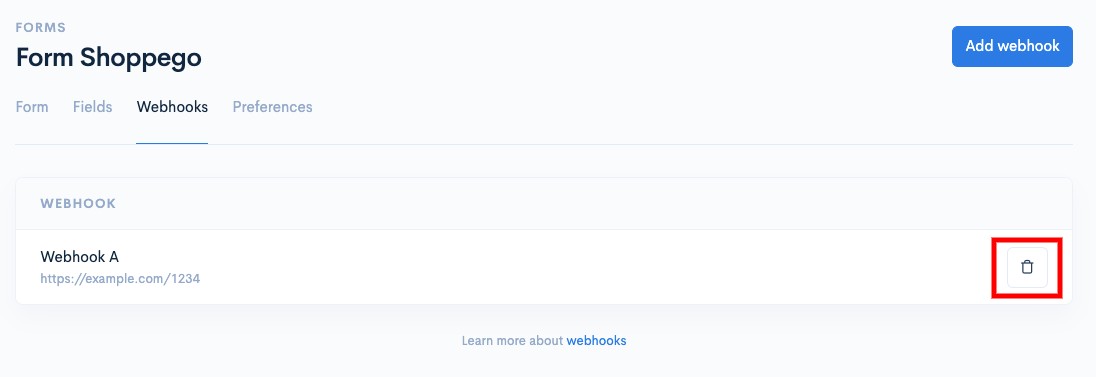
1. To delete/remove the webhook you have created, you can click on **the trash can icon button**

<figure><img src="https://3359028955-files.gitbook.io/~/files/v0/b/gitbook-x-prod.appspot.com/o/spaces%2F-Lh09fNwqqta5Vj6Wr8p%2Fuploads%2Fgit-blob-81e1254a88fd8bdb68a9edbd8954e21075390303%2Fp2H5KOULE7sVDSDRxNuj.jpg?alt=media" alt=""><figcaption></figcaption></figure>

### Products

You can add products to your form to allow customers to make purchases.

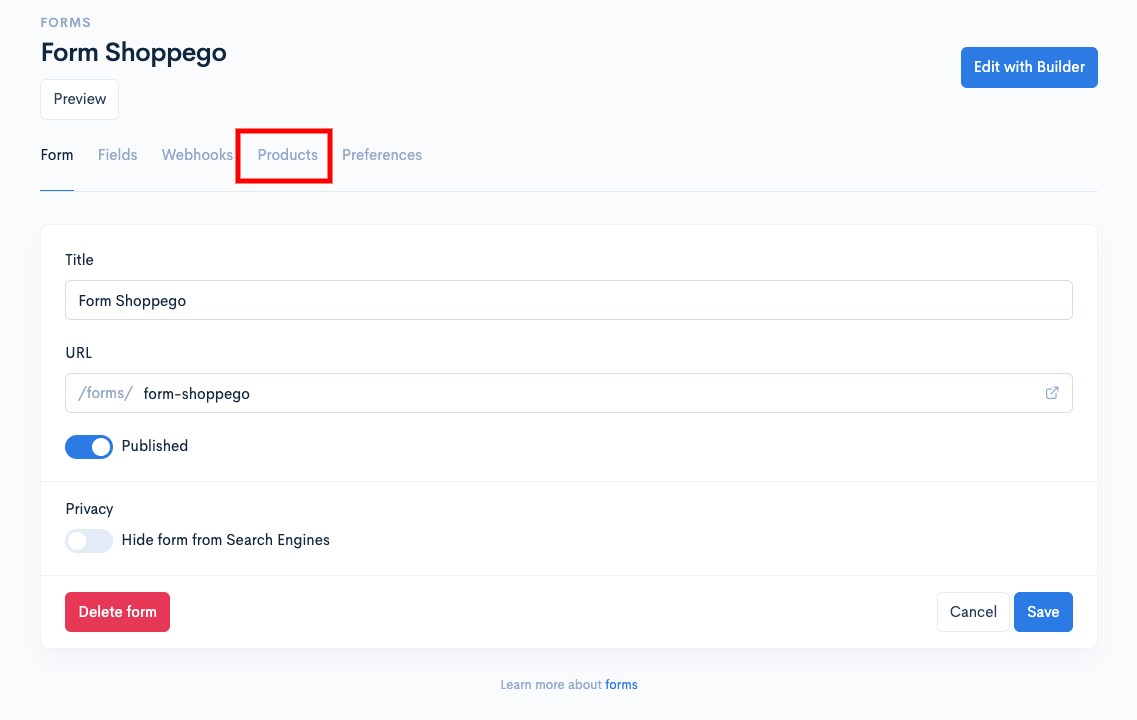
1. Click on the **Products** button.

<figure><img src="https://3359028955-files.gitbook.io/~/files/v0/b/gitbook-x-prod.appspot.com/o/spaces%2F-Lh09fNwqqta5Vj6Wr8p%2Fuploads%2Fgit-blob-059624939bd2c895e5715b6bccf708813d491260%2F0H1CT8ouM5N1GDW7ABeL.jpg?alt=media" alt=""><figcaption></figcaption></figure>

2. Then, you can **select the product you want to enter by clicking on the Select product dropdown**.

<figure><img src="https://3359028955-files.gitbook.io/~/files/v0/b/gitbook-x-prod.appspot.com/o/spaces%2F-Lh09fNwqqta5Vj6Wr8p%2Fuploads%2Fgit-blob-c0959c82b3acad8cfdf60cb16cbbe06a3be25de3%2FJMj0ph2zh733LIQ1LBqx.jpg?alt=media" alt=""><figcaption></figcaption></figure>

#### Delete product

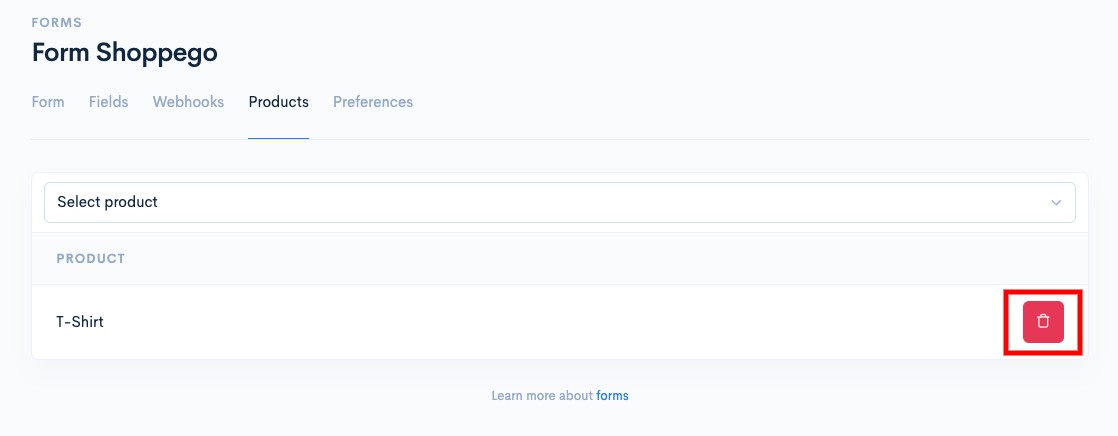
To delete the product you have added to the form, you can click on the **trash can icon button**

<figure><img src="https://3359028955-files.gitbook.io/~/files/v0/b/gitbook-x-prod.appspot.com/o/spaces%2F-Lh09fNwqqta5Vj6Wr8p%2Fuploads%2Fgit-blob-b2a1be3615847a21e6d2bd3e649f9a11db313149%2FjFDpC4C9JNCpScagA3sV.jpg?alt=media" alt=""><figcaption></figcaption></figure>

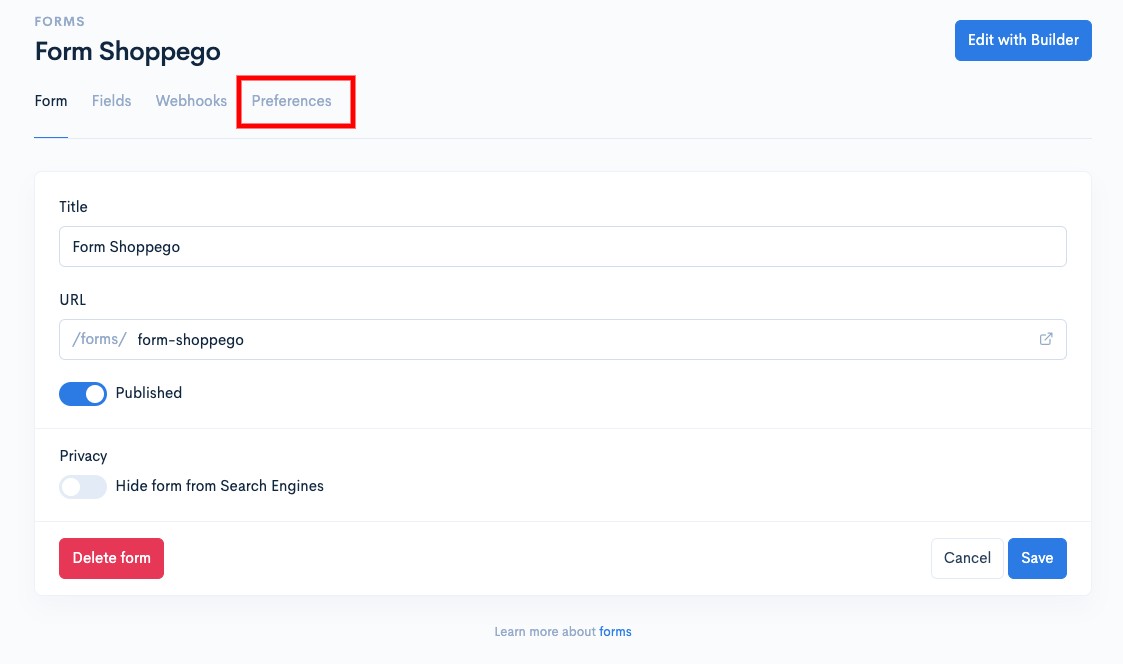
### Preferences

1. You can see other settings you can make for your form submission process by clicking on the **Preferences** button

<figure><img src="https://3359028955-files.gitbook.io/~/files/v0/b/gitbook-x-prod.appspot.com/o/spaces%2F-Lh09fNwqqta5Vj6Wr8p%2Fuploads%2Fgit-blob-97108a291a667643b73c6c4a30b2993e4e452f7f%2FQnrMJ5Z6O8zJQDBimAsQ.jpg?alt=media" alt=""><figcaption></figcaption></figure>

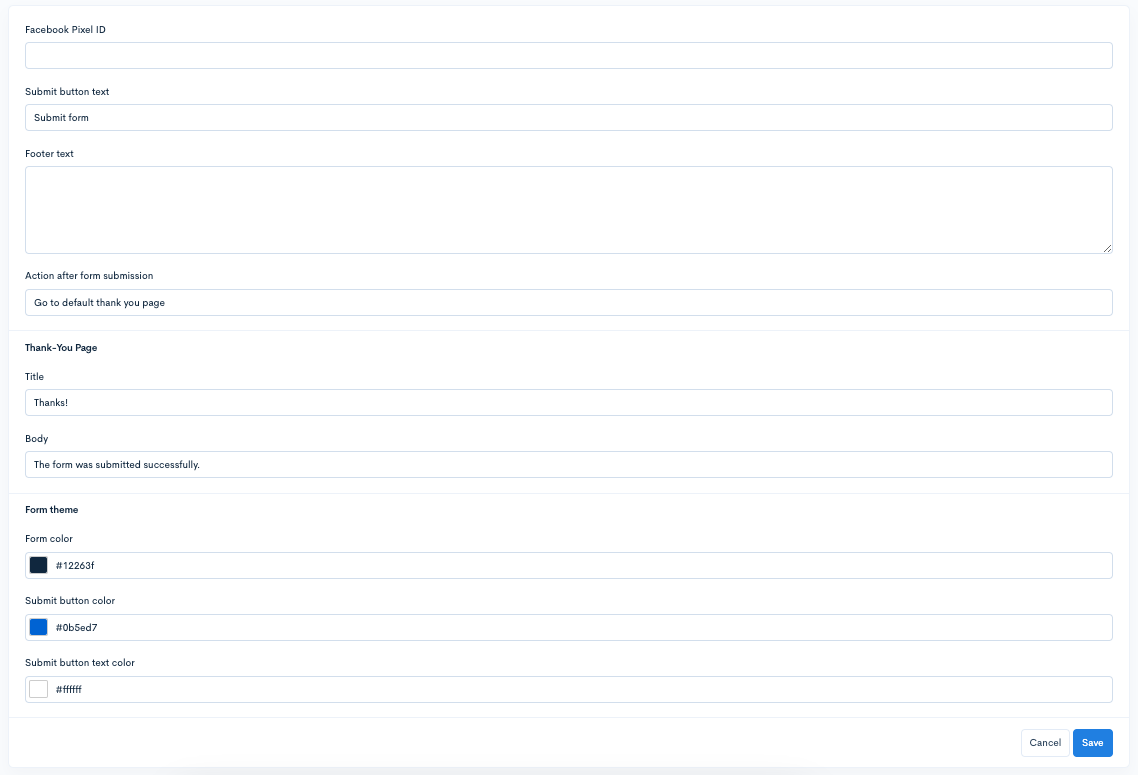
2. Then, you can do the setting you want:

| Settings                                  | Description                                                                                                                                                                                                                                         |
| ----------------------------------------- | --------------------------------------------------------------------------------------------------------------------------------------------------------------------------------------------------------------------------------------------------- |
| **Facebook Pixel ID**                     | You can enter your FB pixel ID.                                                                                                                                                                                                                     |
| **Facebook Pixel Access Token**           | You can enter your FB pixel Access Token.                                                                                                                                                                                                           |
| **Facebook test\_event\_code**            | You can enter your FB test\_event\_code.                                                                                                                                                                                                            |
| **Enable pre-iOS 14 tracking bypass**     | You can tick this toggle to bypass pre-iOS 14 tracking.                                                                                                                                                                                             |
| **Tiktok Pixel ID**                       | You can enter your Tiktok pixel ID.                                                                                                                                                                                                                 |
| **Google Analytics ID**                   | You can enter your Google Analytics ID.                                                                                                                                                                                                             |
| **Enable Google Ads Conversion Tracking** | You can tick this toggle to set up Google Ads Conversion Tracking.                                                                                                                                                                                  |
| **Google Ads ID**                         | You can enter your Google Ads ID. You need to tick the "Enable Google Ads Conversion Tracking" toggle to use this function.                                                                                                                         |
| **Initiate checkout**                     | You can enter your Initiate checkout label. You need to tick the "Enable Google Ads Conversion Tracking" toggle to use this function.                                                                                                               |
| **Purchase label**                        | You can enter your Purchase label. You need to tick the "Enable Google Ads Conversion Tracking" toggle to use this function.                                                                                                                        |
| **Submit lead label**                     | You can enter your Submit lead label. You need to tick the "Enable Google Ads Conversion Tracking" toggle to use this function.                                                                                                                     |
| **Google Tag Manager ID**                 | You can enter your Google Tag Manager ID.                                                                                                                                                                                                           |
| **Submit button text**                    | You can change the text of your form's submit button to another text                                                                                                                                                                                |
| **Footer text**                           | You can display the text below your form                                                                                                                                                                                                            |
| **Action after form submission**          | <p>You can set the page you want to bring when the customer submits your form.</p><ol><li>Go to default thank you page = Take the customer to the thank you page</li><li>Redirect to URL address = Take the customer to the page you want</li></ol> |
| **Thank-You Page > Title**                | You can change the text title on the thank you page of your form (The page after the customer submits the form)                                                                                                                                     |
| **Thank-You Page > Body**                 | You can change the text body on the thank you page of your form (The page after the customer submits the form)                                                                                                                                      |
| **Form theme > Form color**               | You can change the color of the divider for the form.                                                                                                                                                                                               |
| **Form theme > Submit button color**      | You can change the color of the CTA button for the form                                                                                                                                                                                             |
| **Form theme > Submit button text color** | You can change the color of the text on the CTA button for the form.                                                                                                                                                                                |

<figure><img src="https://3359028955-files.gitbook.io/~/files/v0/b/gitbook-x-prod.appspot.com/o/spaces%2F-Lh09fNwqqta5Vj6Wr8p%2Fuploads%2Fgit-blob-9d94a31215e0c8da863cfcdd65bc47a7ad6746a2%2FfUOYO7l5ypVgmNmKsPjL.png?alt=media" alt=""><figcaption></figcaption></figure>

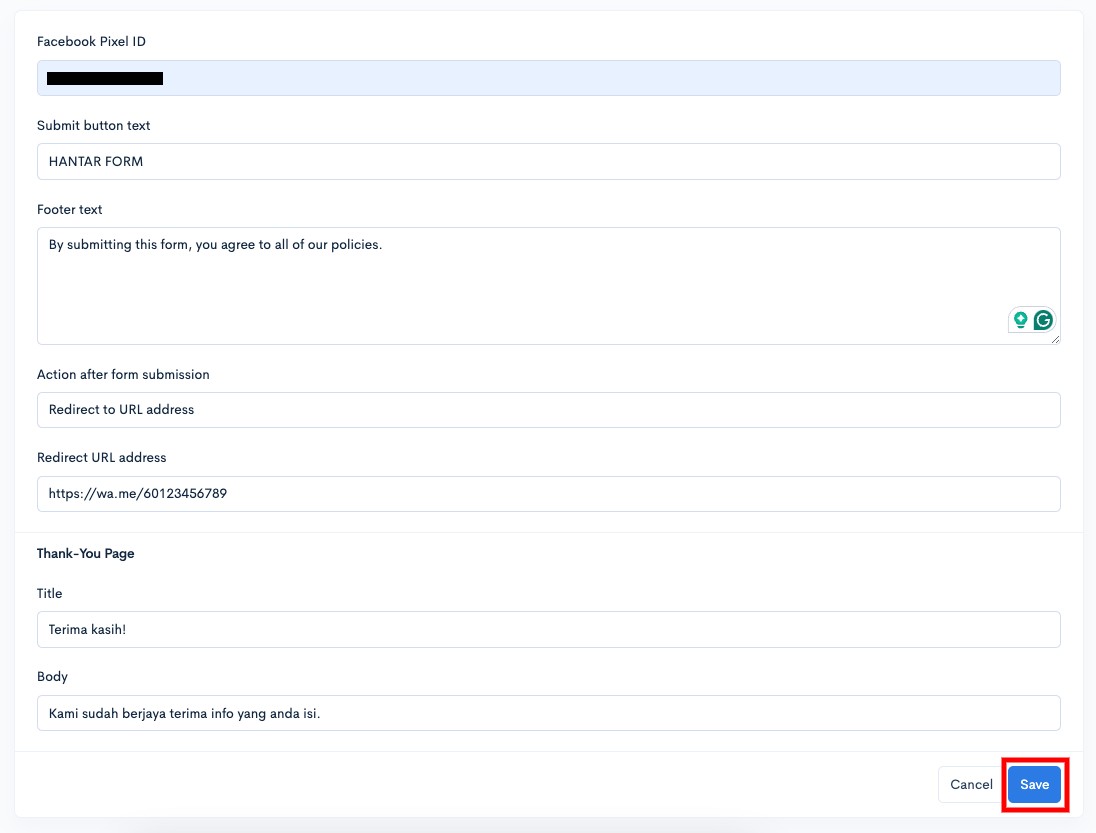
3. Once you're done making your settings, make sure you click on the **Save** button

<figure><img src="https://3359028955-files.gitbook.io/~/files/v0/b/gitbook-x-prod.appspot.com/o/spaces%2F-Lh09fNwqqta5Vj6Wr8p%2Fuploads%2Fgit-blob-8be2b471782d29182f3912ec56667823b0bd529a%2F9GAlLq2TxCUi54JEPUQx.jpg?alt=media" alt=""><figcaption></figcaption></figure>

## Management of Leads

For you to see all incoming lead data, you need to go to the Leads page. For more info, you can click on the tab button below:

{% content-ref url="/pages/7JTpjT0tseUko9h3CBwC" %}
[Leads](/tutorials/en/forms/leads.md)
{% endcontent-ref %}