> For the complete documentation index, see [llms.txt](https://docs.shoppego.my/tutorials/llms.txt). Markdown versions of documentation pages are available by appending `.md` to page URLs; this page is available as [Markdown](https://docs.shoppego.my/tutorials/en/products/bundles.md).

# Bundles

{% hint style="info" %}
For product bundle setting, it is only available in the <mark style="color:blue;">**Ultimate**</mark>**&#x20;subscription plan**.
{% endhint %}

{% hint style="success" %}
This features can be used on **Hartamas, Tampin** and **Solaris Themes**.
{% endhint %}

## Part 1: Adding Product Bundle

To start adding a product bundle, you can follow the steps below:

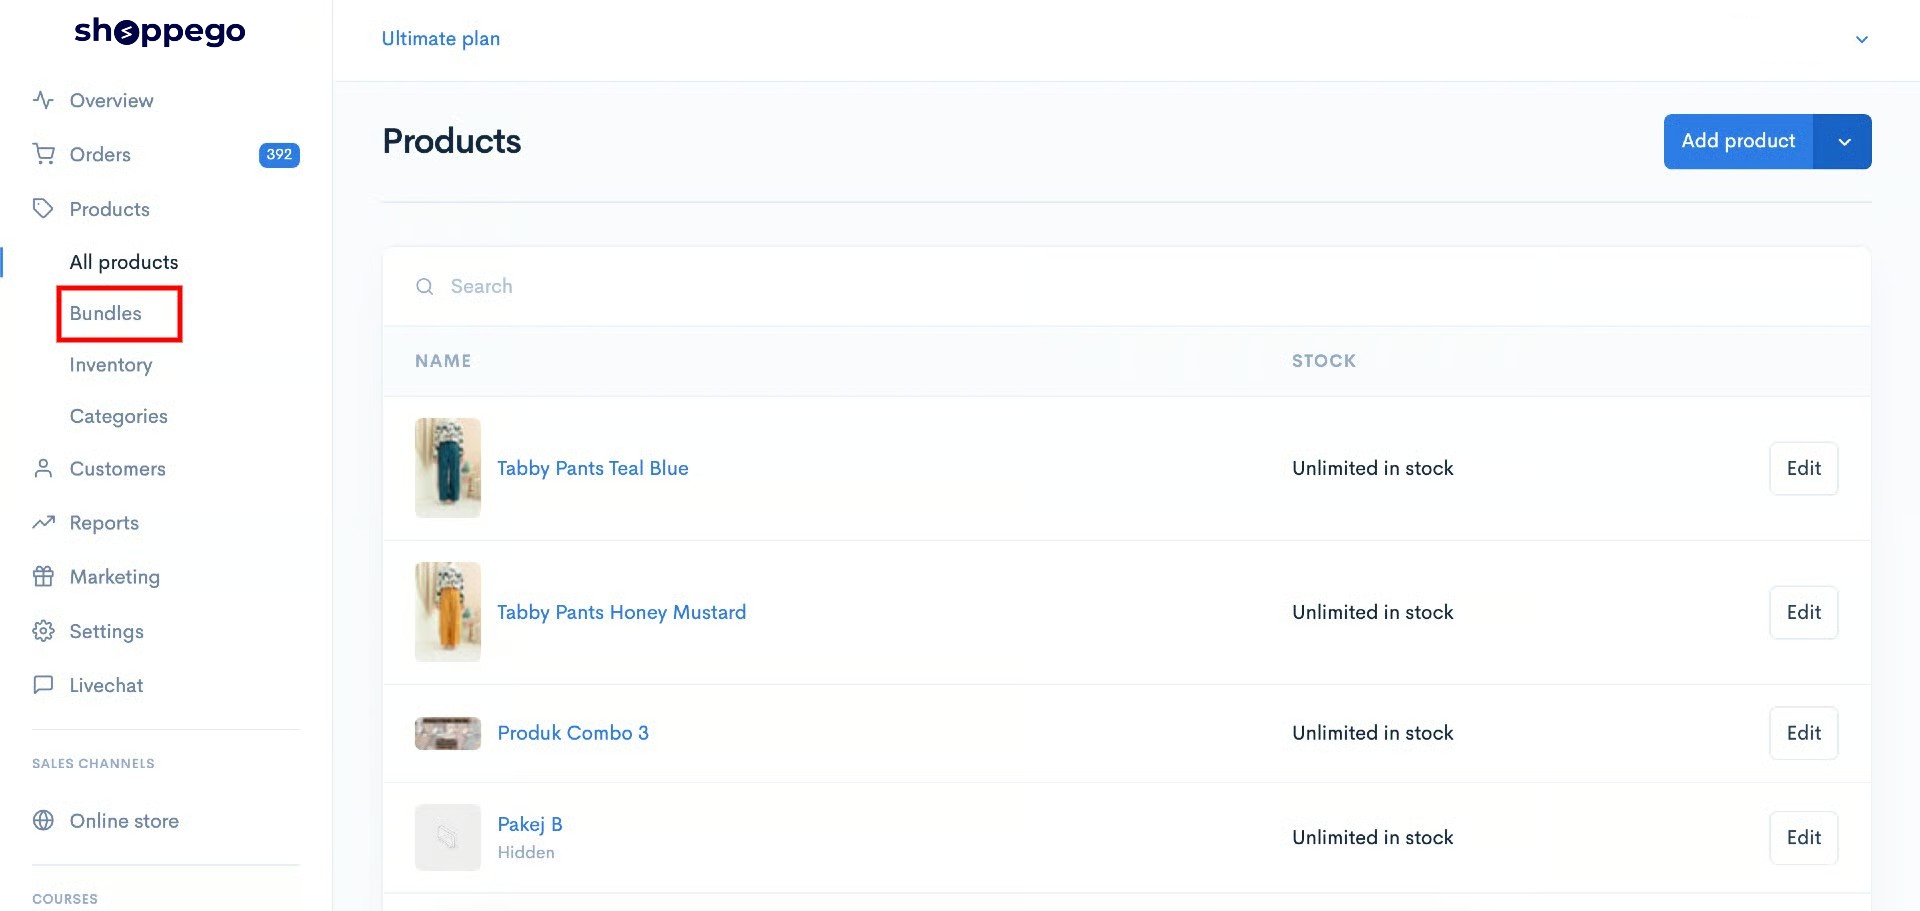
1. Log in to your Shoppego account -> Click on Products -> Click on Bundles.

<figure><img src="https://3359028955-files.gitbook.io/~/files/v0/b/gitbook-x-prod.appspot.com/o/spaces%2F-Lh09fNwqqta5Vj6Wr8p%2Fuploads%2Fgit-blob-7e7e0cb6496a73971bbf4886b5d7bcf9fbaea5a1%2FyzsTlaqt3rJ2Wyl3ArsK.jpg?alt=media" alt=""><figcaption></figcaption></figure>

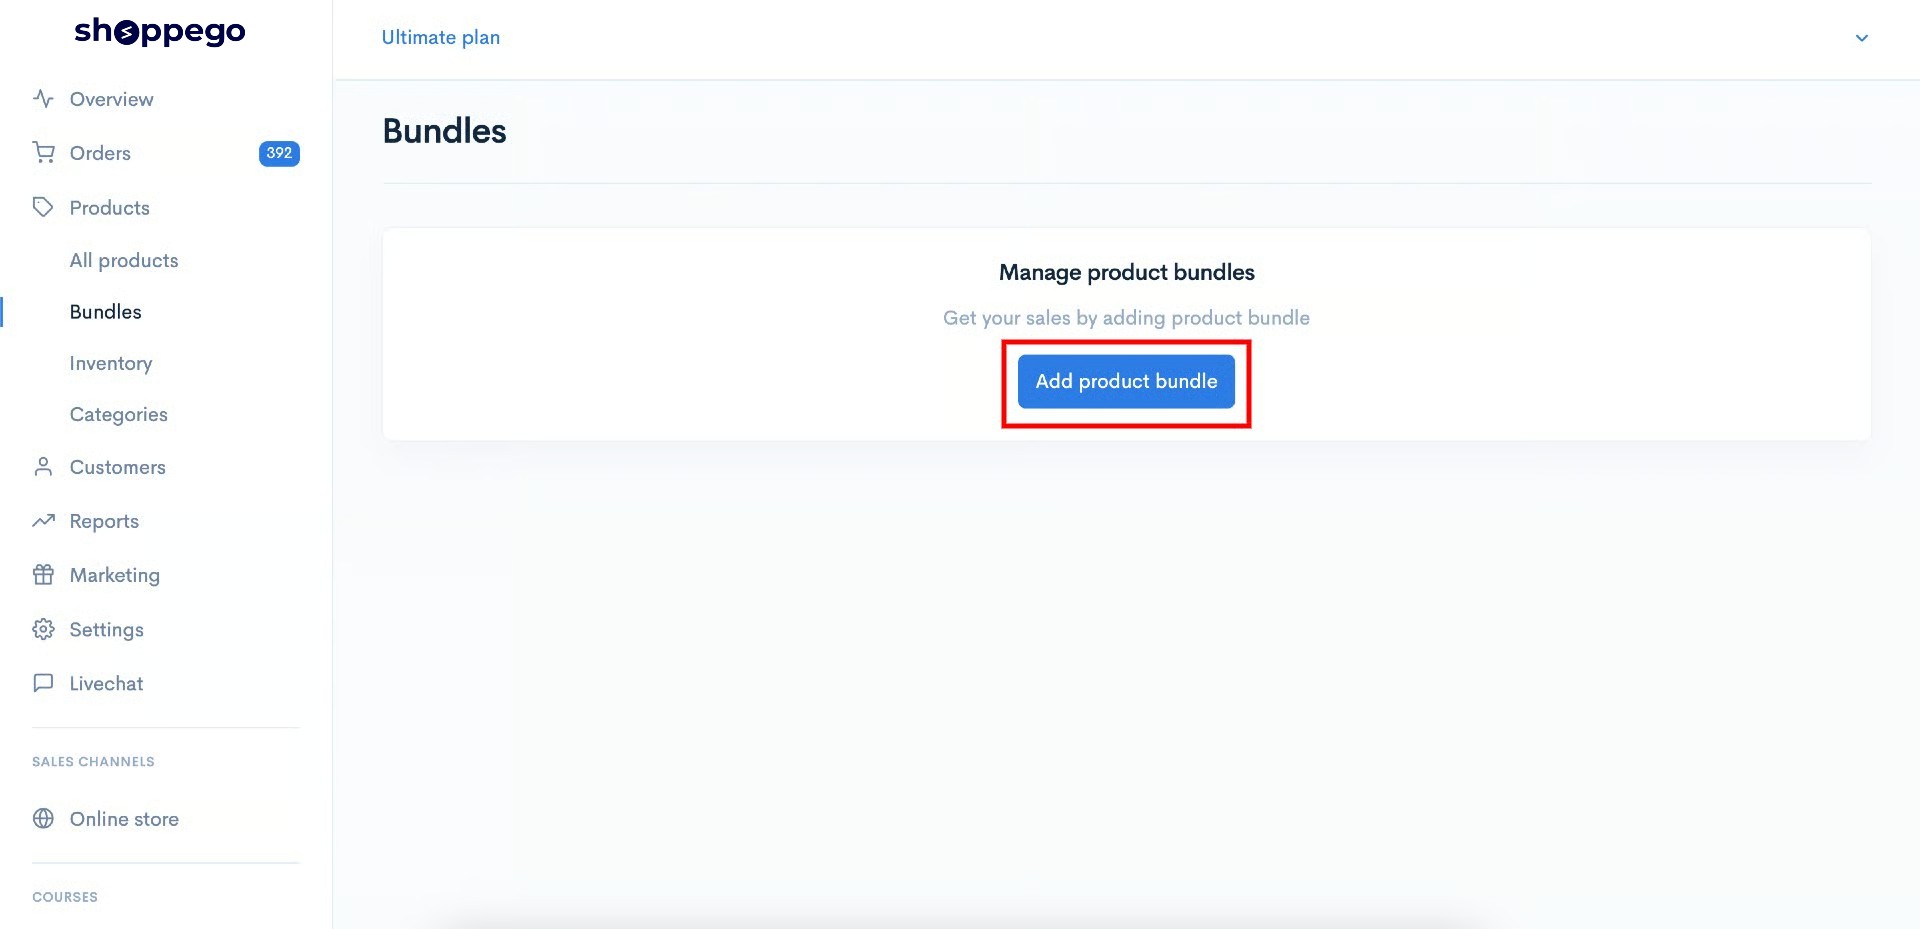
2. Click on the "Add Product Bundle" button.

<figure><img src="https://3359028955-files.gitbook.io/~/files/v0/b/gitbook-x-prod.appspot.com/o/spaces%2F-Lh09fNwqqta5Vj6Wr8p%2Fuploads%2Fgit-blob-940e937fc3d64e1b148ff9d49f719fbbd0349cd8%2FH1V5AqAfPnUT3pakViGS.jpg?alt=media" alt=""><figcaption></figcaption></figure>

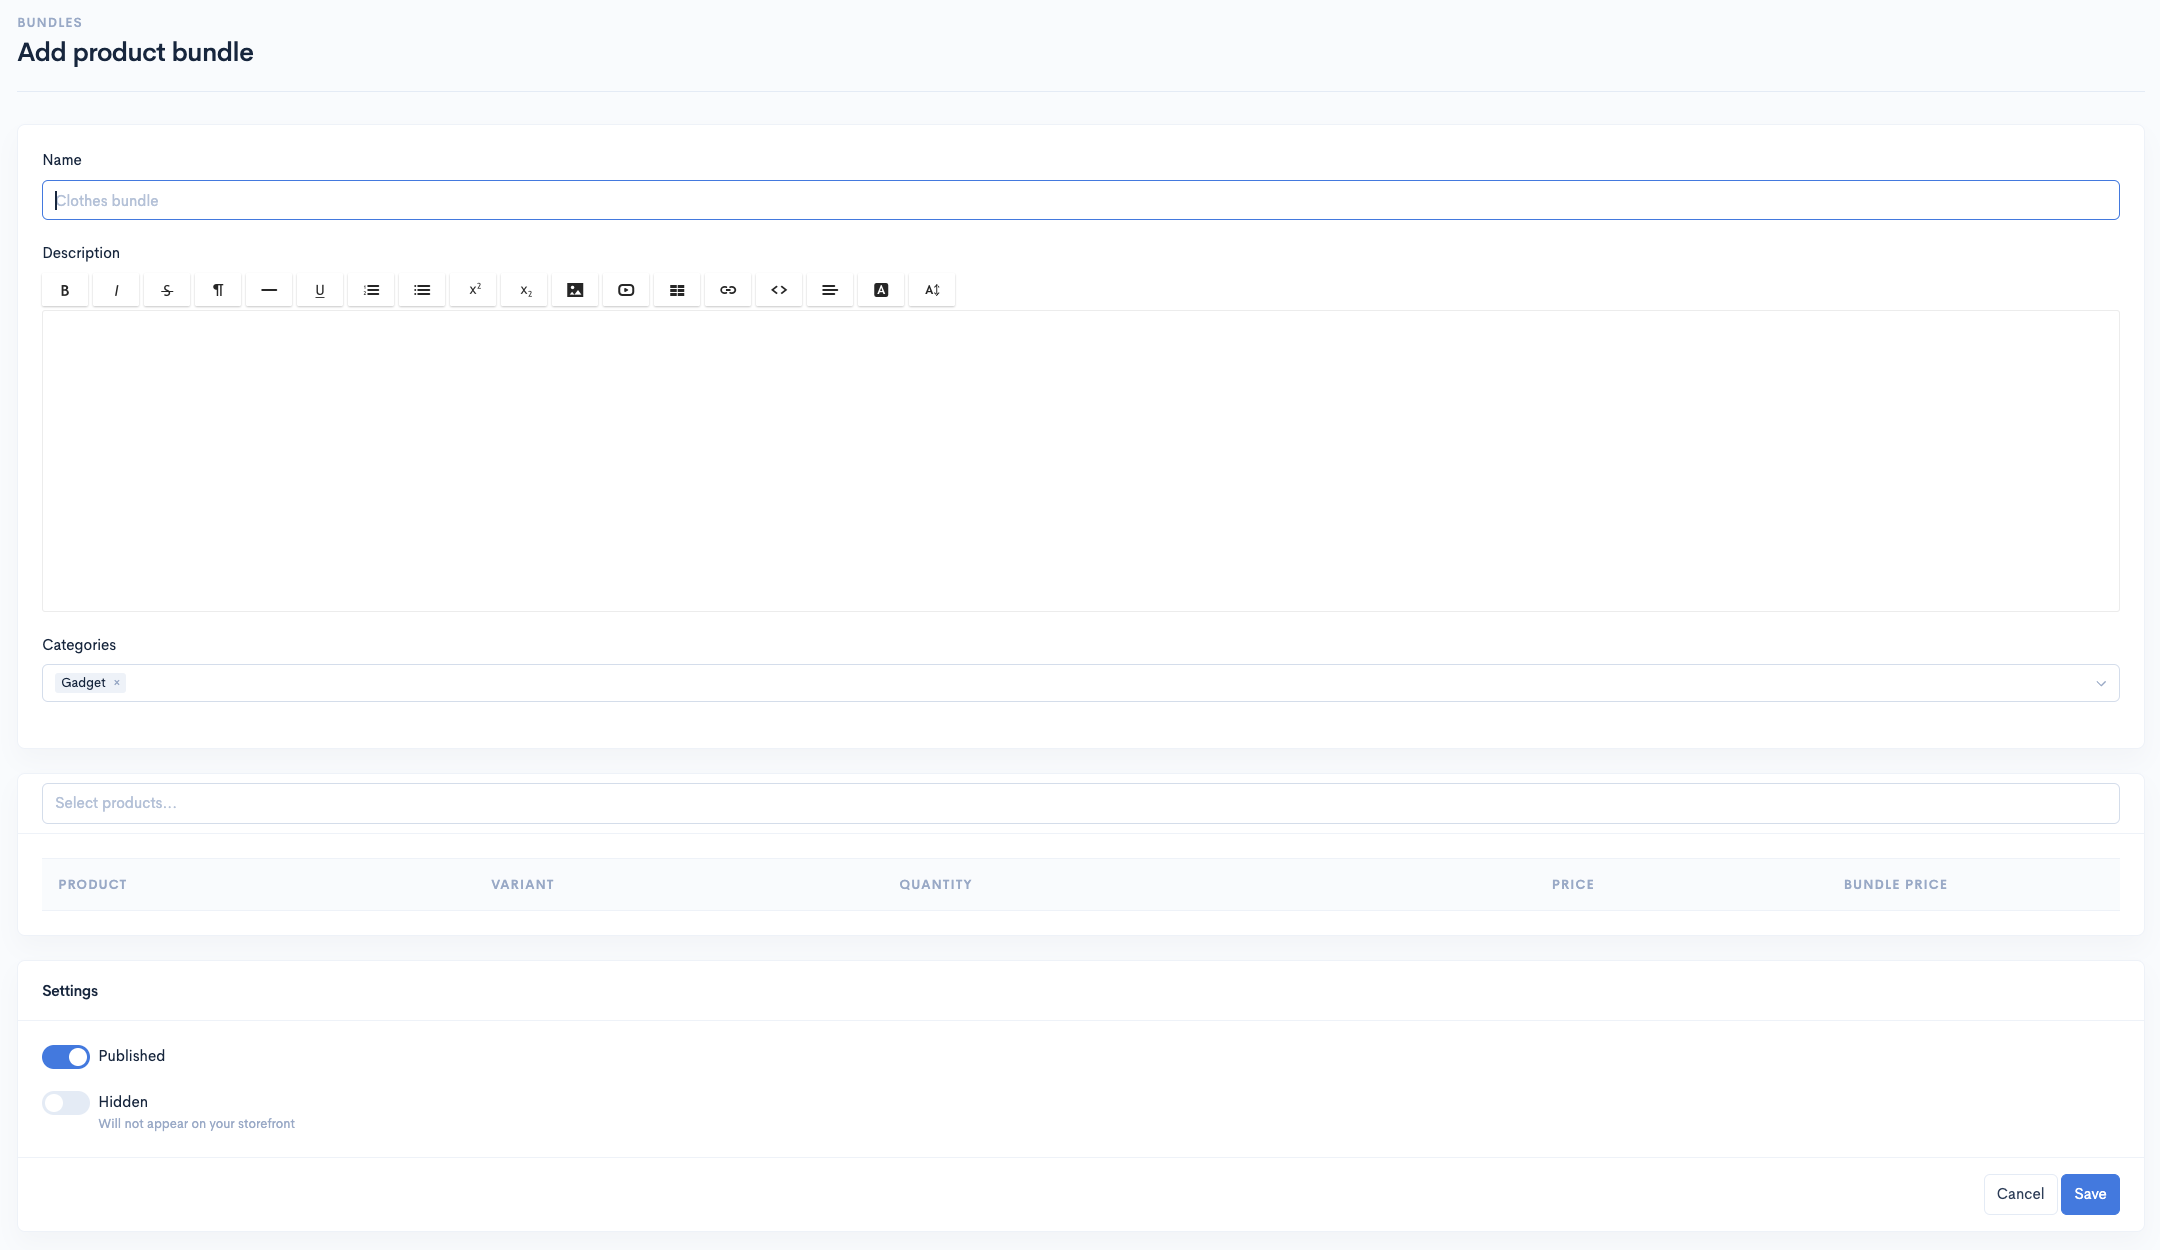
After that, you can proceed to set up the product bundle settings that you desire.

<figure><img src="https://3359028955-files.gitbook.io/~/files/v0/b/gitbook-x-prod.appspot.com/o/spaces%2F-Lh09fNwqqta5Vj6Wr8p%2Fuploads%2Fgit-blob-b46232d9f18d47c79b757e0675b45f18f11c6e9e%2FwKIooUkSVhBy1ecUwJtV.png?alt=media" alt=""><figcaption></figcaption></figure>

<table><thead><tr><th width="204">Tajuk</th><th>Penerangan</th></tr></thead><tbody><tr><td><strong>Name</strong></td><td>Your product bundle name.</td></tr><tr><td><strong>Description</strong></td><td>Brief description of your product bundle.</td></tr><tr><td><strong>Categories</strong></td><td>The category set for your product bundle.</td></tr><tr><td><strong>Select products</strong></td><td>Products that will be included in your product bundle.</td></tr><tr><td><strong>Product</strong></td><td>Display name of your product.</td></tr><tr><td><strong>Variant</strong></td><td>Display of your product variant names.</td></tr><tr><td><strong>Quantity</strong></td><td>Display of your product quantity. Refer <a href="#1-quantity">here</a>.</td></tr><tr><td><strong>Price</strong></td><td>Display of your product's original price.</td></tr><tr><td><strong>Bundle Price</strong></td><td>Setting the bundle price for your product.</td></tr><tr><td><strong>Published</strong></td><td>Make sure you enable this function so that your product can be viewed on your website.</td></tr><tr><td><strong>Hidden</strong></td><td>If you want to hide your product from customers and only share it with specific people, you can enable this function.</td></tr></tbody></table>

### 1 : Quantity

Quantity settings are divided into two types, **Fixed Quantity** and **None (the Fixed Quantity box is not checked).**

* **Fixed Quantity** - The quantity of products with **Fixed Quantity** has been **set** and **cannot be changed.** If a bundle price is set, the products will be sold at that price.\
  \
  For example, if the **quantity is 3** and the **bundle price is RM10**, then **3 products** will be sold at the **price of RM10**.
* **None** - Quantity can be changed according to customer needs.

## Bundles

Every product bundle that you have created can be accessed through:

1. Login to your Shoppegram account -> Click on Products -> Click on Bundles.

<figure><img src="https://3359028955-files.gitbook.io/~/files/v0/b/gitbook-x-prod.appspot.com/o/spaces%2F-Lh09fNwqqta5Vj6Wr8p%2Fuploads%2Fgit-blob-7e7e0cb6496a73971bbf4886b5d7bcf9fbaea5a1%2FyzsTlaqt3rJ2Wyl3ArsK.jpg?alt=media" alt=""><figcaption></figcaption></figure>

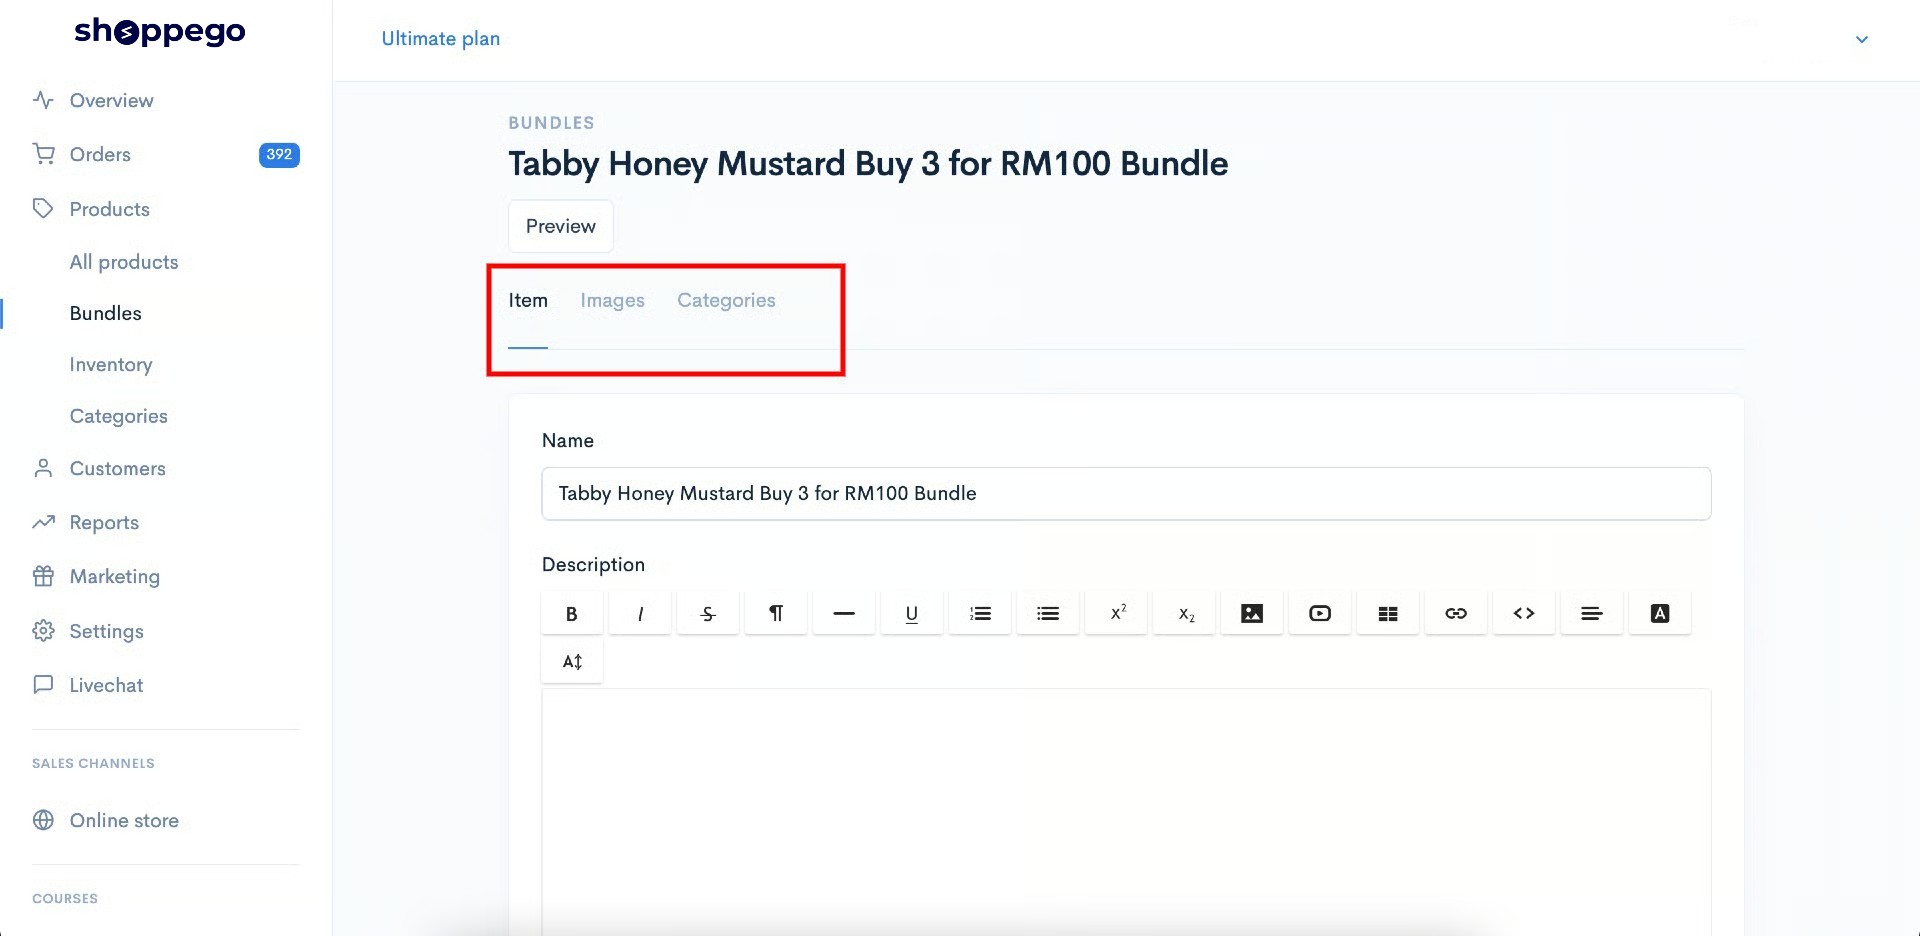
If you click on any product bundle, you will be able to see 3 tabs for settings, which are:

<figure><img src="https://3359028955-files.gitbook.io/~/files/v0/b/gitbook-x-prod.appspot.com/o/spaces%2F-Lh09fNwqqta5Vj6Wr8p%2Fuploads%2Fgit-blob-4998c09613c0cbf6bd07260fd062e2461329f37b%2FR91GXAbkBJVj3KOm9VlF.jpg?alt=media" alt=""><figcaption></figcaption></figure>

### 1 : Items

In this setting, you can make changes to your product bundle setting.

### 2 : Images

In this setting, you can add images to your product bundle.

{% hint style="success" %}
The **supported image file extensions** are **jpg, jpeg, png, gif,** and **webp** only.
{% endhint %}

### 3 : Categories

In this setting, you can make changes or additions to the category of your product bundle.

## Additional information

With the product bundle function, there are several scenarios that you can do, including:

{% content-ref url="/pages/Fgb3l8uuboHabDrfcNrf" %}
[Buy 3 for RM 100](/tutorials/en/products/bundles/buy-3-for-rm-100.md)
{% endcontent-ref %}

{% content-ref url="/pages/tpJEFTf4UhD2QtijcCpt" %}
[Buy 2 Product 1 Price](/tutorials/en/products/bundles/buy-2-product-1-price.md)
{% endcontent-ref %}

{% content-ref url="/pages/Wdvdd21ze2qLIPDCWIkm" %}
[Buy 1 Bundle and Clearance](/tutorials/en/products/bundles/buy-1-bundle-and-clearance.md)
{% endcontent-ref %}