
> For the complete documentation index, see [llms.txt](https://docs.shoppego.my/tutorials/llms.txt). Markdown versions of documentation pages are available by appending `.md` to page URLs; this page is available as [Markdown](https://docs.shoppego.my/tutorials/en/products/options.md).

# Options

{% hint style="info" %}
**\*\***<mark style="color:red;">**Important**</mark>**: The maximum setting of Options is only 3 in 1 product.**
{% endhint %}

{% hint style="info" %}
**\*\***<mark style="color:red;">**Important**</mark>**: If you delete all the Button/Dropdown/Swatch type options in the product, the system will also delete all the variants you have created in the product and only leave the Default variant.**
{% endhint %}

**Product Options** is the section **for making variations that have sub-variations**.

For example, a shirt design has **many sizes** and **each size has many types of sleeves or colors**.

See the example below:

![](https://3359028955-files.gitbook.io/~/files/v0/b/gitbook-x-prod.appspot.com/o/spaces%2F-Lh09fNwqqta5Vj6Wr8p%2Fuploads%2Fgit-blob-f9c3d7d714392f14498efe2ebe290f6407a13629%2FMS7YITTBfhfUd59hh8C0.jpg?alt=media)

<mark style="color:blue;">**Size**</mark> and <mark style="color:blue;">**Sleeve Type**</mark> are Variations (<mark style="color:blue;">**Options**</mark>), and <mark style="color:green;">**XS**</mark>, <mark style="color:green;">**S**</mark>, <mark style="color:green;">**Short**</mark>, <mark style="color:green;">**Long**</mark> are Sub-Variations (<mark style="color:green;">**Variants**</mark>) in <mark style="color:blue;">**Options**</mark>.

## **Options settings**

1. Log in to Dashboard **Products** -> **All Products** and click on your product name

![](https://3359028955-files.gitbook.io/~/files/v0/b/gitbook-x-prod.appspot.com/o/spaces%2F-Lh09fNwqqta5Vj6Wr8p%2Fuploads%2Fgit-blob-14aada4dfd8c0fff98a746cb967ca0b70c5db435%2F9hD2pZ9zK2stgVSkuTH5.jpg?alt=media)

2. Click on the **Options** tab and **Add Option**. Enter your options, for example, in the case of clothes there is a Size option. Next, in the Type column, you can choose the option you want to use for this product. When finished click the **Add** button.

{% hint style="info" %}
There are **7 types of options** that you can choose from, namely: **Button**, **Dropdown**, **Date**, **Datetime**, **Swatch**, **Input (Text)** and **Textarea**.
{% endhint %}

{% hint style="info" %}
For the **Button**, **Dropdown** and **Swatch** option types, it will be set as **Required** and <mark style="color:red;">**cannot be changed**</mark> because it is an option type that needs to be determined by its variant value. Whereas, for the option types **Date**, **Datetime**, **Input(Text)** and **Textarea**, you <mark style="color:red;">**can change**</mark> whether you want it to be **required** or **not**.
{% endhint %}

![](https://3359028955-files.gitbook.io/~/files/v0/b/gitbook-x-prod.appspot.com/o/spaces%2F-Lh09fNwqqta5Vj6Wr8p%2Fuploads%2Fgit-blob-1eb35073fa6a08d806d5dc6f7c439d228d4724b4%2FZePmXmezbESL9xMpK6jx.png?alt=media)

3. The display will appear as follows. This means your first option has been successfully created. Next, click the **Add option** button again to add the Sleeve option.

![](https://3359028955-files.gitbook.io/~/files/v0/b/gitbook-x-prod.appspot.com/o/spaces%2F-Lh09fNwqqta5Vj6Wr8p%2Fuploads%2Fgit-blob-35d2aca1a5b2c636b8ce7a15a1f9034484e9b677%2FEmvbczoLxX5G86SmucGO.png?alt=media)

4. When finished adding the second option, the following display will appear. This means you have successfully created two options for 1 of your product.

![](https://3359028955-files.gitbook.io/~/files/v0/b/gitbook-x-prod.appspot.com/o/spaces%2F-Lh09fNwqqta5Vj6Wr8p%2Fuploads%2Fgit-blob-de63987a8a8c94b2a2de026029045926dbec4f16%2FguoRr0nYfEt5x3r9VGe0.png?alt=media)

## Option value settings

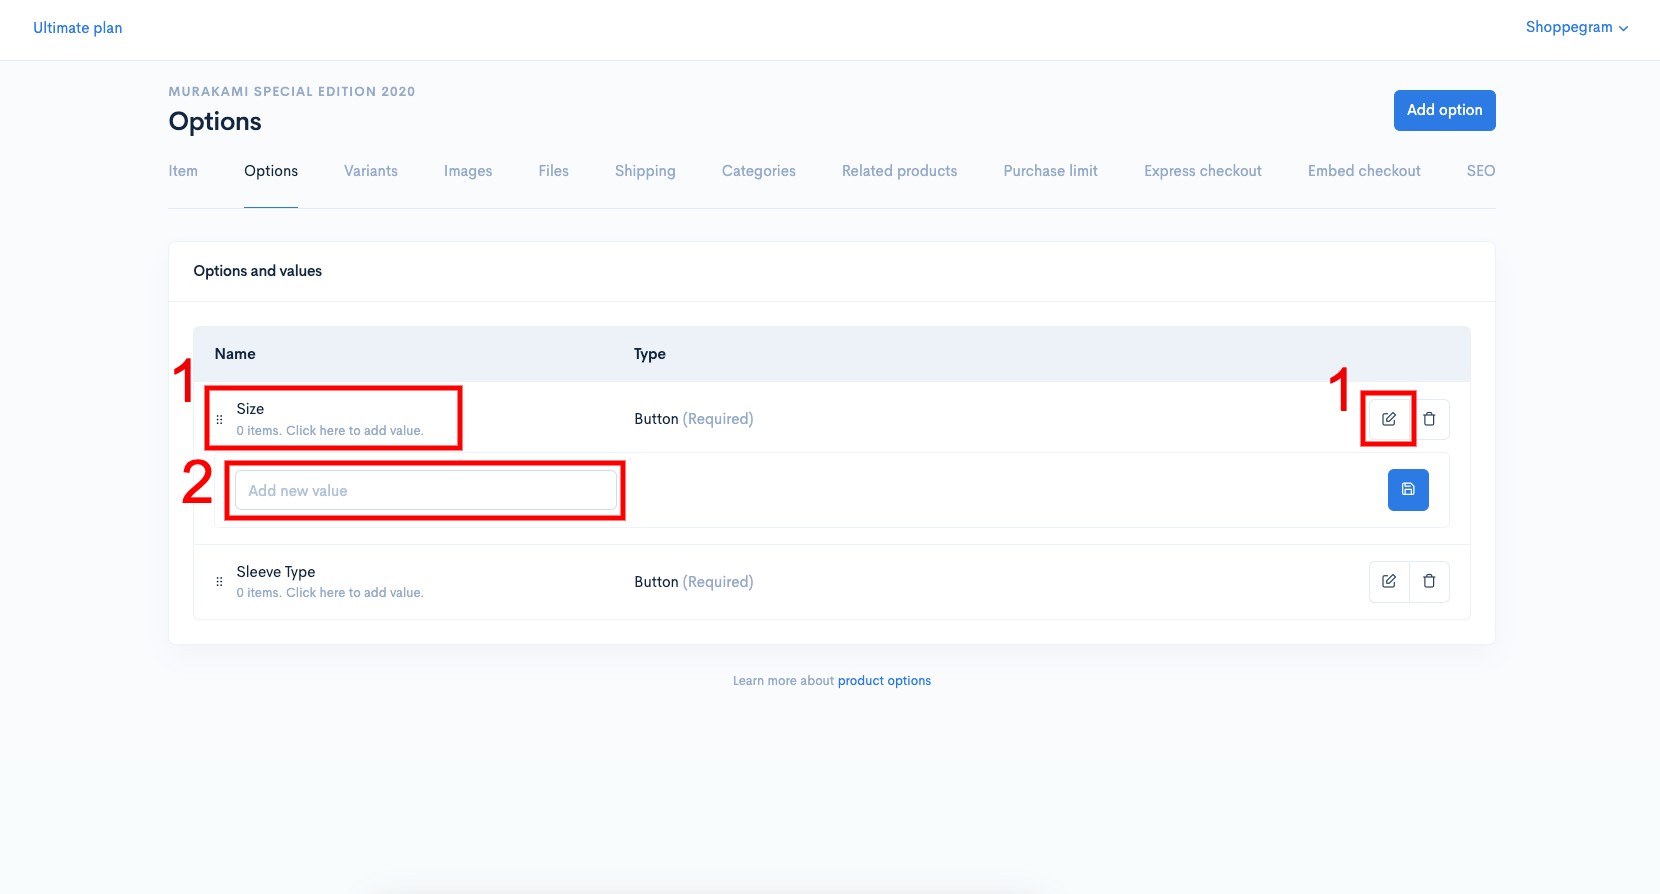
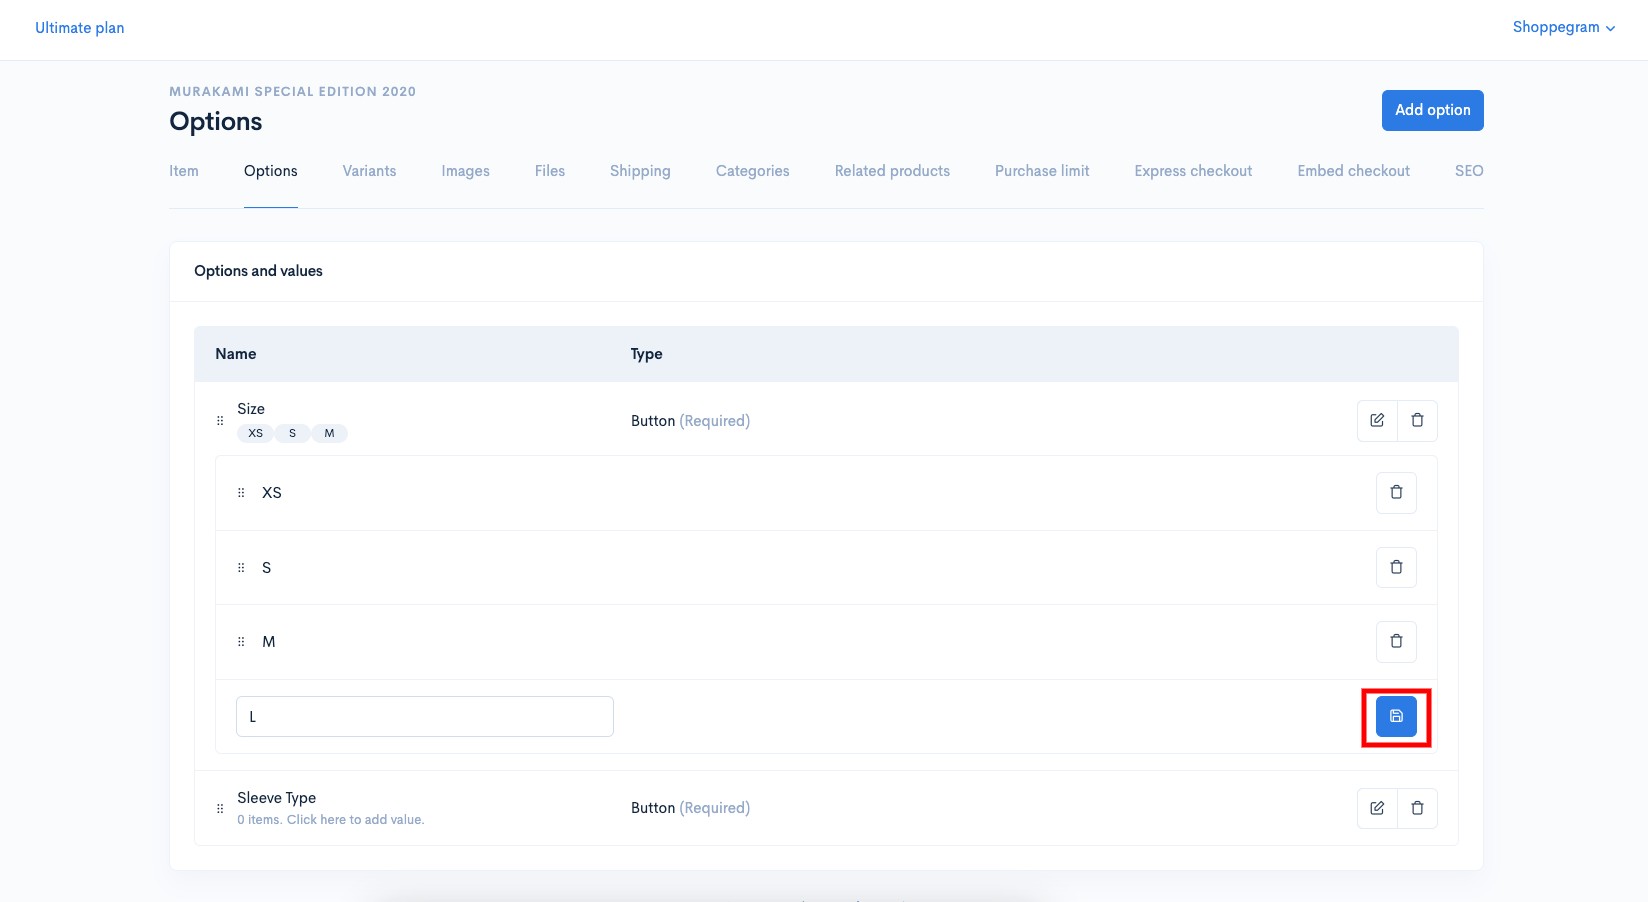
1. Then, you can click on the **Option Size** and **enter the value/text in the option** you want for example for Option Size such as **XS**, **S**, **M** and **L** in the **Add new value** column.

<figure><img src="https://3359028955-files.gitbook.io/~/files/v0/b/gitbook-x-prod.appspot.com/o/spaces%2F-Lh09fNwqqta5Vj6Wr8p%2Fuploads%2Fgit-blob-ed74ab05c5f7eff4ebb90d30bd93a72ee98eb551%2F1p7AgzjUsszniPb7jV22.jpg?alt=media" alt=""><figcaption></figcaption></figure>

2. Make sure that **for each added option value**, you click on the **Save button** or click **Enter on your keyboard to save the setting**.

<figure><img src="https://3359028955-files.gitbook.io/~/files/v0/b/gitbook-x-prod.appspot.com/o/spaces%2F-Lh09fNwqqta5Vj6Wr8p%2Fuploads%2Fgit-blob-0d195258d3eb315a8bf962c5131486a0d4f928cb%2FG4NHpzfTmQHFf4AGWYkL.jpg?alt=media" alt=""><figcaption></figcaption></figure>

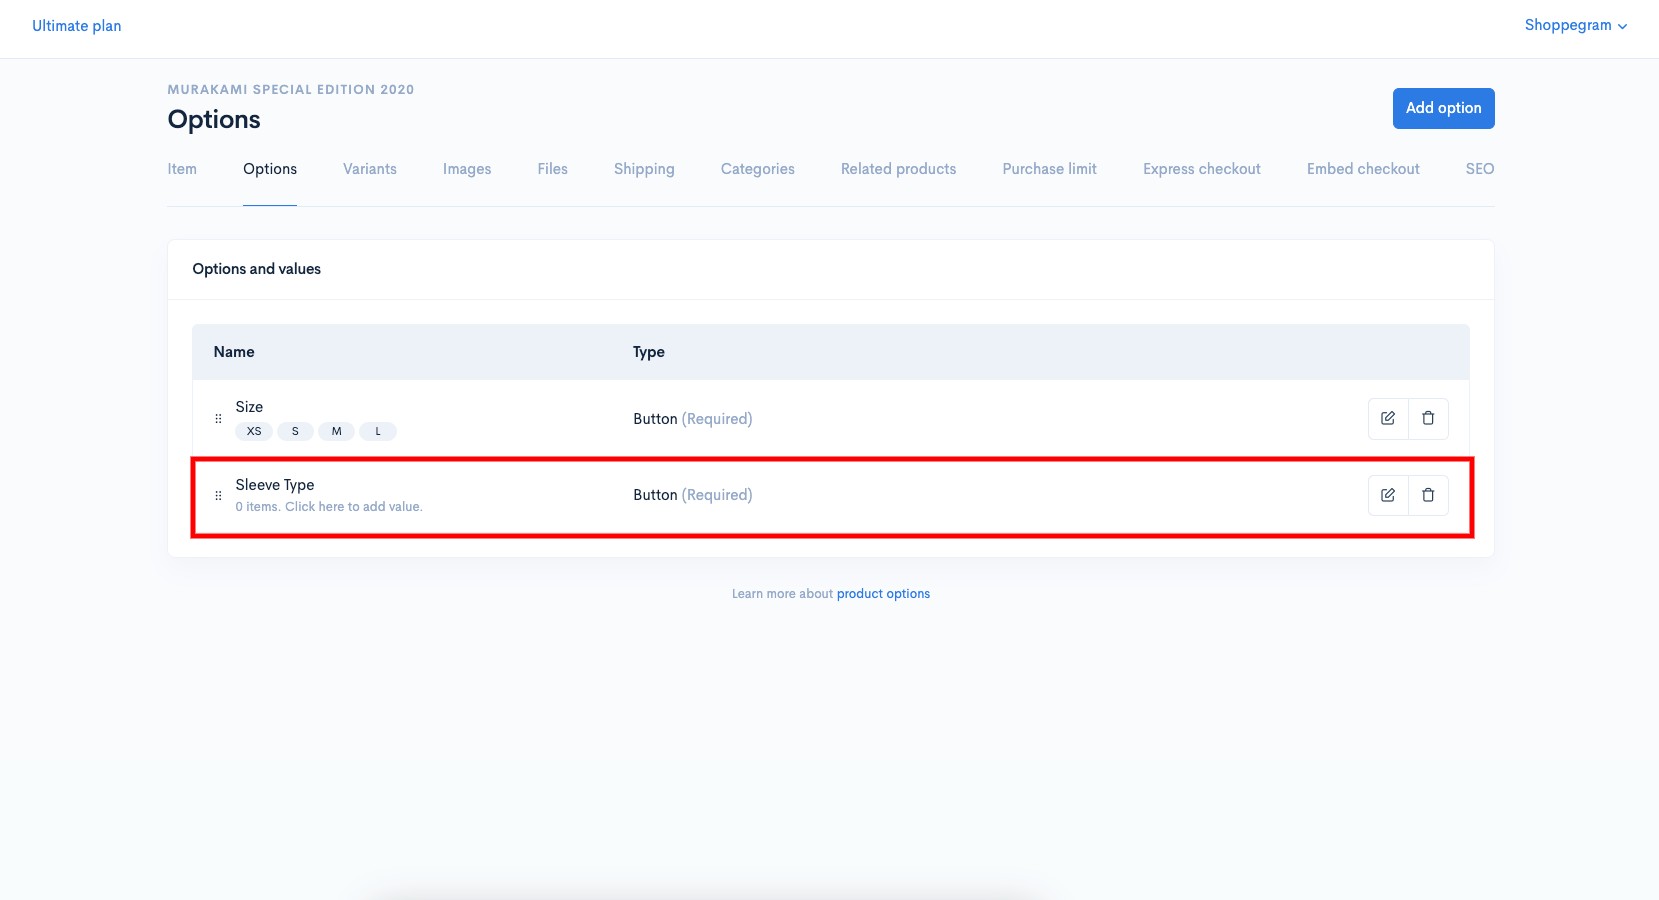
3. Next, you can repeat the steps above to add another Option value for Option Sleeve Type.

<figure><img src="https://3359028955-files.gitbook.io/~/files/v0/b/gitbook-x-prod.appspot.com/o/spaces%2F-Lh09fNwqqta5Vj6Wr8p%2Fuploads%2Fgit-blob-a5bcc7343d3dc37594873183a4d91aacd312afe9%2FwdWm9ZqNKTbc1kL1ozf6.jpg?alt=media" alt=""><figcaption></figcaption></figure>

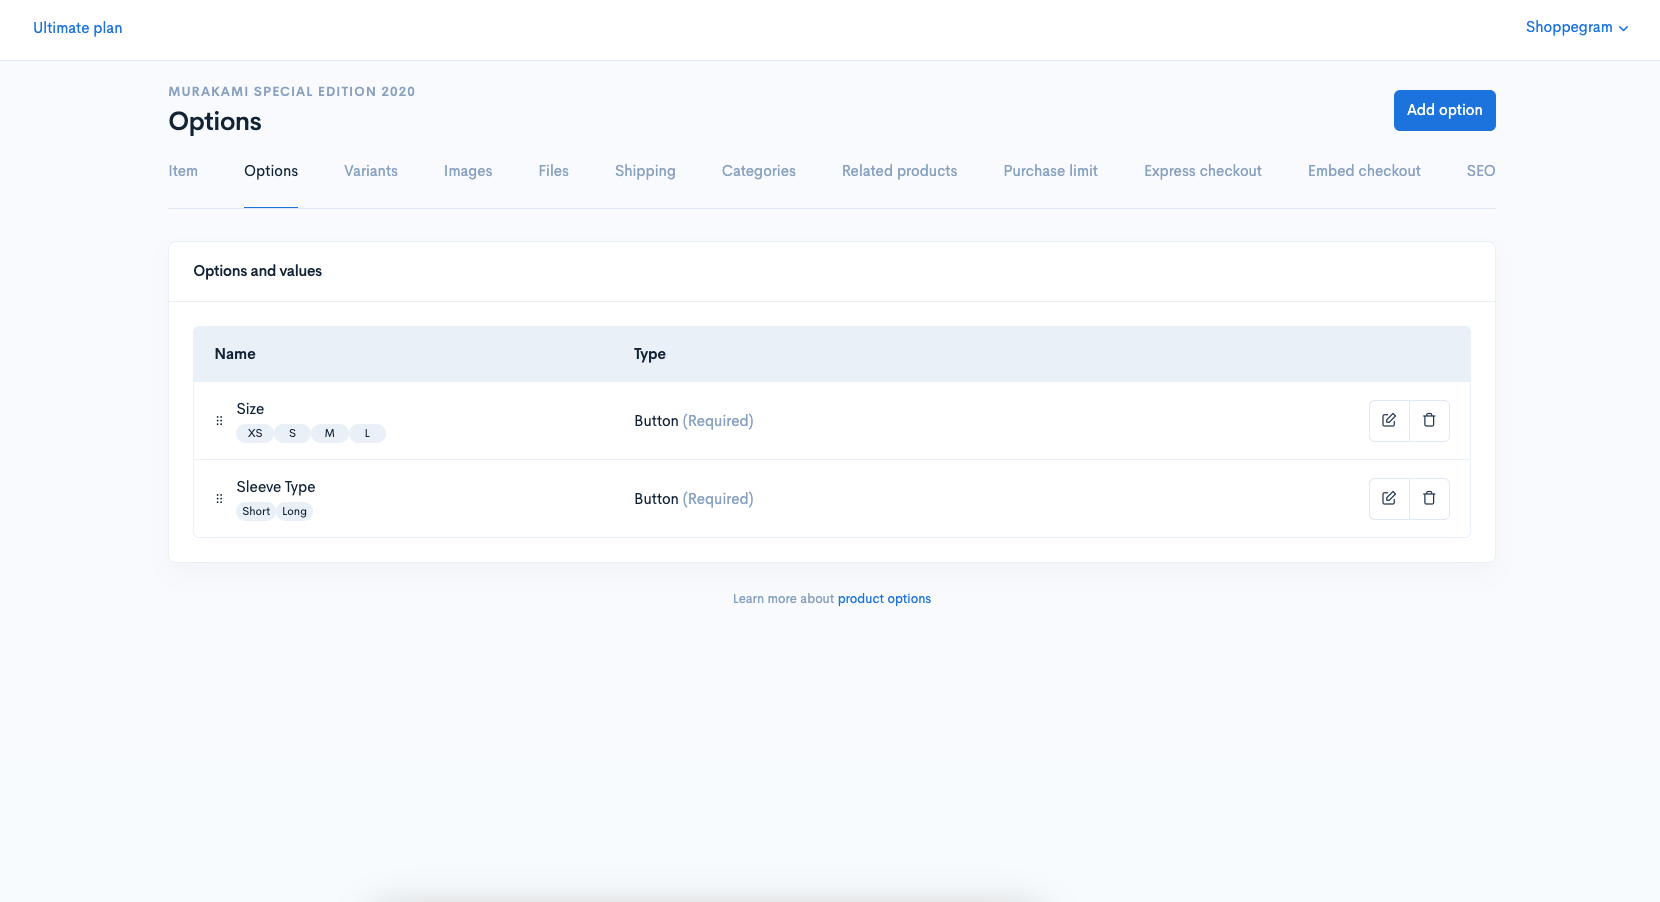
4. Once you have finished adding the Option and Option Value you want, you will get the display as below.

<figure><img src="https://3359028955-files.gitbook.io/~/files/v0/b/gitbook-x-prod.appspot.com/o/spaces%2F-Lh09fNwqqta5Vj6Wr8p%2Fuploads%2Fgit-blob-cccee33ecb321f3dae5a9f4c3c2ea7a1a0e74796%2F3fz29fEcX4NurzioslnH.png?alt=media" alt=""><figcaption></figcaption></figure>

## Variants settings

{% content-ref url="/pages/ytVgz4VAMXbFNWSkgc0J" %}
[Variants](/tutorials/ms/products/variants.md)
{% endcontent-ref %}

{% hint style="info" %}
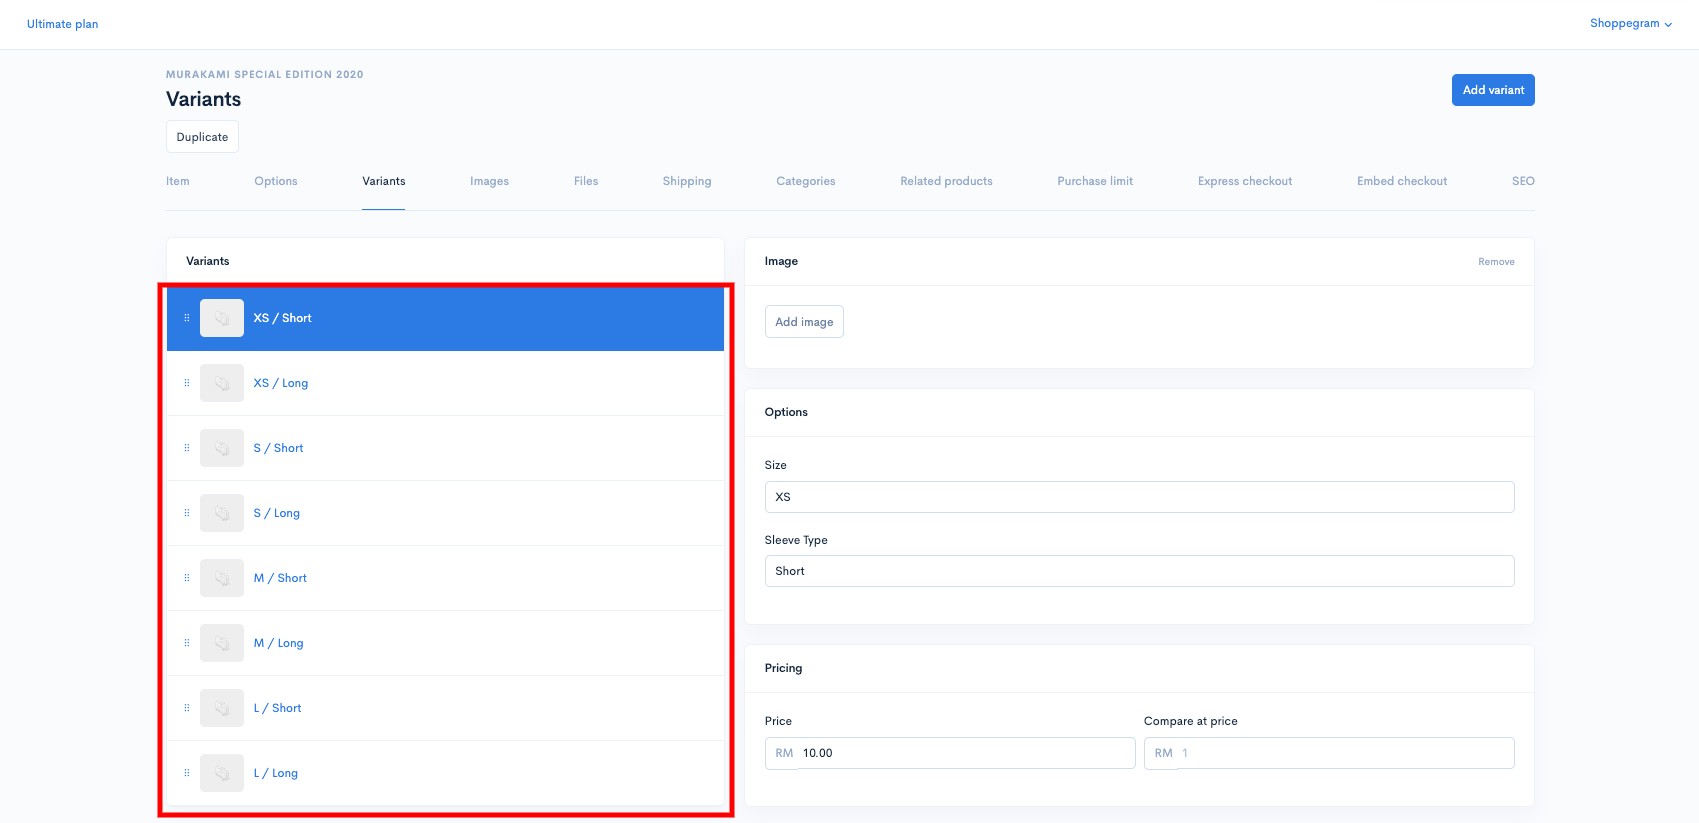
**For information, for every option value that you have added in that option, the system will automatically generate variants for the values ​​that you entered in that option.**
{% endhint %}

For price changes, product stock and so on you need to do it on the page in the Variants tab.

1. You can go to the **Variants** tab.\
   \
   You will be able to see all the variants that have been automatically generated by setting the option value that you have previously set.

![](https://3359028955-files.gitbook.io/~/files/v0/b/gitbook-x-prod.appspot.com/o/spaces%2F-Lh09fNwqqta5Vj6Wr8p%2Fuploads%2Fgit-blob-a826a330b71dd192a3e9d398244042c7c956ecd9%2FNzsS97m87EUiFOiPMvii.jpg?alt=media)

2. You can **click on any of the variants tab** to **change the Price**, **Stock and other settings for the variants**.

{% hint style="info" %}
For setting the **Inventory** refer [<mark style="color:blue;">**here**</mark>](#inventory).
{% endhint %}

<figure><img src="https://3359028955-files.gitbook.io/~/files/v0/b/gitbook-x-prod.appspot.com/o/spaces%2F-Lh09fNwqqta5Vj6Wr8p%2Fuploads%2Fgit-blob-b6cb80361e995d4db12de87bec889b132e977e70%2FGRA4XvydQjkvAKsEs68M.jpg?alt=media" alt=""><figcaption></figcaption></figure>

3. Once you have **finished making any changes to the settings**, make sure you click on the **Save** button to save the settings.

![](https://3359028955-files.gitbook.io/~/files/v0/b/gitbook-x-prod.appspot.com/o/spaces%2F-Lh09fNwqqta5Vj6Wr8p%2Fuploads%2Fgit-blob-9ecafdc1033e8dfea38d197ce16845b66a596c2c%2FRxPe25tEVGRRxW8QROKv.jpg?alt=media)

4. The display on the **Product Page** will be like this.

![](https://3359028955-files.gitbook.io/~/files/v0/b/gitbook-x-prod.appspot.com/o/spaces%2F-Lh09fNwqqta5Vj6Wr8p%2Fuploads%2Fgit-blob-5e80a4dffead1bb5a53939ac225787513440e070%2F-MBmUMv_yAK3_BHjVjs4.png?alt=media)

## Inventory

### 1: View Inventory Logs

{% hint style="info" %}
\*\*<mark style="color:red;">**Note**</mark>: The SKU section is for **monitoring data for your product** and <mark style="color:red;">**not for stock updates**</mark>.
{% endhint %}

In this section, you can see the changes or trace the quantity made on the stock part of the product.\
\
1\. Click on the **View inventory logs**.

<figure><img src="https://3359028955-files.gitbook.io/~/files/v0/b/gitbook-x-prod.appspot.com/o/spaces%2F-Lh09fNwqqta5Vj6Wr8p%2Fuploads%2Fgit-blob-769930e2d1d3c4f9c7654b4042af979f8c289862%2FIm6z1UER7V8g7fKt4jeb.png?alt=media" alt=""><figcaption></figcaption></figure>

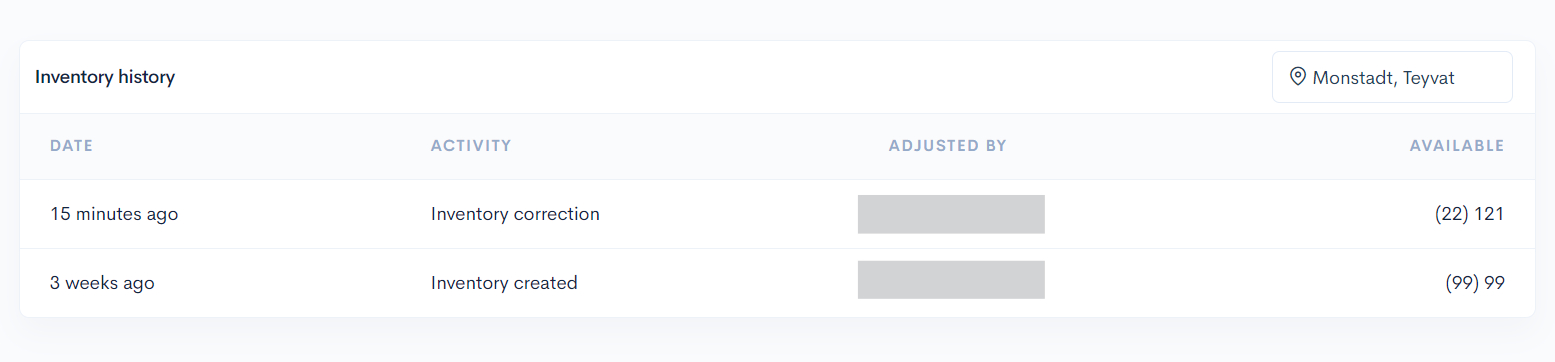
2\. In this section, all changes made to the product stock quantity will be recorded.

<figure><img src="https://3359028955-files.gitbook.io/~/files/v0/b/gitbook-x-prod.appspot.com/o/spaces%2F-Lh09fNwqqta5Vj6Wr8p%2Fuploads%2Fgit-blob-6066b6ecd3188e201905fdbb278951be8d64b167%2F6BbhvSW3EFgyg9090m10.png?alt=media" alt=""><figcaption></figcaption></figure>

<table><thead><tr><th width="155">Field</th><th>Description</th></tr></thead><tbody><tr><td><strong>Address</strong></td><td><strong>You can change the address in this section to view the logs based on location.</strong></td></tr><tr><td><strong>Date</strong></td><td><strong>Each change made will have a date recorded.</strong></td></tr><tr><td><strong>Activity</strong></td><td><strong>Refers to the thing you did when changing stock quantity.</strong></td></tr><tr><td><strong>Adjusted by</strong></td><td><strong>Refers to the person who made the change to the stock.</strong></td></tr><tr><td><strong>Available</strong></td><td><strong>Referring to the latest stock value.</strong></td></tr></tbody></table>

### 2: Product Stock

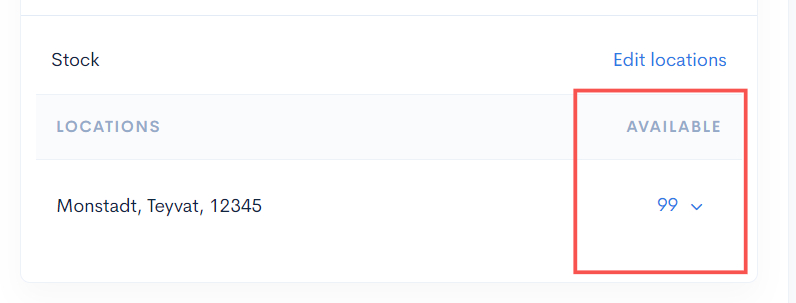
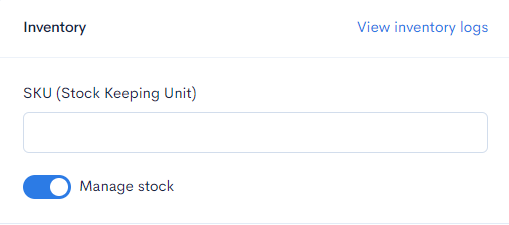
1. To **add product stock**, you need to enter it in the space provided. You only need to **click on the dropdown.**

<figure><img src="https://3359028955-files.gitbook.io/~/files/v0/b/gitbook-x-prod.appspot.com/o/spaces%2F-Lh09fNwqqta5Vj6Wr8p%2Fuploads%2Fgit-blob-1fad8b291a03018374043ed7b05876b698e2f220%2FwdOygixkmnD7w13SxKh8.jpg?alt=media" alt=""><figcaption></figcaption></figure>

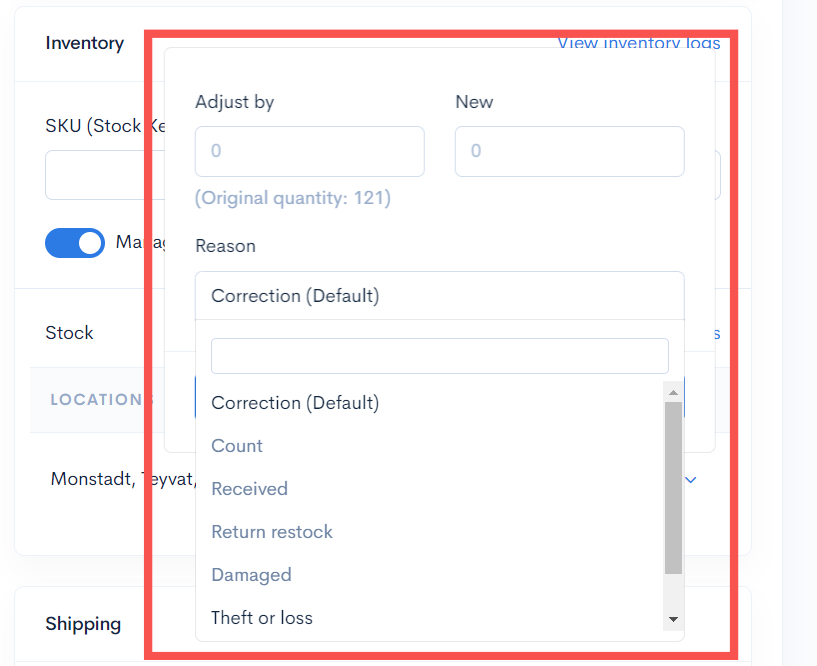
2. After that, you can **select the reason or information** related to the change in your product stock.

<figure><img src="https://3359028955-files.gitbook.io/~/files/v0/b/gitbook-x-prod.appspot.com/o/spaces%2F-Lh09fNwqqta5Vj6Wr8p%2Fuploads%2Fgit-blob-60bafad6dbdd3c3b81384ebb3c4a0ec8d1ab840e%2FYu8F9hTI0aZtbWbDX3aQ.jpg?alt=media" alt=""><figcaption></figcaption></figure>

3. You will see the latest updated value for your product stock.

{% hint style="info" %}
If the Manage Stock button is <mark style="color:red;">**not**</mark>**&#x20;turned on**, your product will be considered to have **unlimited stock**.
{% endhint %}

<figure><img src="https://3359028955-files.gitbook.io/~/files/v0/b/gitbook-x-prod.appspot.com/o/spaces%2F-Lh09fNwqqta5Vj6Wr8p%2Fuploads%2Fgit-blob-2e35f22571913bd16ca4d9eaa40e03756875a778%2FFCPnWMw1Hexr5r6teGsR.png?alt=media" alt=""><figcaption></figcaption></figure>

4. If you press the **View Inventory Logs button**, you will see a list of information regarding the changes to your product stock.

<figure><img src="https://3359028955-files.gitbook.io/~/files/v0/b/gitbook-x-prod.appspot.com/o/spaces%2F-Lh09fNwqqta5Vj6Wr8p%2Fuploads%2Fgit-blob-e198d78eeb2e8610786834220d9ef4fa50947f41%2FU4SfKlNeluUWCmDESHTU.jpg?alt=media" alt=""><figcaption></figcaption></figure>

## Additional Information

1. **If you&#x20;**<mark style="color:red;">**delete/remove all types of options (Button/Dropdown/Swatch) whose variant values ​​are determined in your product**</mark>**,&#x20;**<mark style="color:red;">**all your variant settings will also be deleted/removed**</mark>**&#x20;from the product and&#x20;**<mark style="color:red;">**the system will only leave the 'Default' variant**</mark>**&#x20;on the product.**
2. **You can organize the display of variants on your website by using the drag & drop sort function on the Options tab page.**

<figure><img src="https://3359028955-files.gitbook.io/~/files/v0/b/gitbook-x-prod.appspot.com/o/spaces%2F-Lh09fNwqqta5Vj6Wr8p%2Fuploads%2Fgit-blob-2f4dc9bcbfb02328b061f78d0a1228bb1873f155%2FhmHD1950FeSsDiNw16DO.jpg?alt=media" alt=""><figcaption></figcaption></figure>