> For the complete documentation index, see [llms.txt](https://docs.shoppego.my/tutorials/llms.txt). Markdown versions of documentation pages are available by appending `.md` to page URLs; this page is available as [Markdown](https://docs.shoppego.my/tutorials/en/settings/custom-domain.md).
# Custom Domain
{% hint style="info" %}
Each store in Shoppego will **get a hosting and free subdomain( ****cannot be changed afterwards****)** in the form of : [https://kedaianda.myshoppegram.com](https://kedaianda.myshoppegram.com./)
{% endhint %}
However, if users want to use their own domain is also allowed by Shoppego by only having to **set up DNS on CNAME record** from the domain provider to DNS Shoppego information.
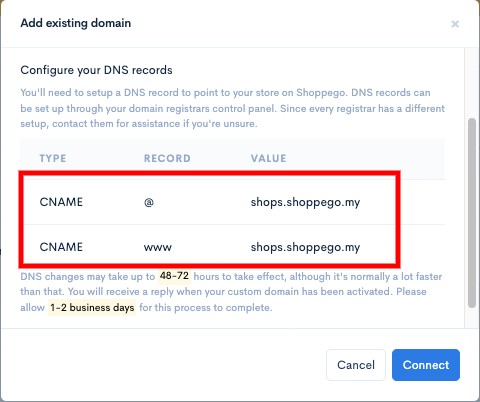
**Starting February 26, 2026, every Shoppego user only need to do a CNAME record and every store/website will have the same CNAME record value/setting.**
## List of Domains and Setup Tutorials
The following are the names of domains and setup tutorials:
{% content-ref url="/pages/ISshvKaut6iMcczIZaFk" %}
[Shinjiru](/tutorials/en/settings/custom-domain/shinjiru.md)
{% endcontent-ref %}
{% content-ref url="/pages/EicUcCSocb3wbvZymfJ8" %}
[Godaddy](/tutorials/en/settings/custom-domain/godaddy.md)
{% endcontent-ref %}
{% content-ref url="/pages/VLe51je2tlQR5yNDw3Uh" %}
[Namecheap](/tutorials/en/settings/custom-domain/namecheap.md)
{% endcontent-ref %}
{% content-ref url="/pages/A32ciCyx4ge4zxalMVoX" %}
[Cloudflare](/tutorials/en/settings/custom-domain/cloudflare.md)
{% endcontent-ref %}
{% content-ref url="/pages/VGoP4PElokEsijW9Leuw" %}
[Exabytes](/tutorials/en/settings/custom-domain/exabytes.md)
{% endcontent-ref %}
{% content-ref url="/pages/FM9lx9pS3qJoRRxjYK6q" %}
[CPanel](/tutorials/en/settings/custom-domain/cpanel.md)
{% endcontent-ref %}
{% content-ref url="/pages/Pv09l6gE3qfCLUr2bv5e" %}
[Domain Migration](/tutorials/en/settings/custom-domain/domain-migration.md)
{% endcontent-ref %}
## Important Tips
### Domain name
{% hint style="info" %}
**Make sure your domain name ****does not have a hyphen ( -)** symbol.
* This is because domains that have a hyphen ( -) symbol are often symbolized/categorized as **domain spam**.
* Domains that have this symbol will also always have a **typo** while the customer/buyer is typing.
{% endhint %}
{% hint style="info" %}
**Make sure you ****use a .com domain** because a .com domain makes it easier for your customers/buyers to find your website.
* In addition, each mobile phone also has a .com button and it can make it easier for your customers/buyers to type in the URL of your website.
* **Note**: If there is no .com domain, you can use the .com.my domain instead.
{% endhint %}
{% hint style="info" %}
**Make sure your domain name is ****short and easy to remember**** and called**
* Domain that is **short and easy** to remember **can reduce typos** typed by customers/buyers.
* We recommend that your domain name be **no longer**** than 15 words.**
{% endhint %}
{% hint style="info" %}
**Make sure your ****domain name is unique**** and has its own brand**
* Attractive domains can attract people to come to your website.
* For example, Amazon.com looks more attractive than BuyBooksOnline.com.
{% endhint %}
## Get a Custom Domain
To use your own domain, you can get it from any Domain Name provider according to your convenience, among them are at
* **shinjiru.com.my**
* **exabytes.my**
* **namecheap.com**.
### Setting up Malaysian Domain
For .com domains usually after purchase, it will immediately can be used for DNS setup. For Malaysian domains such as **.my, .com.my, .net.my** need to **wait for at least 72 working hours before it can be used** and you need to change your DNS records in your MYNIC account only.
{% hint style="info" %}
You can **contact** your **domain provider** to make the changes.
{% endhint %}
Once you have your own domain, you can go to the DNS Manager and edit DNS records to point to DNS Shoppego by:-
1. Create an CNAME **record** for **@** and point to **shops.shoppego.my**
2. Create a **CNAME** record for **www** and point to **shops.shoppego.my(Optional)**
{% hint style="info" %}
**These records are ****important**** and ****mandatory**. Only the www CNAME record are optional. So the record you have made should look more or less like the picture below.
{% endhint %}

{% hint style="info" %}
**If your domain provider cannot set a CNAME record for the host to the main domain or @, you can transfer DNS management to the Cloudflare system. You can refer to this link for an example of setting:** [**https://docs.shoppego.com/en/settings/custom-domain/cloudflare**](https://docs.shoppego.com/en/settings/custom-domain/cloudflare)
{% endhint %}
### Subdomain
**Situation**: I have a domain websitesaya.com and I want to add a subdomain.
**Answer**: You only need to add CNAME **Record** for your subdomain.
**For example**:
* **Main Domain**: websitesaya.com
* **Host**: @ or your own domain name
* **Value**: shops.shoppego.my
To use a subdomain from the main domain, you just need to add CNAME **record.**
* **Host**: kedai
* **Value**: shops.shoppego.my
Then, the domain for your new store is **kedai.websitesaya.com**.
{% hint style="info" %}
To use a **subdomain from the main domain**, you just need to **add CNAME Record.**
{% endhint %}
## Value CNAME Record
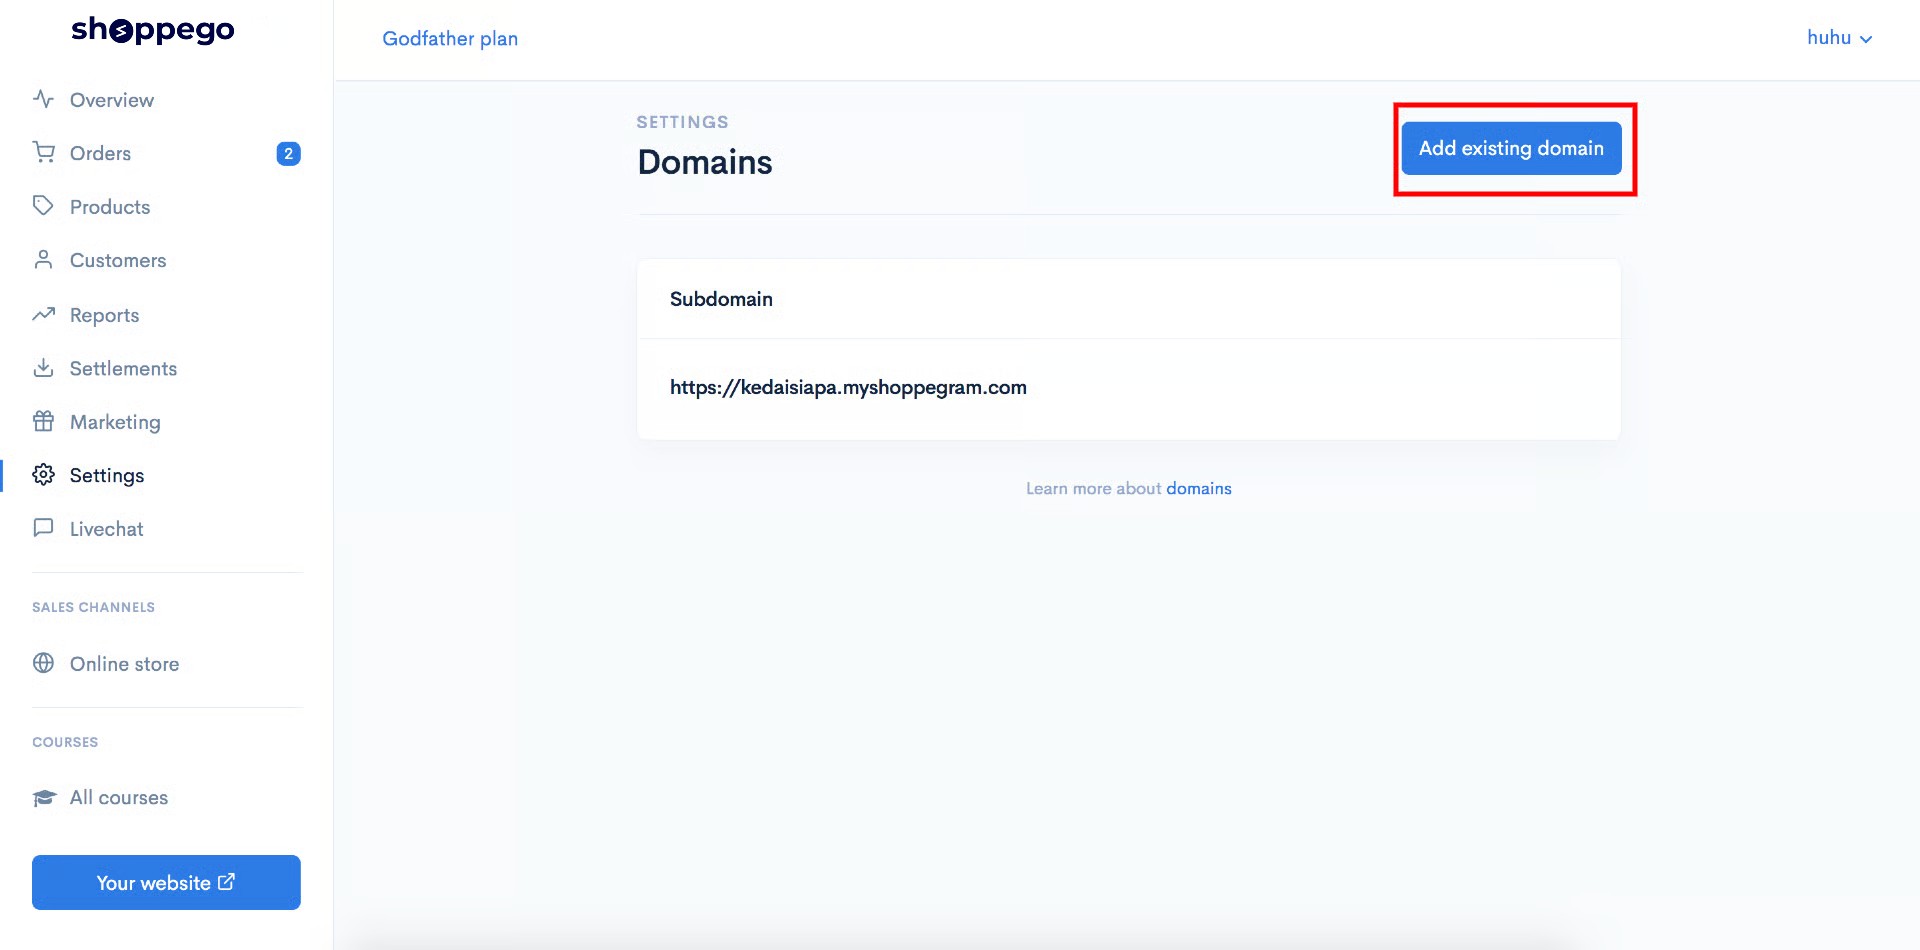
1. In the **Shoppego dashboard**, click on **Settings (1)** and scroll down to **Custom Domain (2).**
2. After that, click on **Add Existing Domain**.
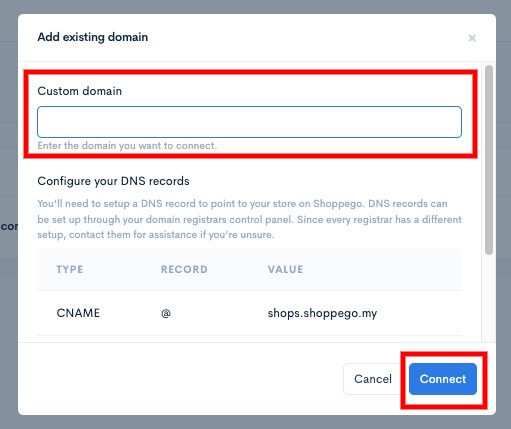
5. Later you will be able to see a popup that has a **value for your A record** and your **CNAME record**.
{% hint style="info" %}
**CNAME designation in the domain provider.**\
1: If the **CNAME value** is **@**, enter **your domain name** or "**@**" in the **CNAME field** in the domain provider.
{% endhint %}
## Additional information:
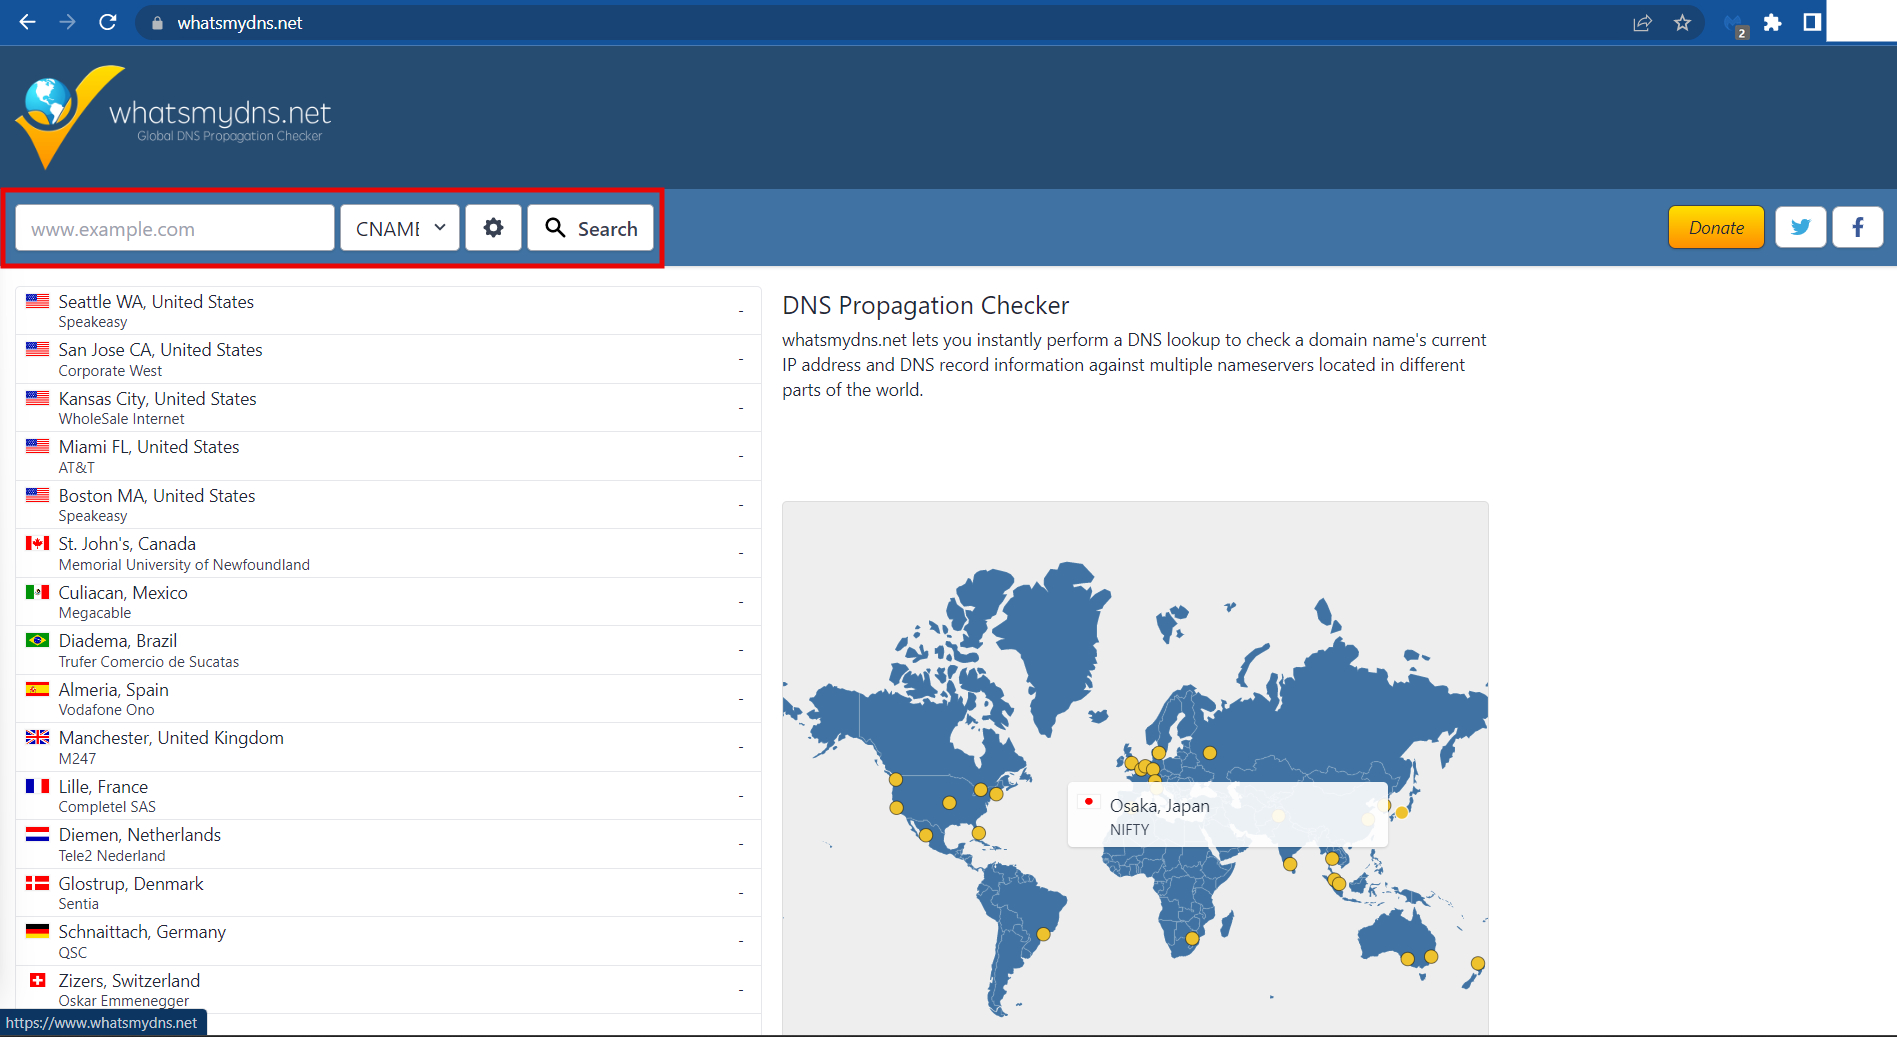
To ensure that your DNS is directed to Shoppego, you can [Check your DNS Here ](https://www.whatsmydns.net/)and make sure the **DNS displayed is the one you have set**.
1. To check your DNS: You can click this link: Check your [**DNS here**](https://www.whatsmydns.net/) or
{% hint style="info" %}
You can enter your **domain name** (with www and **without www**) in the space provided. Make sure you have made the changes to the CNAME record check.
{% endhint %}
## Propagation Period
You only need to wait for a **period of 48 hours** for the setting to be read and your domain can be used before you make a Custom domain setting in Shoppego.
The shortest time your domain can **be used is within 1 hour**. If not, you need to **wait for a period of 48 hours to 72 hours.** You can check the status of your domain propagation through the link we provided ()
## Set up a Custom Domain in Shoppego
1. Log into **Dashboard Shoppego** -> **Settings** -> **Custom Domain** -> **Add existing domain**
2. **Enter the domain name** **without**** www** that you purchased earlier.
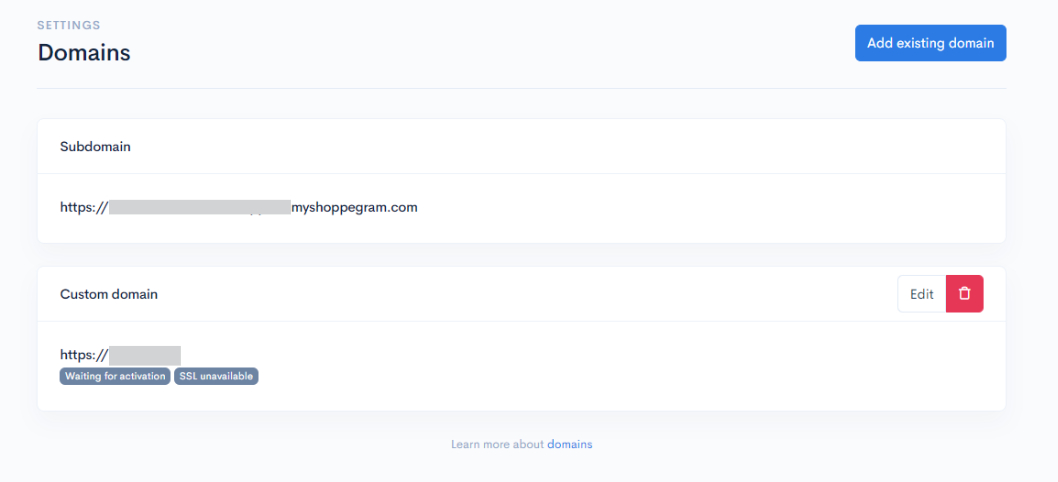
3. When you have successfully entered your domain, the display will change as below:
{% hint style="info" %}
\*\***Note**: If there are **no issues**, the team will take **5-10 minutes to activate your domain**. If your domain still isn't activated within this timeframe, please contact our team.
{% endhint %}
4. If your Custom domain is ready and usable, the following example display will appear.
{% hint style="success" %}
The words **Connected** and **SSL activated** will be green. This situation will only happen if all the settings that have been done above are correct.
{% endhint %}
### Automatic SSL
In Shoppego, each custom domain will also be given SSL automatically without the need to buy at the domain provider. It is enough to just buy a regular domain and Shoppego will provide an SSL certificate for each domain.
When SSL has been successfully entered into your Custom domain, the HTTP protocol will switch to HTTPS automatically.
{% hint style="info" %}
'S' means 'secure', and now a 'padlock' icon will appear on the browser indicating that your website is secure to all buyers. as in the picture
{% endhint %}