> For the complete documentation index, see [llms.txt](https://docs.shoppego.my/tutorials/llms.txt). Markdown versions of documentation pages are available by appending `.md` to page URLs; this page is available as [Markdown](https://docs.shoppego.my/tutorials/en/settings/custom-domain/shinjiru-domain.my.md).

# Shinjiru (Domain.my)

There are 6 parts required for setting up a .com.my domain:

* **Part 1** : CNAME Record Value
* **Part 2**: Purchase Domain from Shinjiru
* **Part 3**: Identity Verification
* **Part 4**: Cloudflare Registration
* **Part 5**: Setting up **Cloudflare Nameservers** in **MYNIC** .
* **Part 6**: Configuration in Shoppego

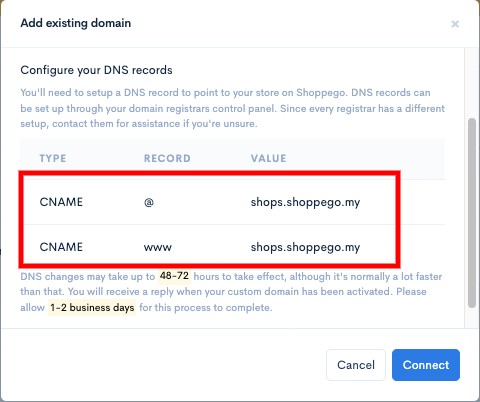
**Starting February 26, 2026, every Shoppego user only need to do a CNAME record and every store/website will have the same CNAME record value/setting.**

## Part 1: CNAME Record Value

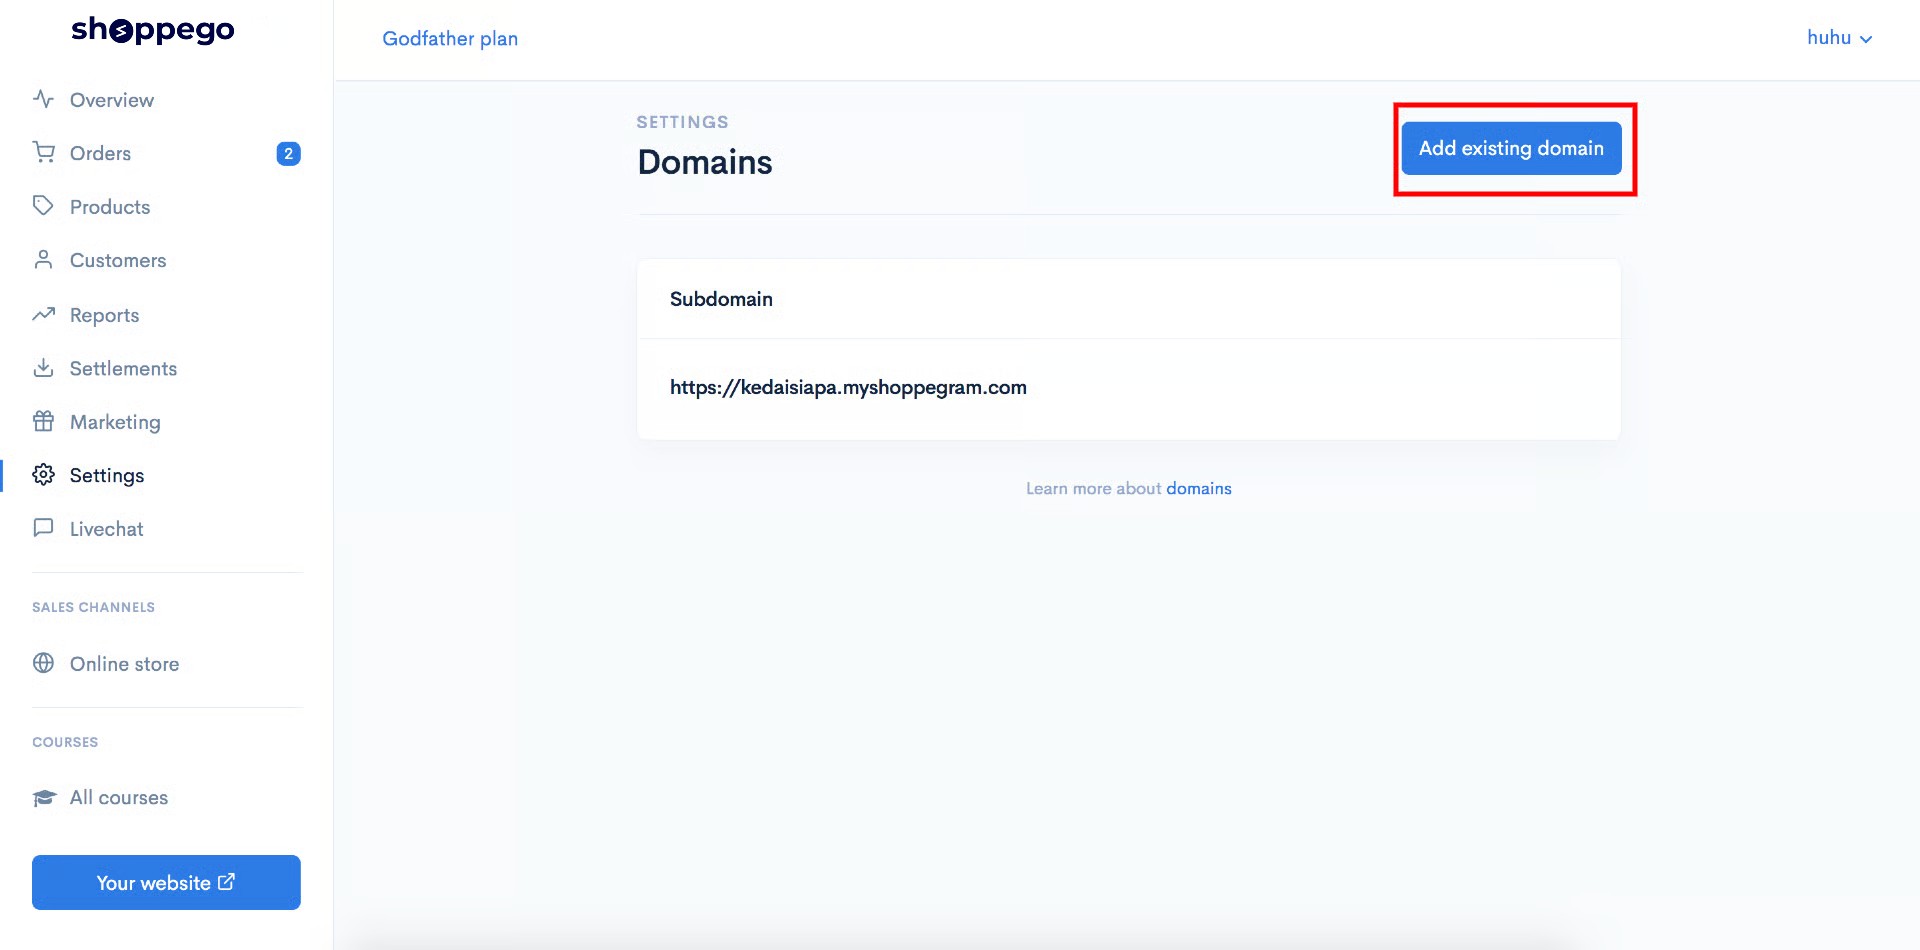
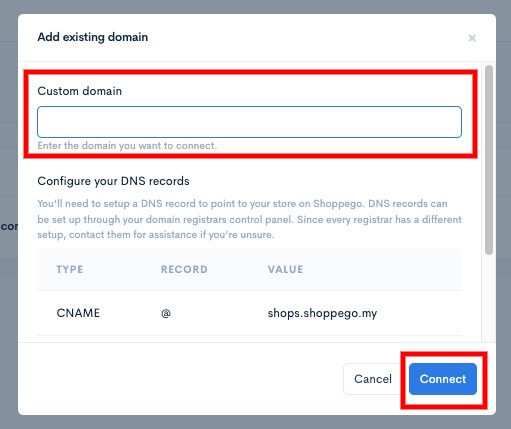
1. To obtain the **values of A and CNAME Records** in Shoppego, you simply need to go to:

**Dashboard Overview -> Settings -> Custom Domain -> Add Existing Domain.**

{% hint style="info" %}
You need to **save** the **Value for CNAME record** for you to enter in your domain's DNS record in the domain provider's system later.
{% endhint %}

<figure><img src="https://3359028955-files.gitbook.io/~/files/v0/b/gitbook-x-prod.appspot.com/o/spaces%2F-Lh09fNwqqta5Vj6Wr8p%2Fuploads%2Fgit-blob-a6360979ea3dd44ca65b2b129bb5aceb1d94149f%2FewURFbN3hwGkPB6KWkmL.jpg?alt=media" alt=""><figcaption></figcaption></figure>

## Part 2: Purchasing a Domain from Shinjiru

1. To **purchase** a domain from Shinjiru, you can go to this link: <https://www.shinjiru.com.my/>.

<figure><img src="https://3359028955-files.gitbook.io/~/files/v0/b/gitbook-x-prod.appspot.com/o/spaces%2F-Lh09fNwqqta5Vj6Wr8p%2Fuploads%2Fgit-blob-c0448582a2d2def6dc694db2d14701dbb0eeace4%2FN4mQbYg68NjTSz8yFB4F.png?alt=media" alt=""><figcaption></figcaption></figure>

## Part 3: Identity Verification

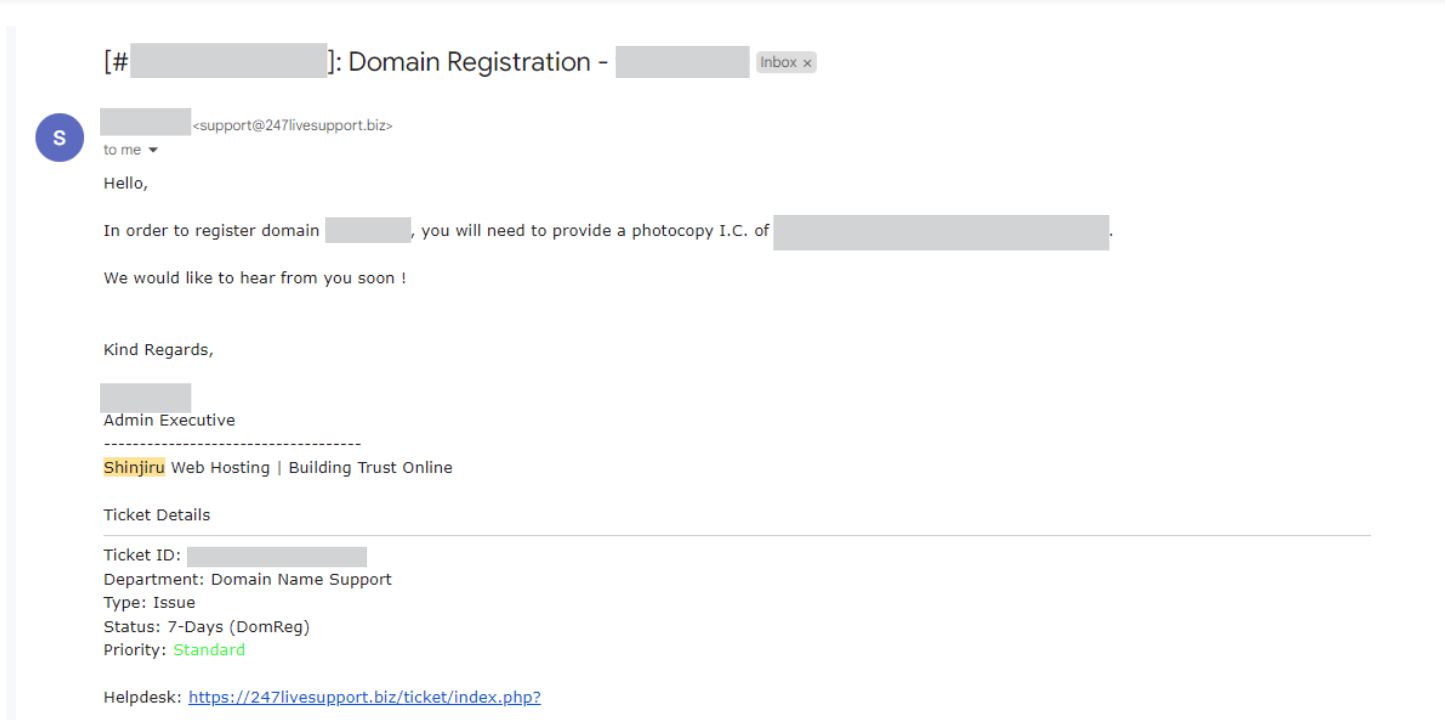
1. After purchasing the domain, Shinjiru will send you an email **requesting identity verification** such as an **identification card (IC)** picture as shown below.

<figure><img src="https://3359028955-files.gitbook.io/~/files/v0/b/gitbook-x-prod.appspot.com/o/spaces%2F-Lh09fNwqqta5Vj6Wr8p%2Fuploads%2Fgit-blob-ffddc67e409ce0930eb80c650726053249cc29ae%2FlKO324JFpzFXcNQn74NI.jpg?alt=media" alt=""><figcaption></figcaption></figure>

{% hint style="info" %} <mark style="color:red;">\*\*Attention\*\*</mark>: After replying to their email, you \*\*need to wait for 1\\\~2 days for the activation\*\* of your \*\*MYNIC domain registration\*\*.
{% endhint %}

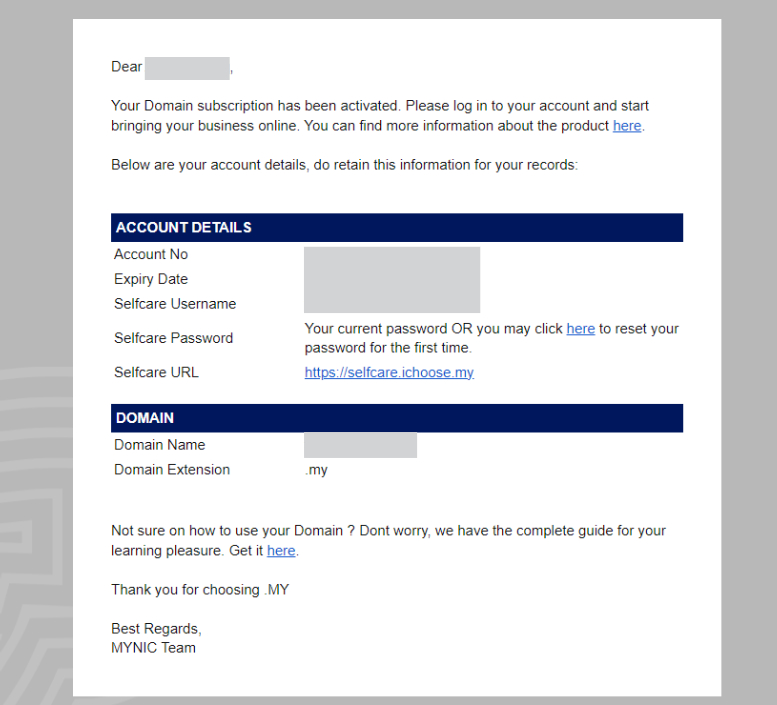
2. After the activation is successfully done, you will **receive information to log in** to your **MYNIC account.**

<figure><img src="https://3359028955-files.gitbook.io/~/files/v0/b/gitbook-x-prod.appspot.com/o/spaces%2F-Lh09fNwqqta5Vj6Wr8p%2Fuploads%2Fgit-blob-fbc0e8a9d324d7bdf07651c99ec454a1b0571947%2F0KcIoVXdOyz3RX82VrA0.jpg?alt=media" alt=""><figcaption></figcaption></figure>

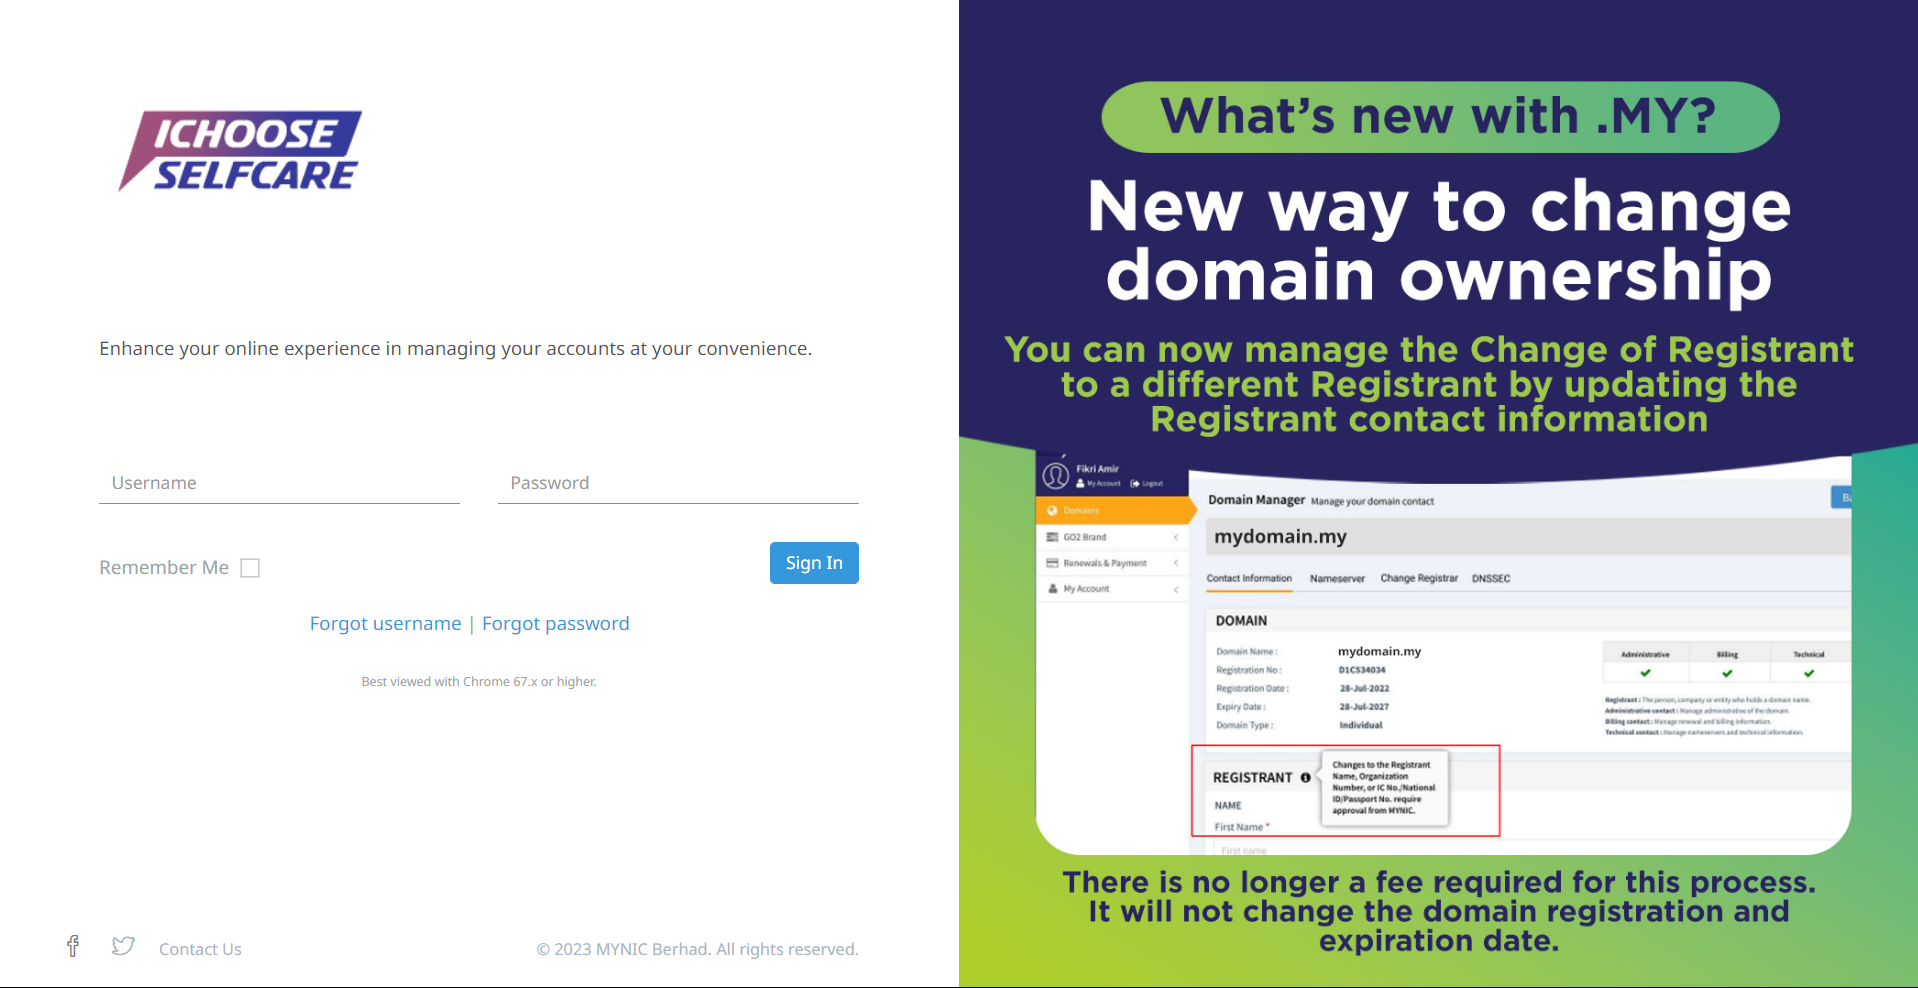
3. After the **activation is successfully done**, you **need to log in** to <https://selfcare.ichoose.my/login> using the given information.

<figure><img src="https://3359028955-files.gitbook.io/~/files/v0/b/gitbook-x-prod.appspot.com/o/spaces%2F-Lh09fNwqqta5Vj6Wr8p%2Fuploads%2Fgit-blob-cafec9b32fac6f4f5c3533e70db84c7691c19b0f%2F3zcFSfRZ9C2zJhOSmLYA.png?alt=media" alt=""><figcaption></figcaption></figure>

## Part 4: Cloudflare Registration

1. To **register for Cloudflare**, you can go to this link: <https://www.cloudflare.com/> and click on the **Sign Up** button.

<figure><img src="https://3359028955-files.gitbook.io/~/files/v0/b/gitbook-x-prod.appspot.com/o/spaces%2F-Lh09fNwqqta5Vj6Wr8p%2Fuploads%2Fgit-blob-1acfa51bd03cfa6c848881f853d010a2d37f7a59%2F9v0tpEcQxHN8how4P8yB.jpg?alt=media" alt=""><figcaption></figcaption></figure>

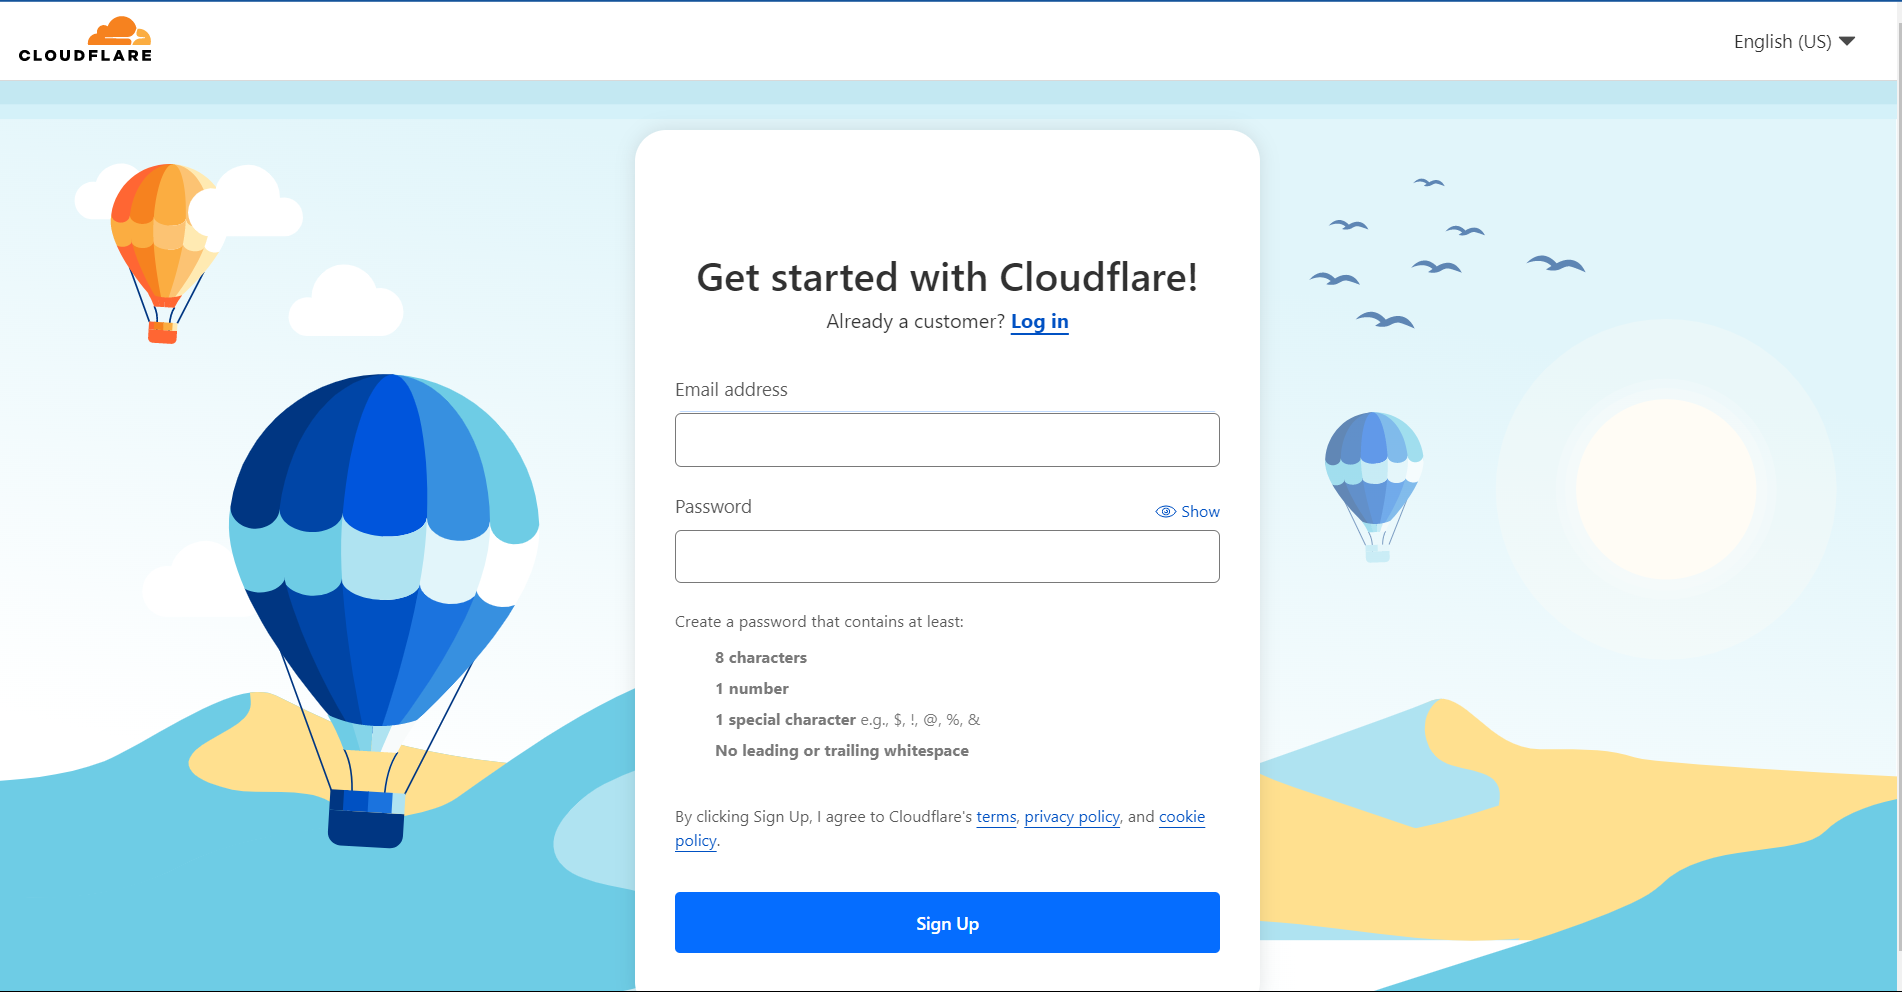
2. After that, you **can enter your Email Address** and **Password**, then **click the Sign Up** button. After that, you can **log in to your Cloudflare account**.

<figure><img src="https://3359028955-files.gitbook.io/~/files/v0/b/gitbook-x-prod.appspot.com/o/spaces%2F-Lh09fNwqqta5Vj6Wr8p%2Fuploads%2Fgit-blob-7db04864676b39c00d07fe49a7095356c201dd25%2FoaphQblC7pNIHzkmzeVm.png?alt=media" alt=""><figcaption></figcaption></figure>

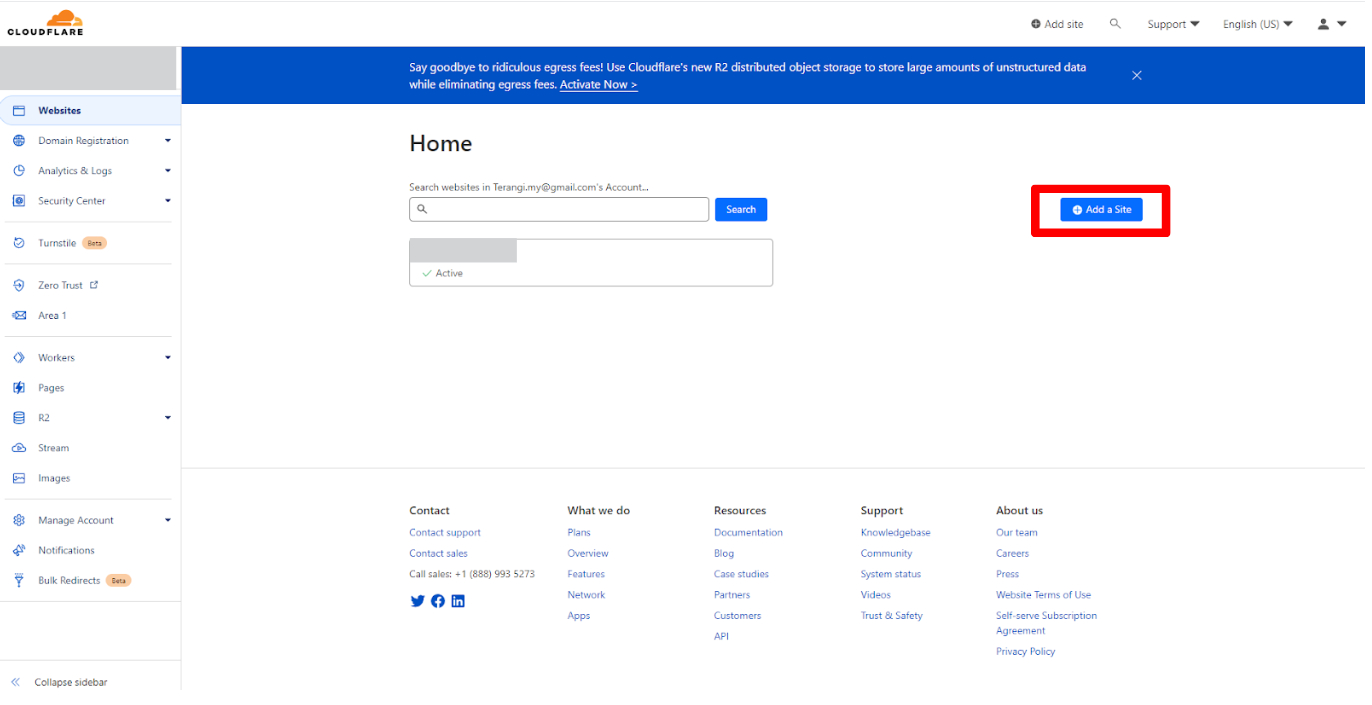
3. After that, click on the **Add Site** button.

<figure><img src="https://3359028955-files.gitbook.io/~/files/v0/b/gitbook-x-prod.appspot.com/o/spaces%2F-Lh09fNwqqta5Vj6Wr8p%2Fuploads%2Fgit-blob-4dd4772b219c0b33c8ea4e3ce984f06a275820da%2Fch2Nc2CqkwGRcHHPSIKc.jpg?alt=media" alt=""><figcaption></figcaption></figure>

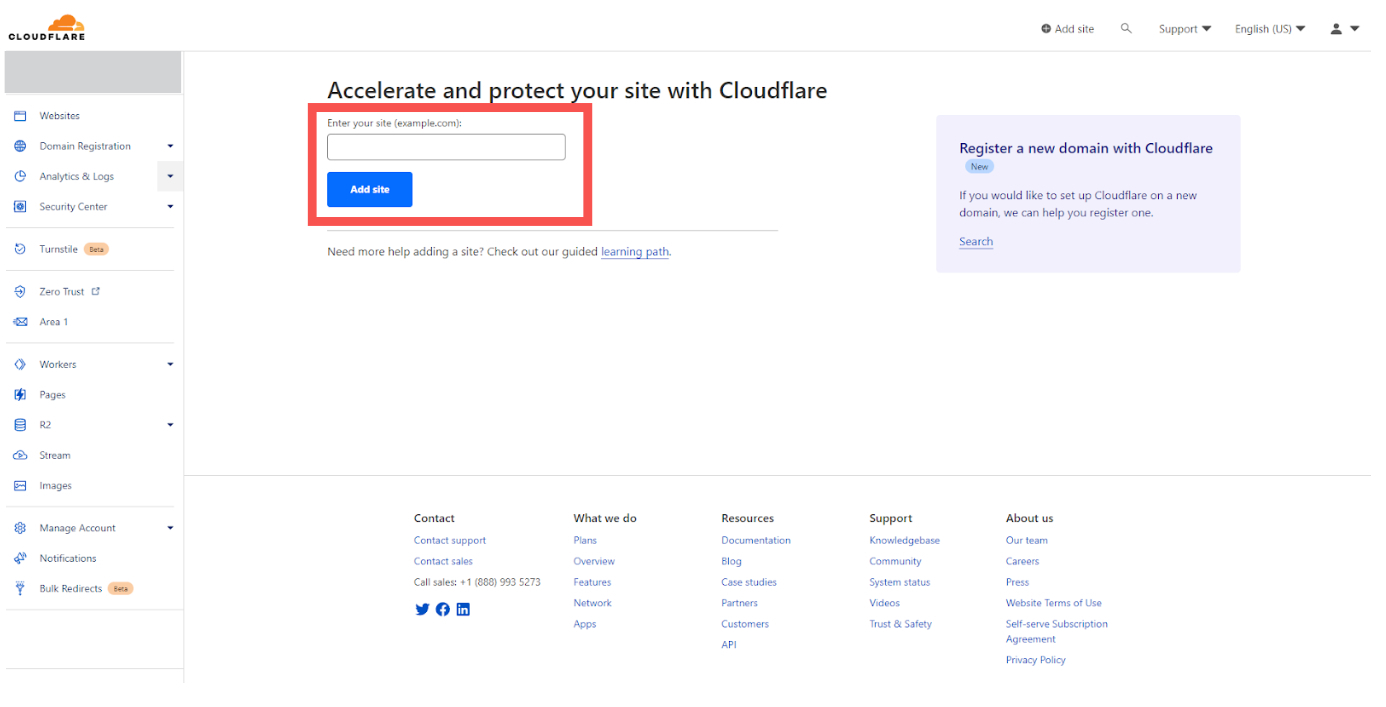
4. Enter the **domain name you have purchased** and **click on the Add Site** button.

<figure><img src="https://3359028955-files.gitbook.io/~/files/v0/b/gitbook-x-prod.appspot.com/o/spaces%2F-Lh09fNwqqta5Vj6Wr8p%2Fuploads%2Fgit-blob-f32346b3110849bbc26d59660546862a0869236f%2FoXEA1JWYx3BRuWpjQBNE.jpg?alt=media" alt=""><figcaption></figcaption></figure>

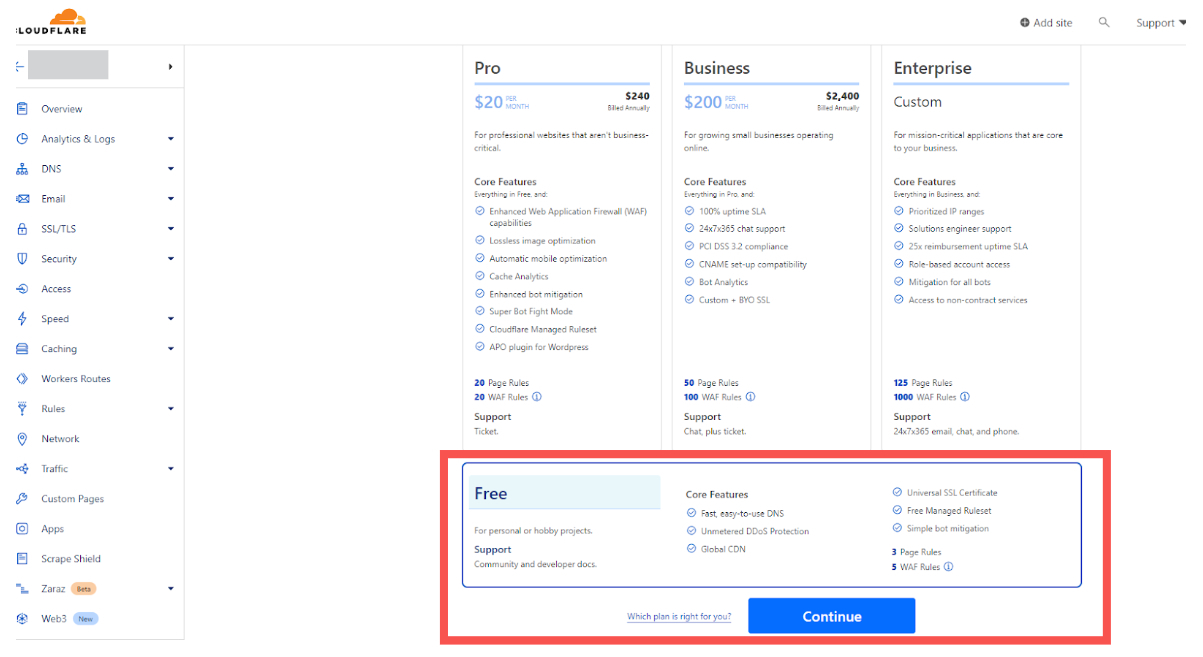
5. After that, you need to click on your **domain name** and **select Free** on the Plan as shown below.

<figure><img src="https://3359028955-files.gitbook.io/~/files/v0/b/gitbook-x-prod.appspot.com/o/spaces%2F-Lh09fNwqqta5Vj6Wr8p%2Fuploads%2Fgit-blob-93aad4941e10a87ca9e2e4ed4eaabe6b20469c78%2FxRgleIXGSsjS39YeIRc9.jpg?alt=media" alt=""><figcaption></figcaption></figure>

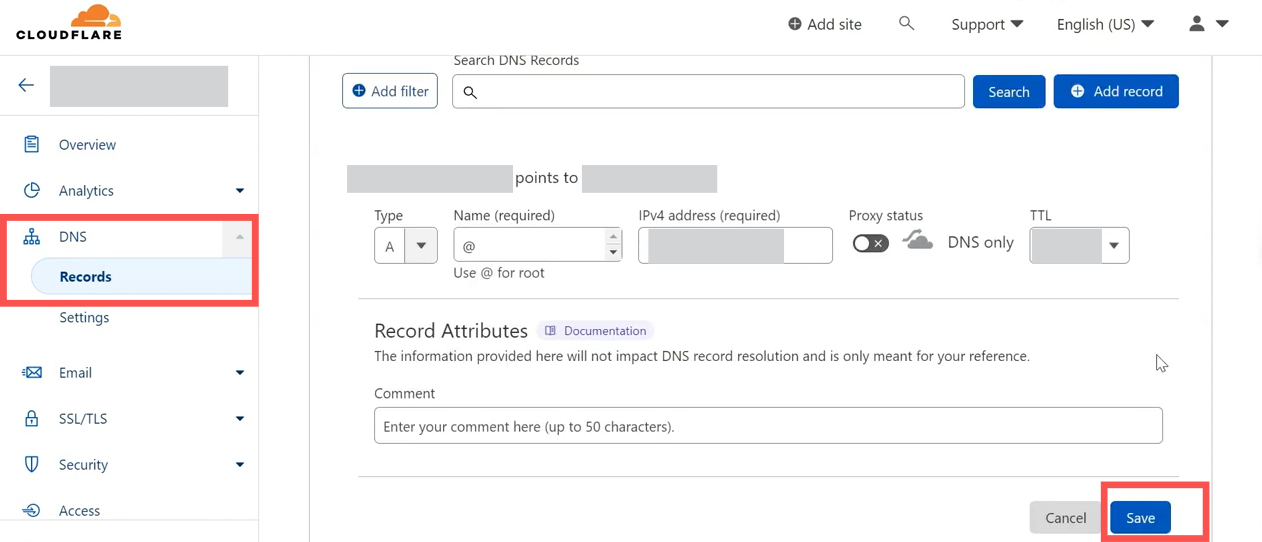
6. After that, you need to **set up DNS** in Cloudflare. You just need to **click on DNS on the left side** and **click on the Record section**.

### 1: Setting up CNAME Record:

1. To set up the CNAME **Record**, you can **select the CNAME dropdown** and enter the following information in the field:

   * **Type**: CNAME
   * **Name**: @ or your own domain name
   * **IPv4 Address**: shops.shoppego.my
   * **Proxy Status**: DNS Only
   * **TTL**: Automatic / 1 Hour

   After you are done, click the **Save** button.

<figure><img src="https://3359028955-files.gitbook.io/~/files/v0/b/gitbook-x-prod.appspot.com/o/spaces%2F-Lh09fNwqqta5Vj6Wr8p%2Fuploads%2Fgit-blob-fc0c0a038dc00c383e436d300cab1ebc46ad1114%2FmNlxA464L0smlicsevum.jpg?alt=media" alt=""><figcaption></figcaption></figure>

### 2: Setting up CNAME www Record(Optional):

2. To set up the **CNAME Record**, you can **select the CNAME dropdown** and enter the following information in the field:

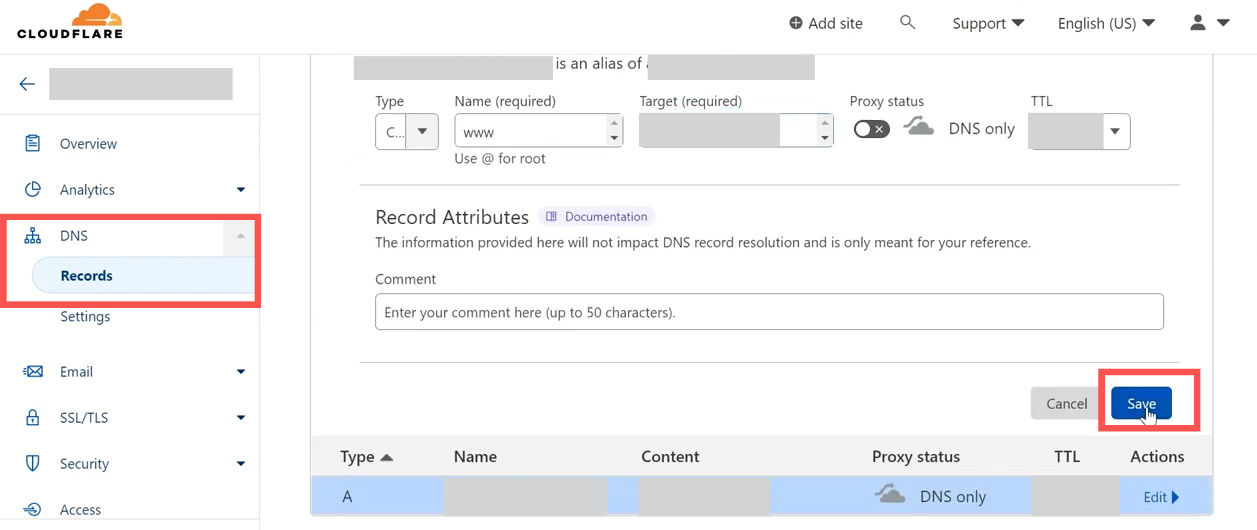
   * **Type**: CNAME
   * **Name**: www
   * **Target**: shops.shoppego.my
   * **Proxy Status**: DNS Only
   * **TTL**: Automatic / 1 Hour

   After you are done, click the **Save** button.

<figure><img src="https://3359028955-files.gitbook.io/~/files/v0/b/gitbook-x-prod.appspot.com/o/spaces%2F-Lh09fNwqqta5Vj6Wr8p%2Fuploads%2Fgit-blob-96b20601b3129b31fe3632b15fb7cc0b959d5c44%2FhBSR4A7HCaF3zdIekBPM.jpg?alt=media" alt=""><figcaption></figcaption></figure>

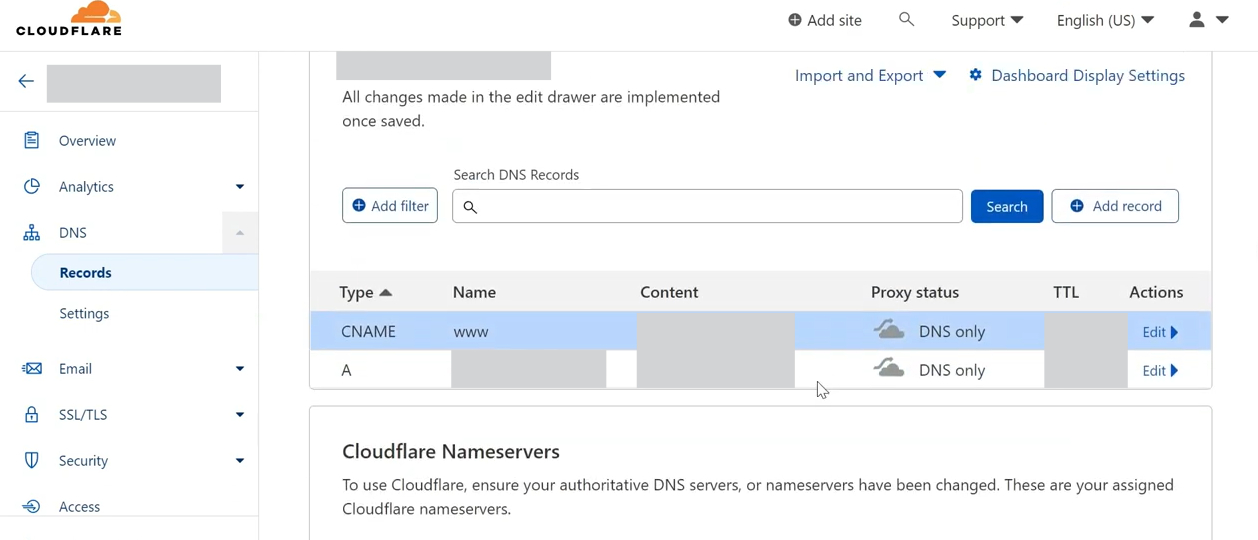
3. After completing the setup, the **display of your DNS** will be as follows:

<figure><img src="https://3359028955-files.gitbook.io/~/files/v0/b/gitbook-x-prod.appspot.com/o/spaces%2F-Lh09fNwqqta5Vj6Wr8p%2Fuploads%2Fgit-blob-aee128fd108bf56b648c2e4bdcc52c445012a343%2FyStptMJ58g0yUSs0fFOK.jpg?alt=media" alt=""><figcaption></figcaption></figure>

### 3: Get Nameservers from Cloudflare:

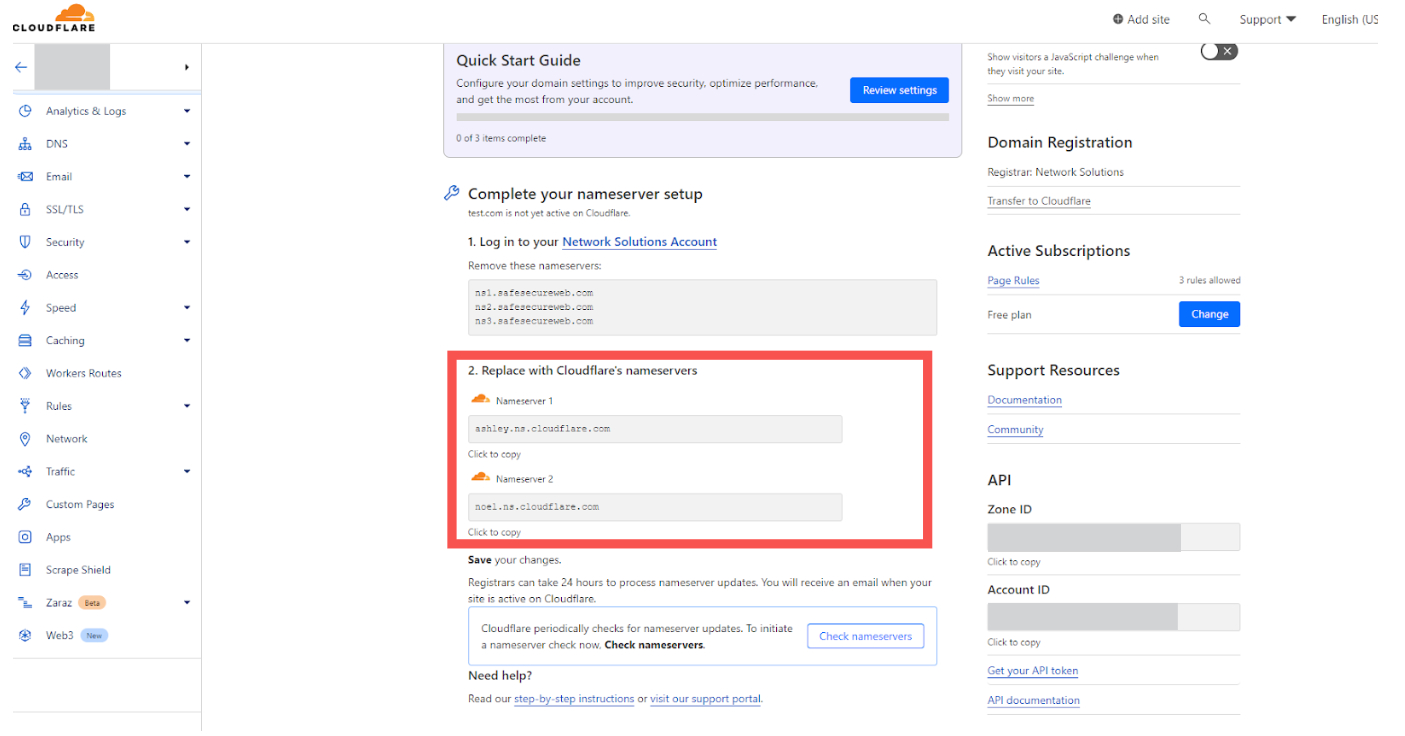
1. On your **Overview** page, you can scroll down to the **section Replace with Cloudflare's Nameserver**. **Copy both nameservers** to be placed in your **MYNIC account.**

<figure><img src="https://3359028955-files.gitbook.io/~/files/v0/b/gitbook-x-prod.appspot.com/o/spaces%2F-Lh09fNwqqta5Vj6Wr8p%2Fuploads%2Fgit-blob-bcea1e1437abcc24d76073782c798b3919754bd3%2F1N0K3fUsnLswZuPuHc7J.jpg?alt=media" alt=""><figcaption></figcaption></figure>

## Part 5: Setting up Cloudflare Nameservers in MYNIC

1. You need to log in to <https://selfcare.ichoose.my/login> using the given information.

<figure><img src="https://3359028955-files.gitbook.io/~/files/v0/b/gitbook-x-prod.appspot.com/o/spaces%2F-Lh09fNwqqta5Vj6Wr8p%2Fuploads%2Fgit-blob-cafec9b32fac6f4f5c3533e70db84c7691c19b0f%2F3zcFSfRZ9C2zJhOSmLYA.png?alt=media" alt=""><figcaption></figcaption></figure>

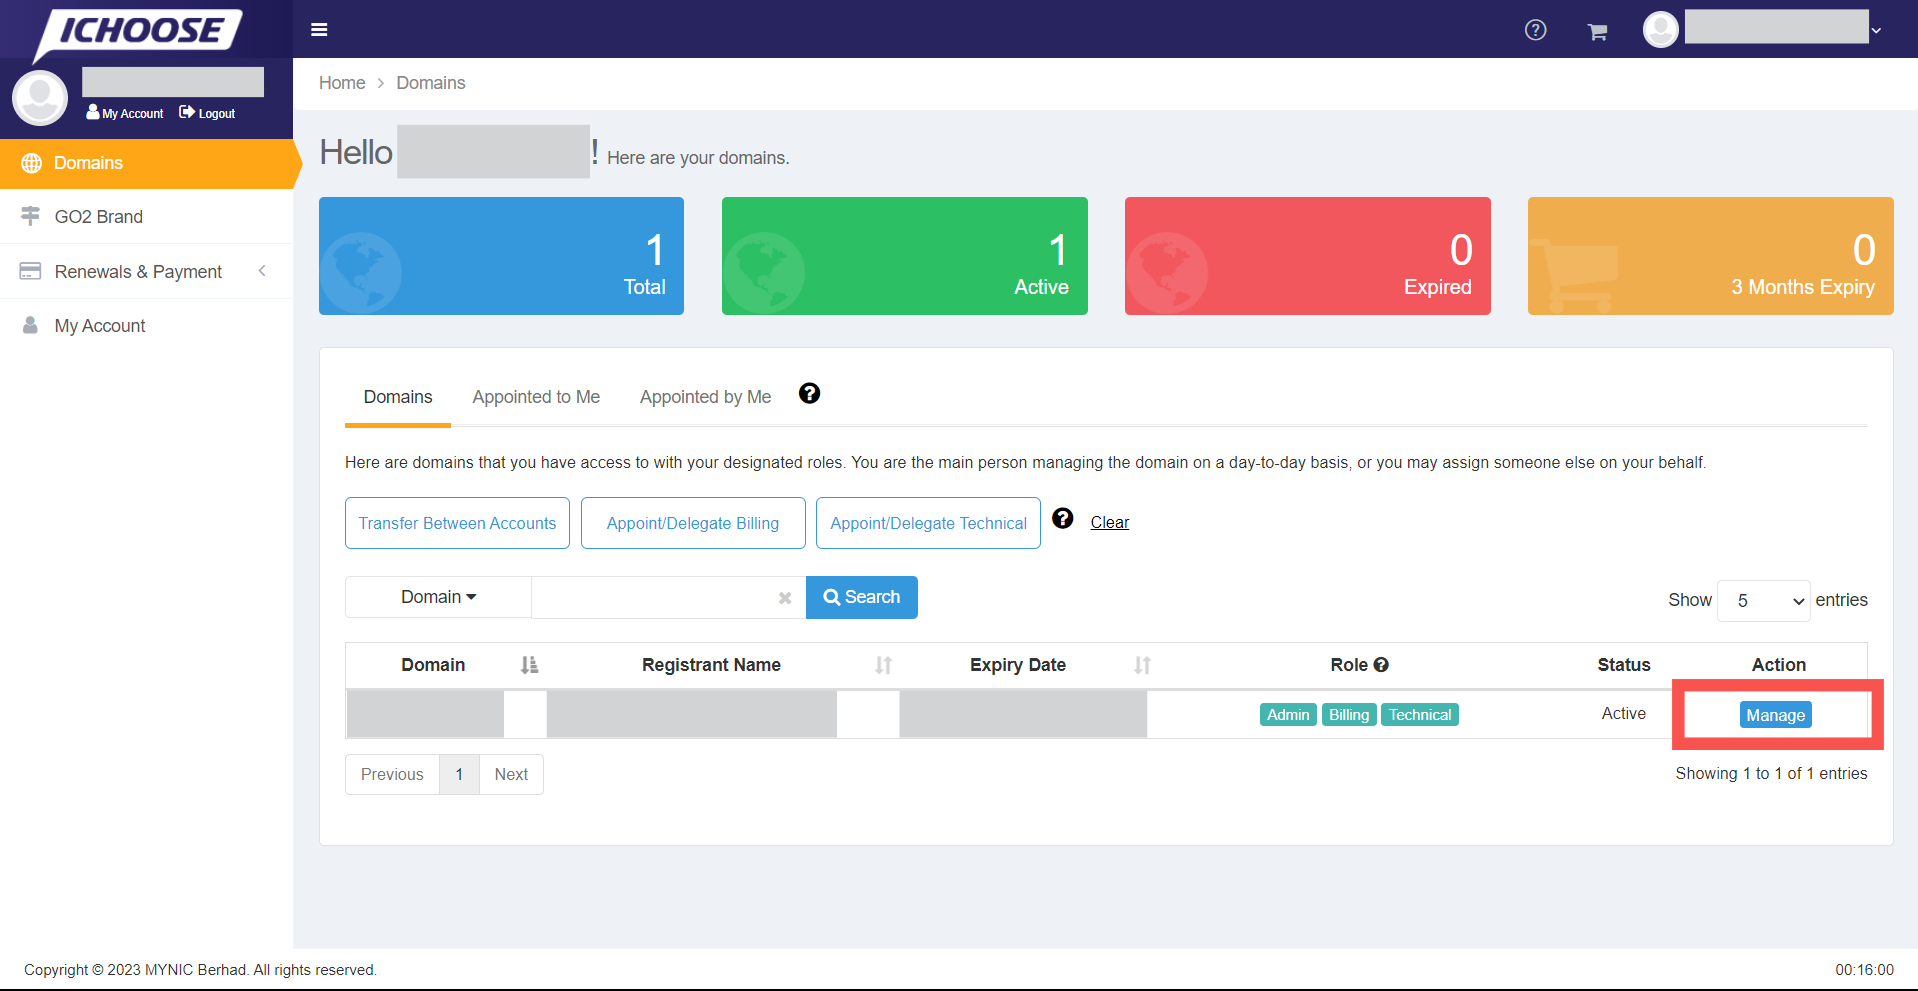
2. After that, you need to click on the **Manage** button.

<figure><img src="https://3359028955-files.gitbook.io/~/files/v0/b/gitbook-x-prod.appspot.com/o/spaces%2F-Lh09fNwqqta5Vj6Wr8p%2Fuploads%2Fgit-blob-b144834f8155b9957f5fca9cb9d97b4d53ebaf65%2Fxjm7eyBmiQRXgy9lmfT8.jpg?alt=media" alt=""><figcaption></figcaption></figure>

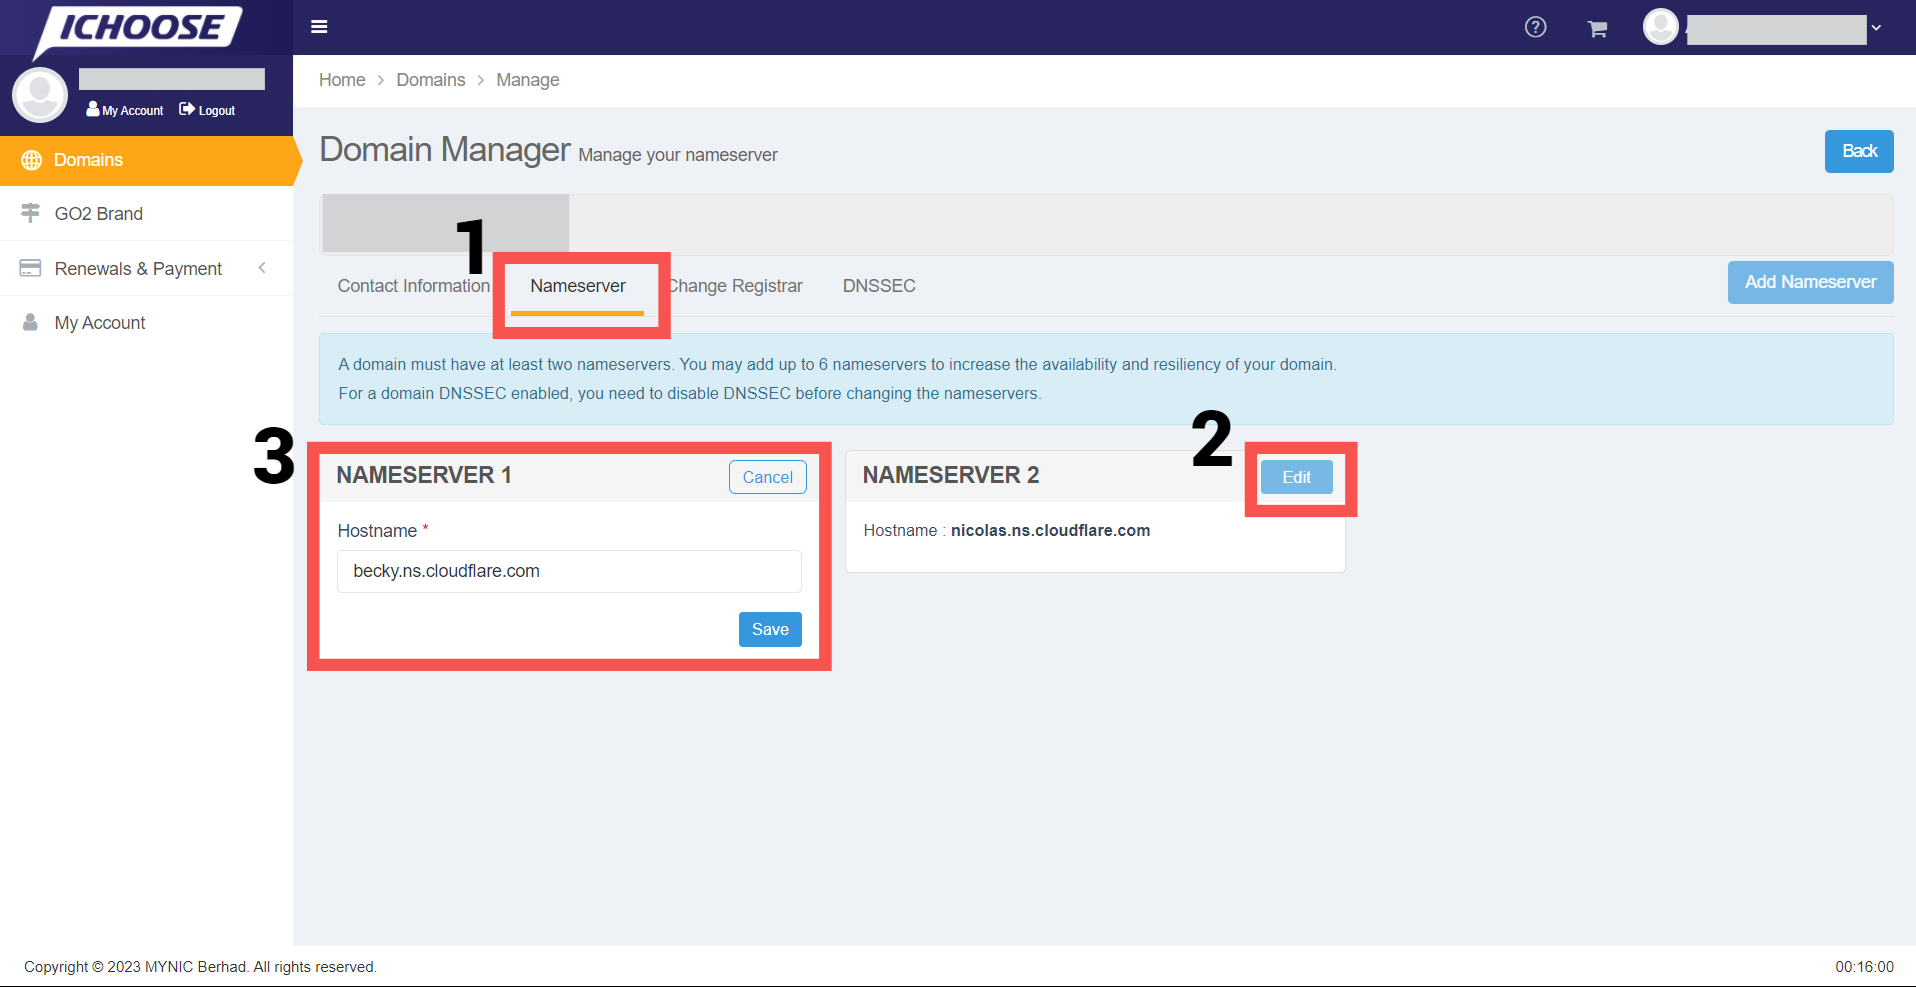
3. After that, you need to click on the Manage button. Then, go to **Nameservers (1)**, click on **Edit (2)** and **enter both Nameservers (3)** that have **been copied from Cloudflare**. You need to click on **Save** button to save the settings that have been made.

<figure><img src="https://3359028955-files.gitbook.io/~/files/v0/b/gitbook-x-prod.appspot.com/o/spaces%2F-Lh09fNwqqta5Vj6Wr8p%2Fuploads%2Fgit-blob-b2b946736132fb32a0c163fa654544a3e56026ba%2FlwppgUbnJoSUL2ydm2jN.jpg?alt=media" alt=""><figcaption></figcaption></figure>

## Propagation Period

You only need to wait for a <mark style="color:red;">**period of 48 hours**</mark> for the setting to be read and your domain can be used before you make a Custom domain setting in Shoppego.

The shortest time your domain can **be used is within 1 hour**. If not, you need to <mark style="color:red;">**wait for a period of 48 hours to 72 hours.**</mark> You can check the status of your domain propagation through the link we provided (<https://www.whatsmydns.net/>)

## Additional information:

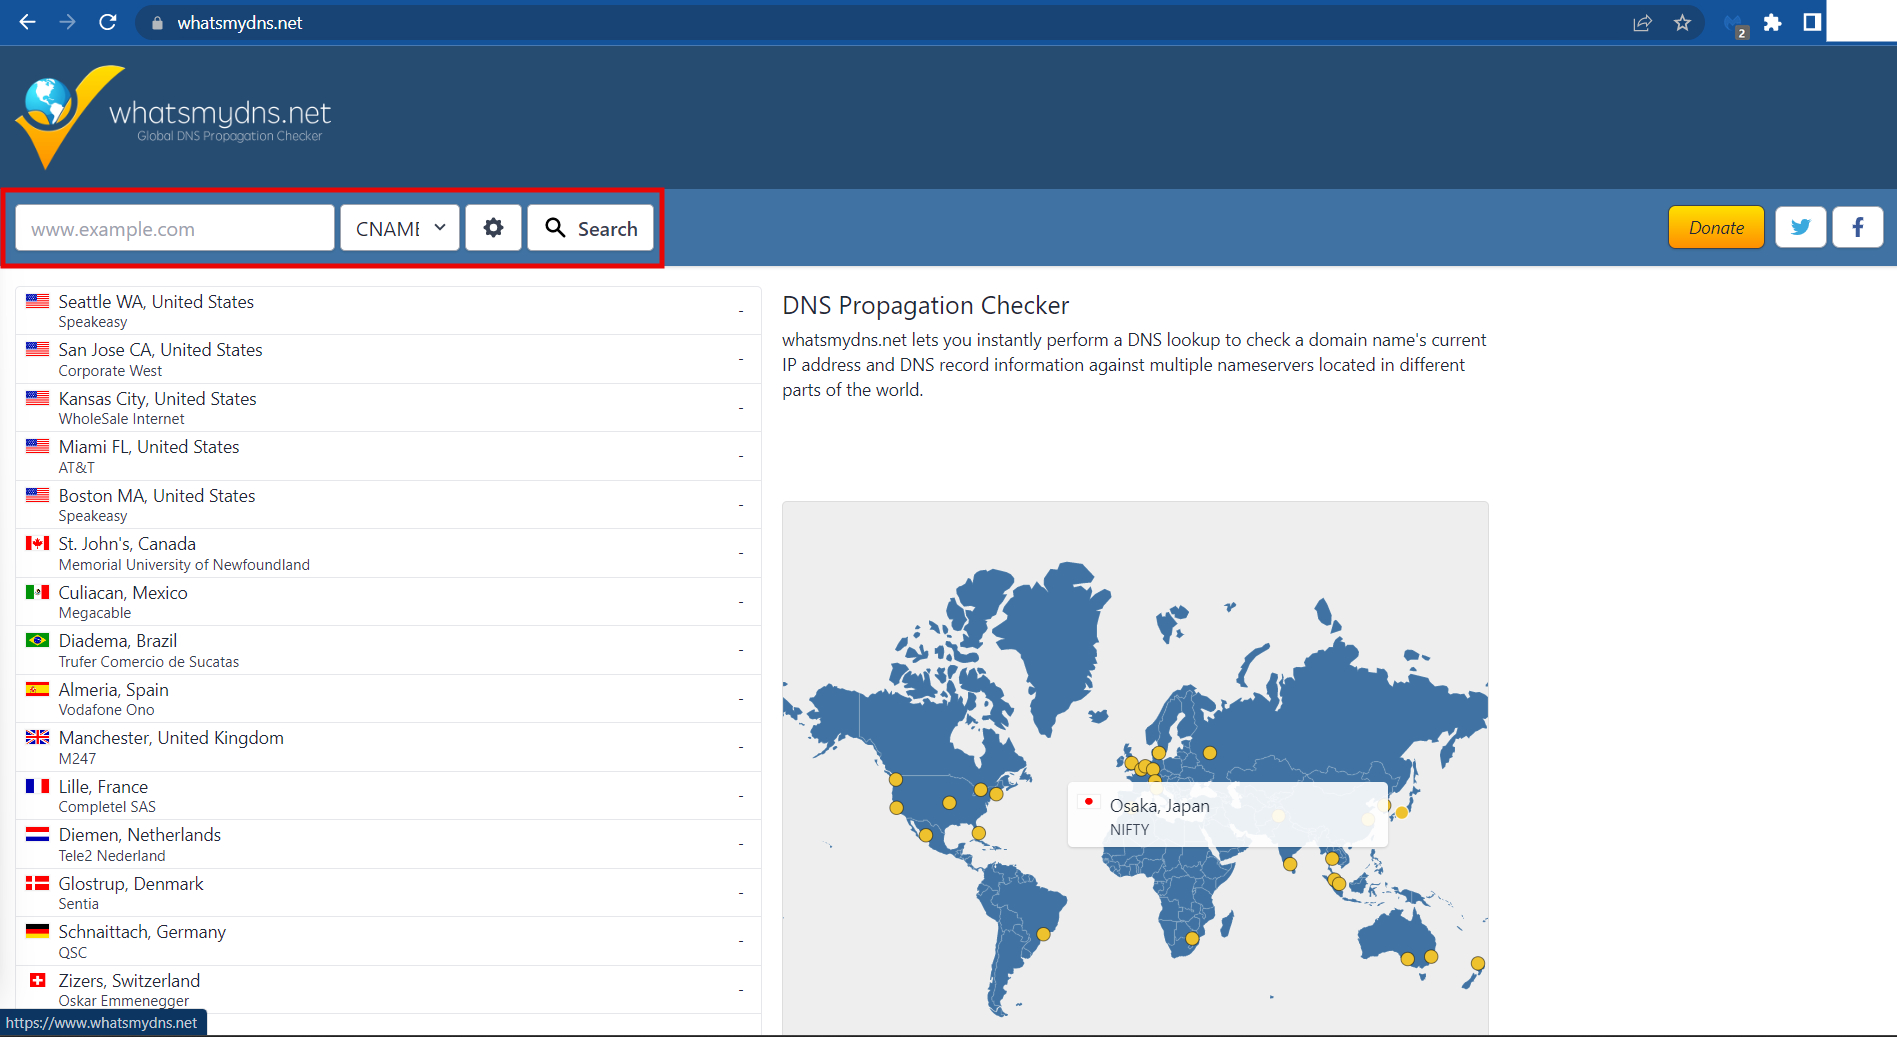
﻿To ensure that your DNS is directed to Shoppego, you can [Check your DNS Here ](https://www.whatsmydns.net/)and make sure the **DNS displayed is the one you have set**.

1. To check your DNS: You can click this link: Check your [**DNS here**](https://www.whatsmydns.net/) or <https://www.whatsmydns.net/>

{% hint style="info" %}
You can enter your **domain name** (with <mark style="color:red;">www</mark> and **without www**) in the space provided. Make sure you have made the changes to the CNAME record check.
{% endhint %}

<figure><img src="https://3359028955-files.gitbook.io/~/files/v0/b/gitbook-x-prod.appspot.com/o/spaces%2F-Lh09fNwqqta5Vj6Wr8p%2Fuploads%2Fgit-blob-867029bb858e121f109f1ad29a9fcae54cfd8b60%2FCrQgoaGRS5ABXprQaxE5.jpg?alt=media" alt=""><figcaption></figcaption></figure>

## Part 6: Configuration in Shoppego

1. In the **Shoppego dashboard**, click on **Settings (1)** and scroll down to **Custom Domain (2).**

<figure><img src="https://3359028955-files.gitbook.io/~/files/v0/b/gitbook-x-prod.appspot.com/o/spaces%2F-Lh09fNwqqta5Vj6Wr8p%2Fuploads%2Fgit-blob-6f20b7c680fe951e04e92357261a5ad56b9cd083%2FrkJDVGfqLTo3sj7i9kCn.jpg?alt=media" alt=""><figcaption></figcaption></figure>

2. After that, click on **Add Existing Domain**.

<figure><img src="https://3359028955-files.gitbook.io/~/files/v0/b/gitbook-x-prod.appspot.com/o/spaces%2F-Lh09fNwqqta5Vj6Wr8p%2Fuploads%2Fgit-blob-678c329f6ecb362a0128329e11faa5bf81e365a8%2F0825t9R6BEsAXRrv5UZn.jpg?alt=media" alt=""><figcaption></figcaption></figure>

3. **Enter the domain name** that you purchased earlier.

<figure><img src="https://3359028955-files.gitbook.io/~/files/v0/b/gitbook-x-prod.appspot.com/o/spaces%2F-Lh09fNwqqta5Vj6Wr8p%2Fuploads%2Fgit-blob-14a5a994854415ec3cfab3630481598c004d27e7%2FZCtFRdcw1oog2Y893cKW.jpg?alt=media" alt=""><figcaption></figcaption></figure>

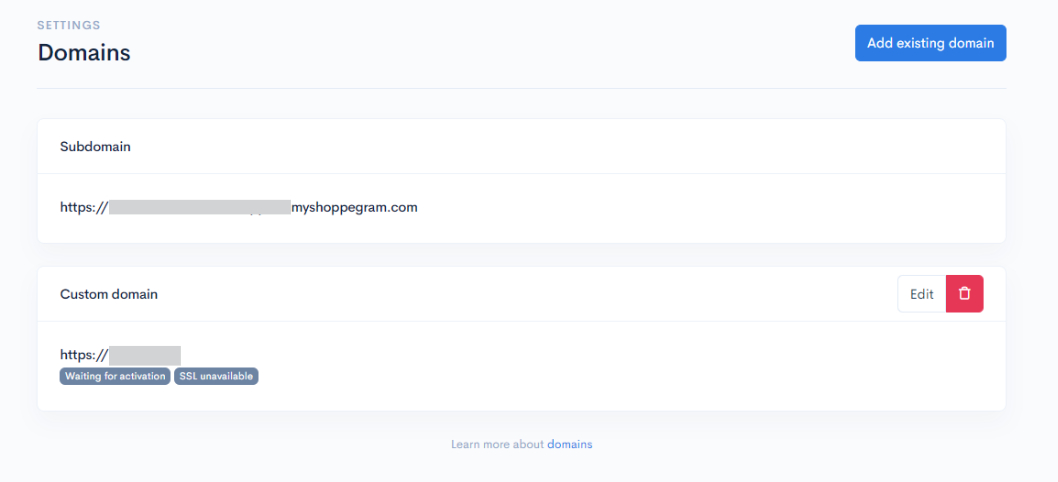
4. When you have successfully entered your domain, the display will change as below:

{% hint style="info" %}
\*\*<mark style="color:red;">**Note**</mark>: If there are **no issues**, the team will take **5-10 minutes to activate your domain**. If your domain still isn't activated within this timeframe, please contact our team.
{% endhint %}

<figure><img src="https://3359028955-files.gitbook.io/~/files/v0/b/gitbook-x-prod.appspot.com/o/spaces%2F-Lh09fNwqqta5Vj6Wr8p%2Fuploads%2Fgit-blob-79e21aba59be2acb52de88674da3a66492250eea%2FOxA9xwgku7giuleysijh.jpg?alt=media" alt=""><figcaption></figcaption></figure>

5. If your **Custom Domain** is **ready** and **can be used**, an example display like the following will appear.

{% hint style="success" %}
The words "**Connected**" and "**SSL activated**" will turn <mark style="color:green;">**green**</mark>. This condition will only occur if all the **settings that have been made are correct.**
{% endhint %}
<figure><img src="https://3359028955-files.gitbook.io/~/files/v0/b/gitbook-x-prod.appspot.com/o/spaces%2F-Lh09fNwqqta5Vj6Wr8p%2Fuploads%2Fgit-blob-18d0f8832efe0cde5025a10649eb68f76255bc54%2FX85NI3O093W3eevMgOSb.jpg?alt=media" alt=""><figcaption></figcaption></figure>