> For the complete documentation index, see [llms.txt](https://docs.shoppego.my/tutorials/llms.txt). Markdown versions of documentation pages are available by appending `.md` to page URLs; this page is available as [Markdown](https://docs.shoppego.my/tutorials/en/settings/mcp.md).

# MCP

Shoppego now allows you to connect Claude or ChatGPT to your store, enabling it to create and manage your pages, forms, themes and products.

The MCP connector URL for your store is as follows: https\://\[namasubdomain].myshoppegram.com/mcp

## On this page:

* [Settings on Shoppego](#settings-on-shoppego)
* [Connecting ChatGPT](#connecting-chatgpt)
* [How to use it on ChatGPT](#how-to-use-it-on-chatgpt)
* [Connecting Claude](#connecting-claude)
* [Additional information](#additional-information)

## Settings on Shoppego

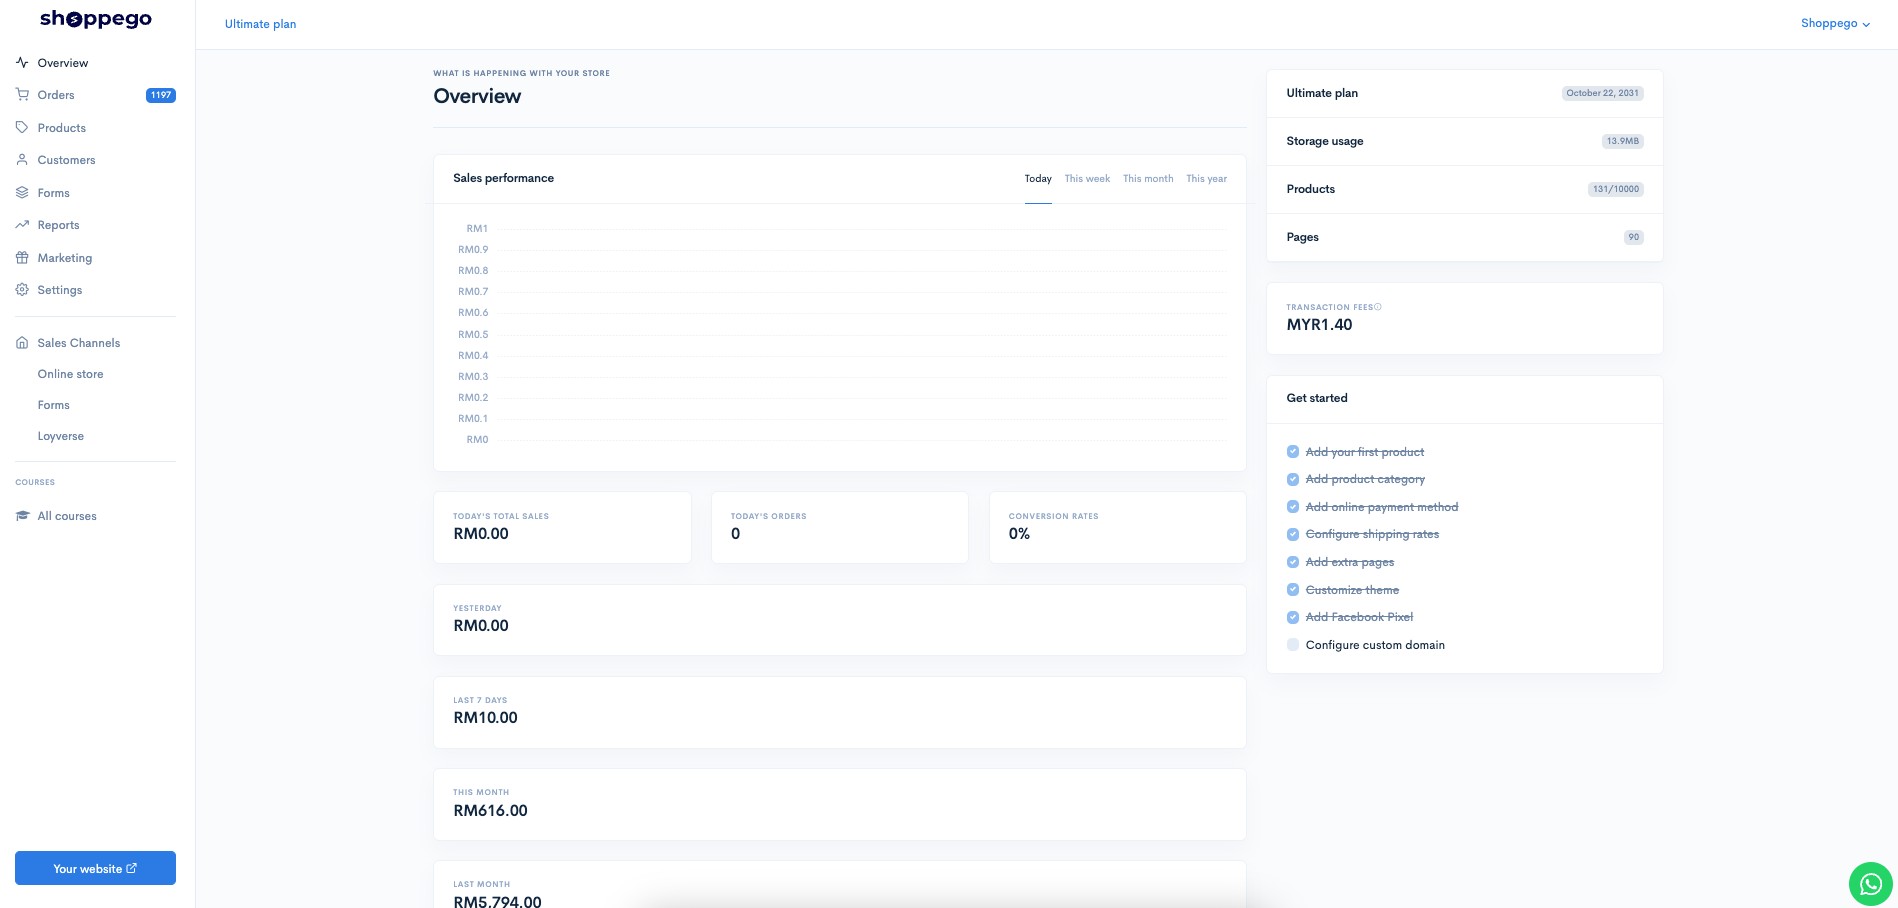
1. Log in to the Shoppego dashboard

<figure><img src="https://3359028955-files.gitbook.io/~/files/v0/b/gitbook-x-prod.appspot.com/o/spaces%2F-Lh09fNwqqta5Vj6Wr8p%2Fuploads%2Fgit-blob-b853fc0189b34fb1d3990f5b1f53fa71deb9d384%2FlCN7aw3FznaFFoOAyya2.jpg?alt=media" alt=""><figcaption></figcaption></figure>

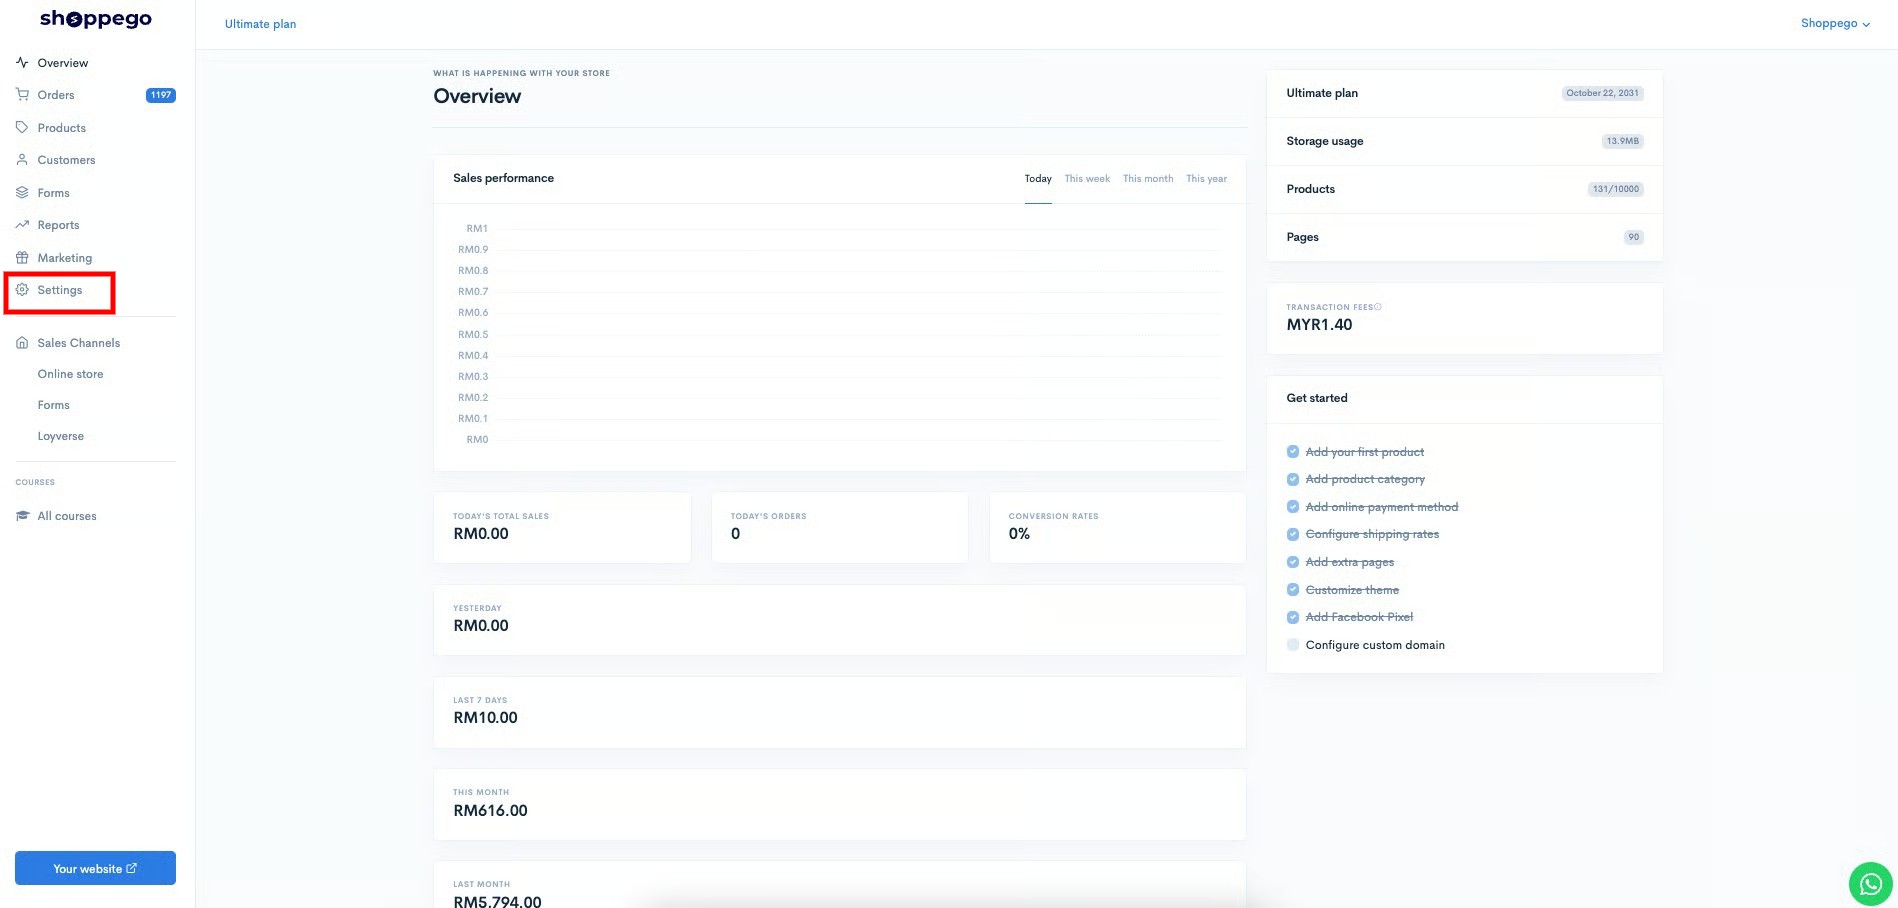
2. Click on **Settings**

<figure><img src="https://3359028955-files.gitbook.io/~/files/v0/b/gitbook-x-prod.appspot.com/o/spaces%2F-Lh09fNwqqta5Vj6Wr8p%2Fuploads%2Fgit-blob-9ae8b66b366958146673b78216b78ff0e8f12b90%2FVsK9zs6aZtUfKK1hcCiM.jpg?alt=media" alt=""><figcaption></figcaption></figure>

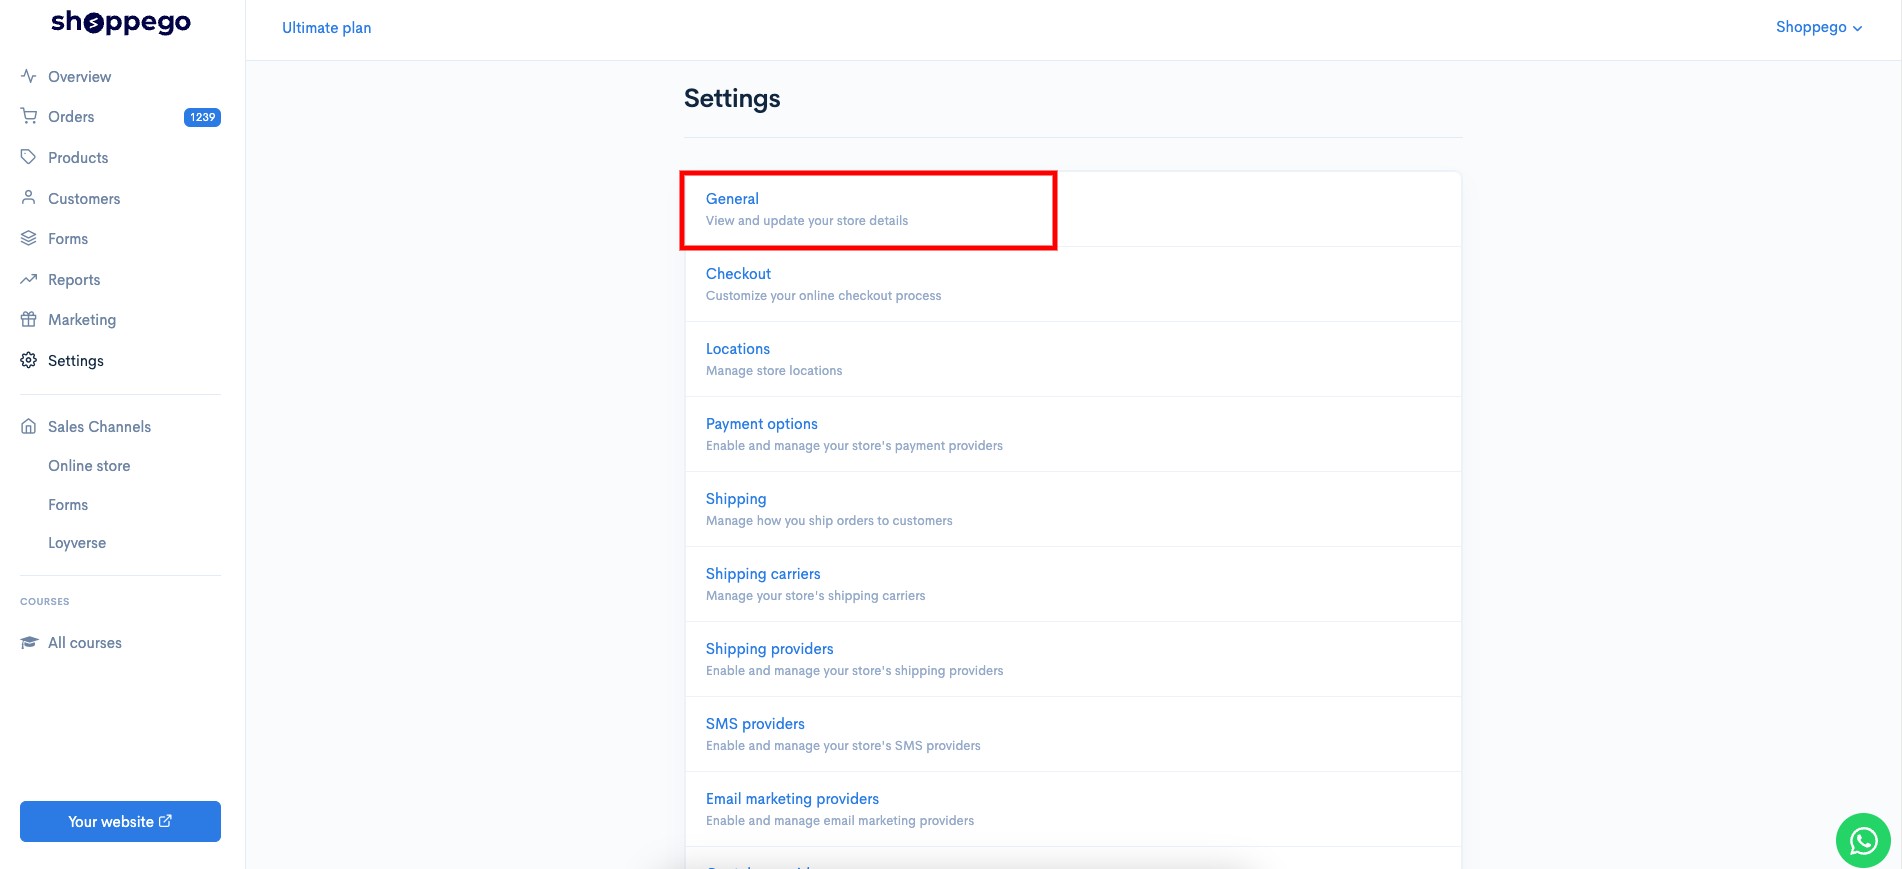
3. Click on **General**

<figure><img src="https://3359028955-files.gitbook.io/~/files/v0/b/gitbook-x-prod.appspot.com/o/spaces%2F-Lh09fNwqqta5Vj6Wr8p%2Fuploads%2Fgit-blob-996b1339523fecd9bcf84b27a26606e2b0c99aa7%2FanealodqyXwHTuzr4AHU.jpg?alt=media" alt=""><figcaption></figcaption></figure>

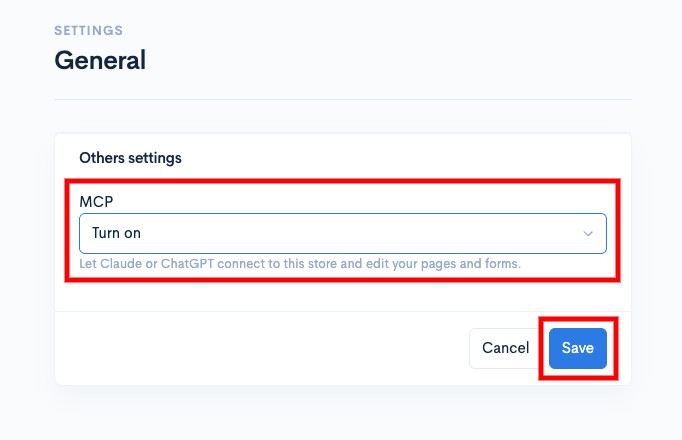
4. Change the MCP setting to "**On**" and **Save** the setting

<figure><img src="https://3359028955-files.gitbook.io/~/files/v0/b/gitbook-x-prod.appspot.com/o/spaces%2F-Lh09fNwqqta5Vj6Wr8p%2Fuploads%2Fgit-blob-cced73d9867d6737591e5c332aaff71a2212bc52%2FdfRI2hqzuLf6EyxwnvAV.jpg?alt=media" alt=""><figcaption></figcaption></figure>

## Connecting ChatGPT

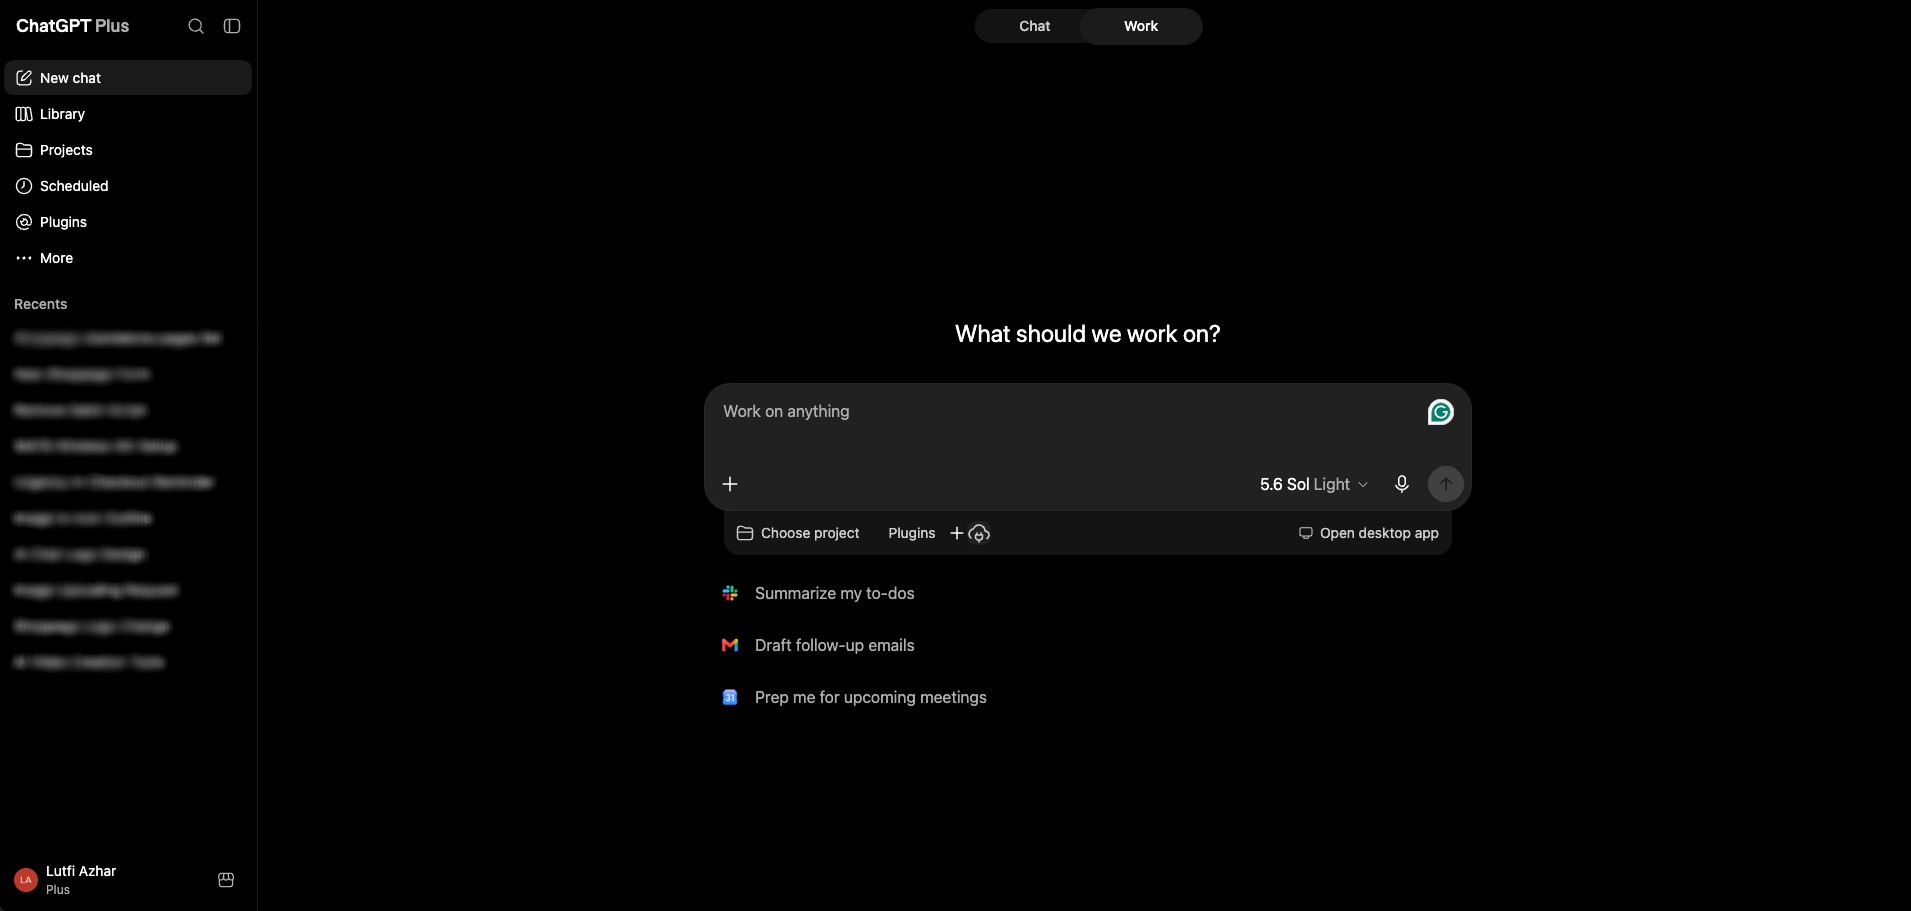
1. Log in to your ChatGPT account.

<figure><img src="https://3359028955-files.gitbook.io/~/files/v0/b/gitbook-x-prod.appspot.com/o/spaces%2F-Lh09fNwqqta5Vj6Wr8p%2Fuploads%2Fgit-blob-15748bf51fb81f55ef1a3ec224b5e99926ca9c96%2FNH2OL0cNlf1BRWmnrYsw.jpg?alt=media" alt=""><figcaption></figcaption></figure>

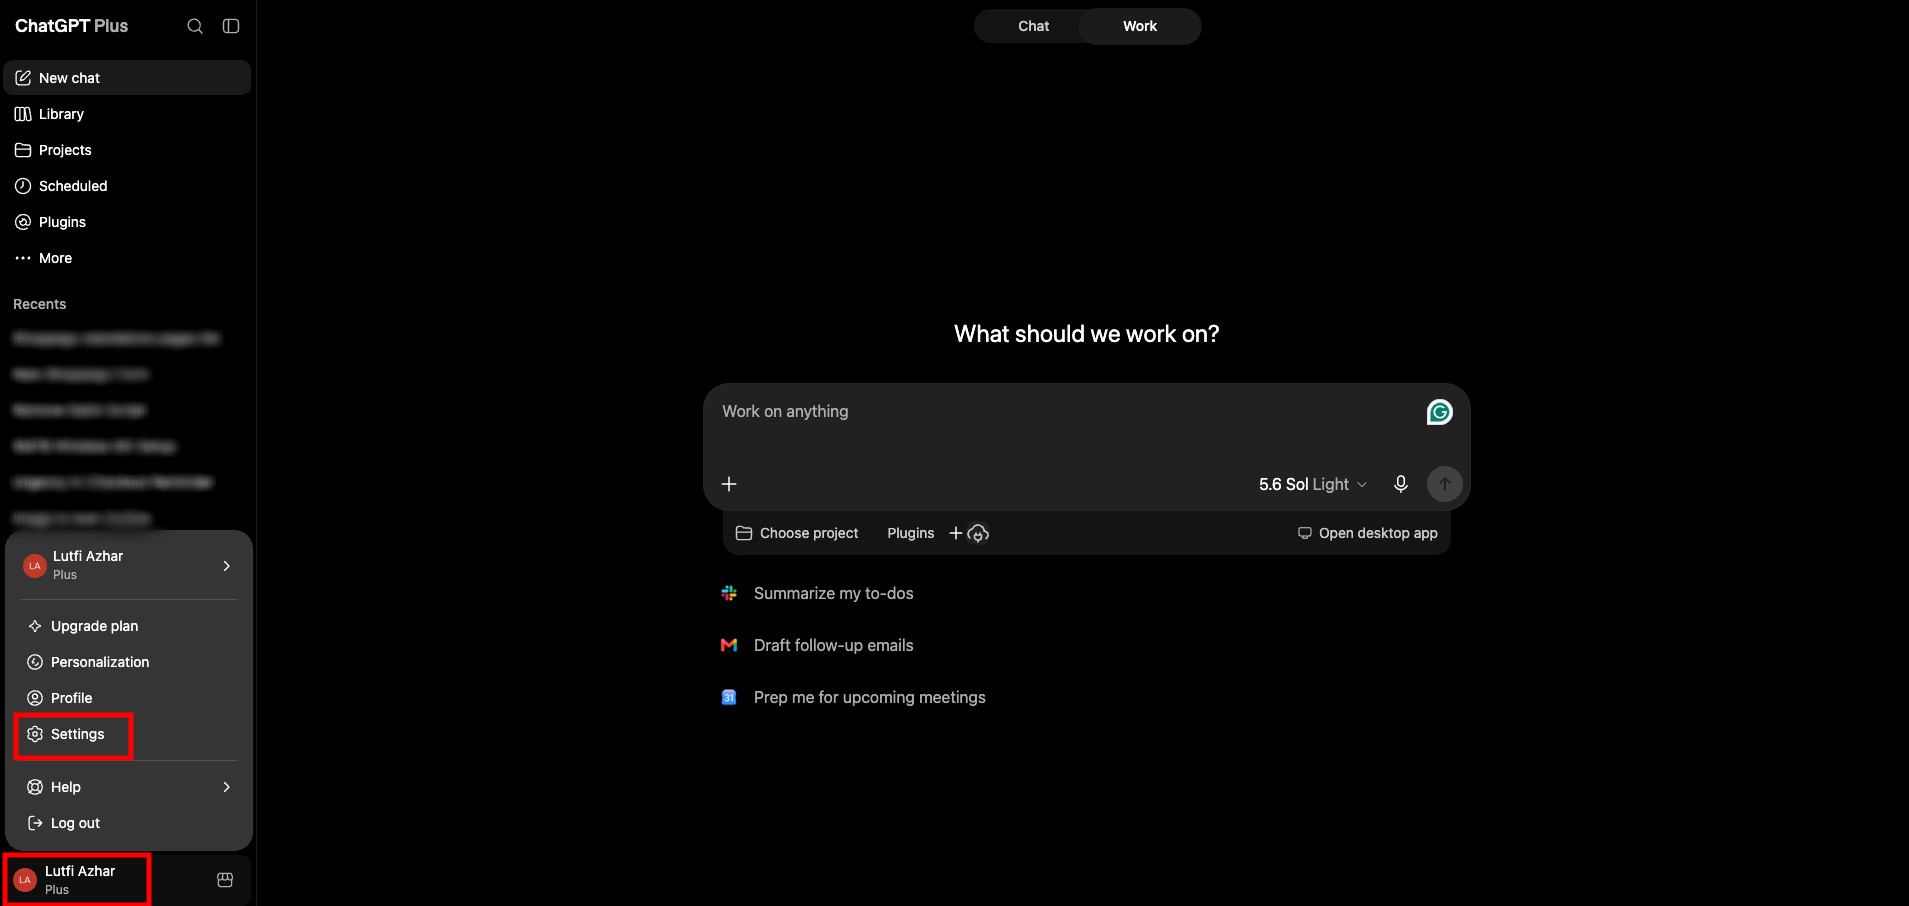
2. Click on your "**Profile Menu**" and select "**Settings**"

<figure><img src="https://3359028955-files.gitbook.io/~/files/v0/b/gitbook-x-prod.appspot.com/o/spaces%2F-Lh09fNwqqta5Vj6Wr8p%2Fuploads%2Fgit-blob-71a1765b382f84d8fbf9e98c77e5e53a0c2f5097%2FGhp1I4yXF4m4jJ4u6f7D.jpg?alt=media" alt=""><figcaption></figcaption></figure>

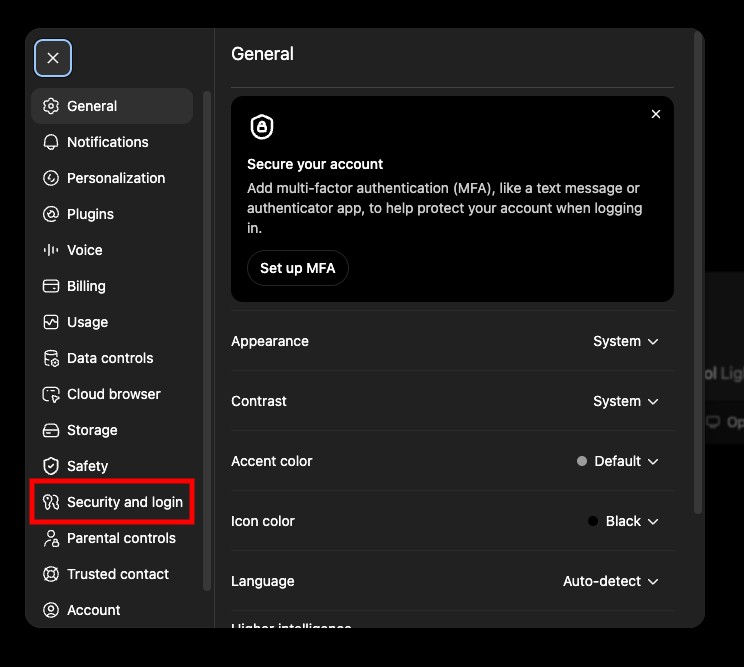
3. Click on the "**Security and login**" menu

<figure><img src="https://3359028955-files.gitbook.io/~/files/v0/b/gitbook-x-prod.appspot.com/o/spaces%2F-Lh09fNwqqta5Vj6Wr8p%2Fuploads%2Fgit-blob-471723a06928791365e82cfcad872347f0f6ad52%2FGLFEe7xUuHal0oCXVglT.jpg?alt=media" alt=""><figcaption></figcaption></figure>

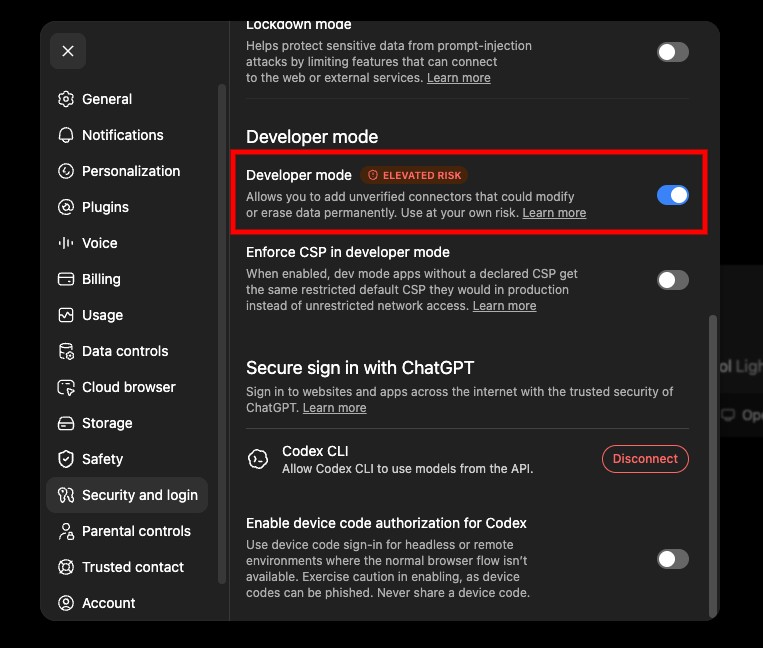
4. Activate the "**Developer mode**" setting toggle

<figure><img src="https://3359028955-files.gitbook.io/~/files/v0/b/gitbook-x-prod.appspot.com/o/spaces%2F-Lh09fNwqqta5Vj6Wr8p%2Fuploads%2Fgit-blob-8d1db52ad3dc5e7b6eba008a0e7196a34ce47633%2FmKZdi29Dd3A2SHKeVqCG.jpg?alt=media" alt=""><figcaption></figcaption></figure>

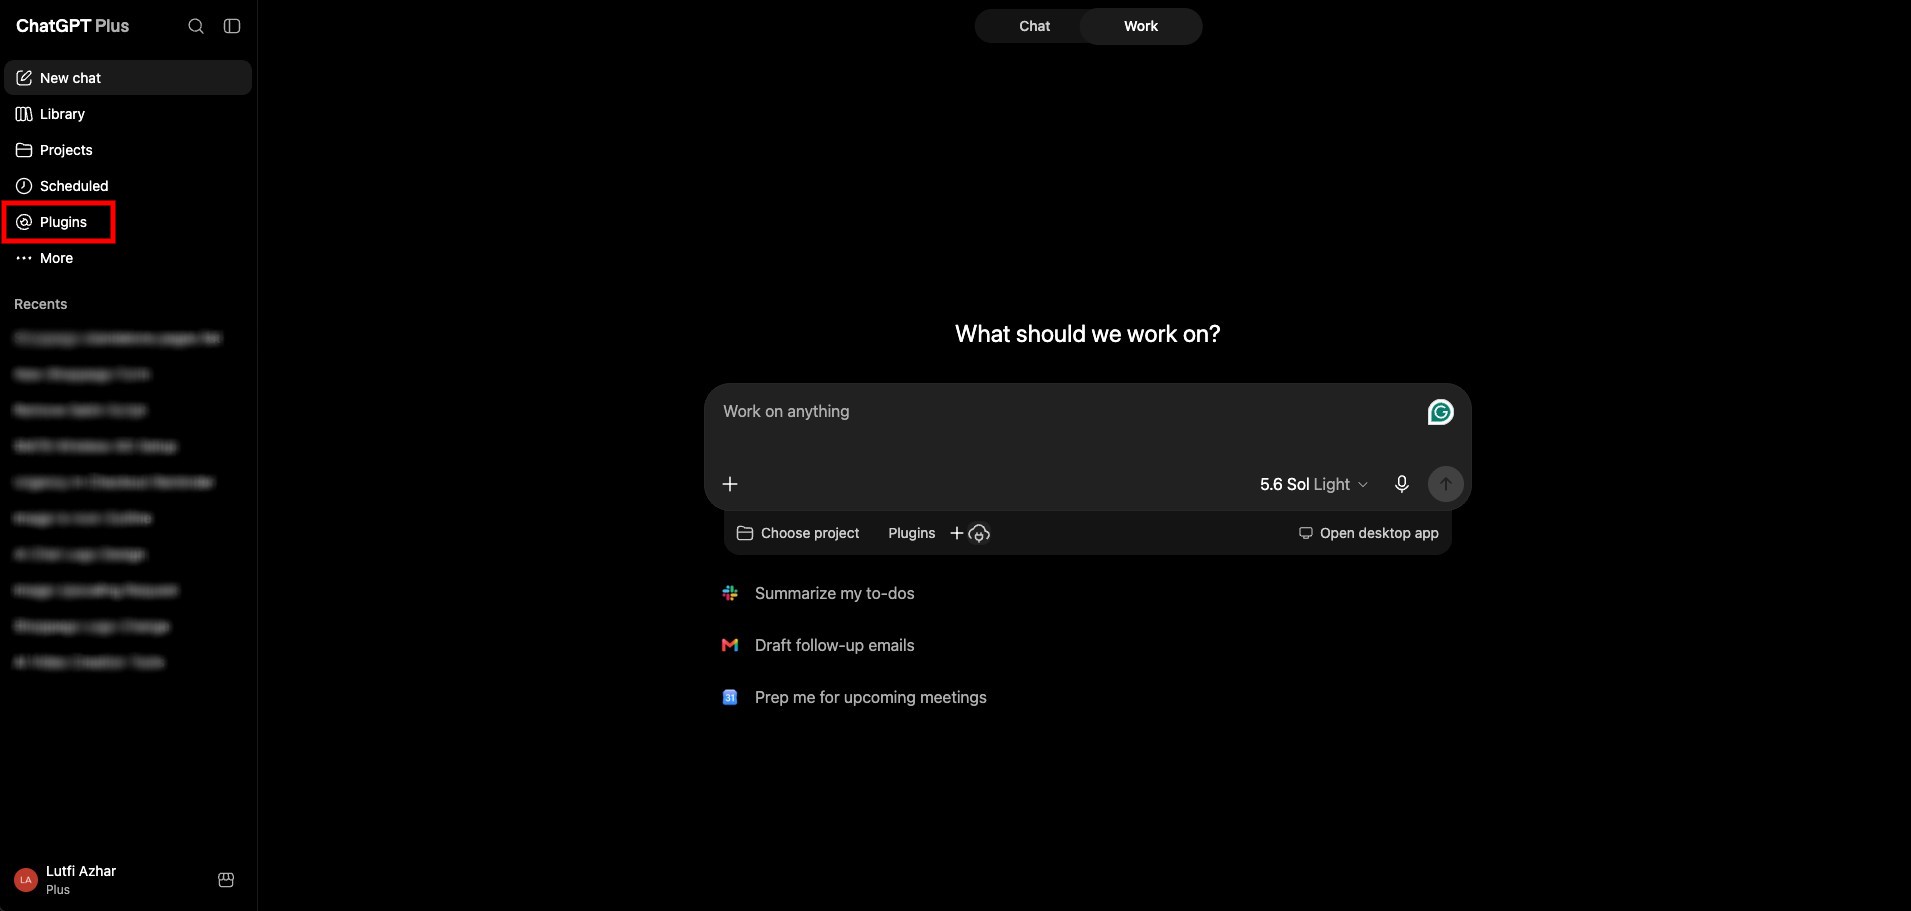
5. Then, you can refresh your ChatGPT dashboard page and click the "**Plugins**" menu.

<figure><img src="https://3359028955-files.gitbook.io/~/files/v0/b/gitbook-x-prod.appspot.com/o/spaces%2F-Lh09fNwqqta5Vj6Wr8p%2Fuploads%2Fgit-blob-ae8b1914f484b8c7454e4322f485e9d8bc57b173%2FdTgDSxFIIsZLwlQhj3Bn.jpg?alt=media" alt=""><figcaption></figcaption></figure>

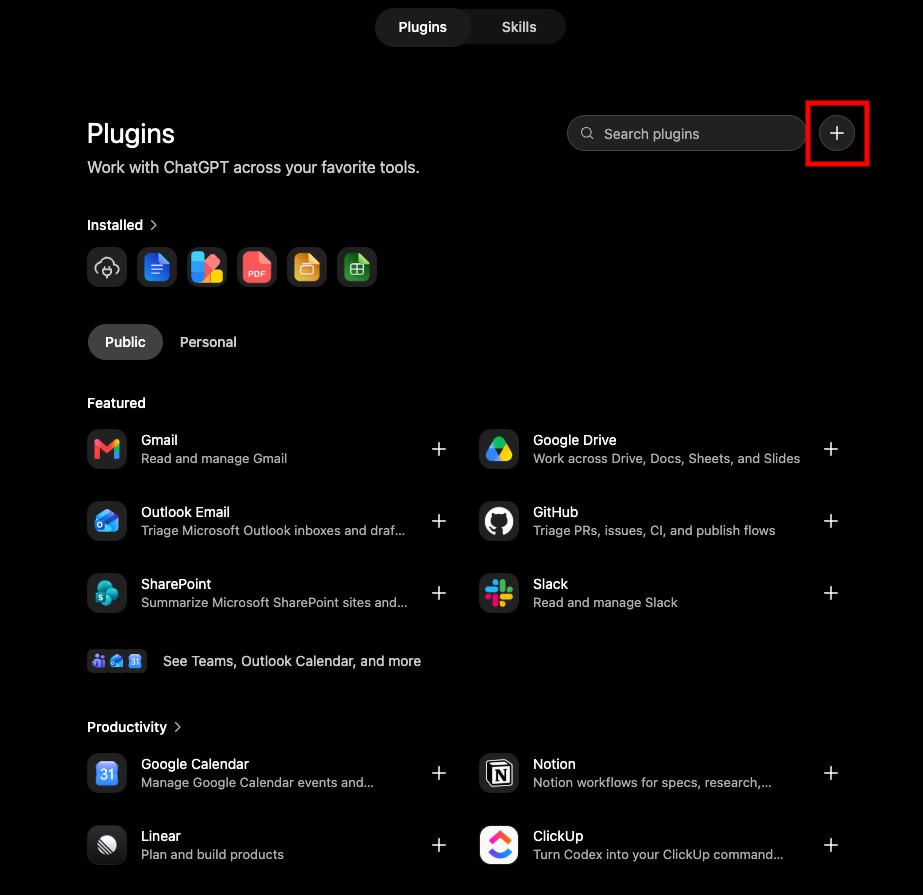
6. On the "**Plugins**" page, you can click the **+ icon** button to add your own plugins.

<figure><img src="https://3359028955-files.gitbook.io/~/files/v0/b/gitbook-x-prod.appspot.com/o/spaces%2F-Lh09fNwqqta5Vj6Wr8p%2Fuploads%2Fgit-blob-43ab55f6f721261d889936f16b13583bf00968f3%2FqQrpuXY7wcGM8Nrk2yY1.jpg?alt=media" alt=""><figcaption></figcaption></figure>

7. You can enter all your MCP information. For "**Authentication**," you can leave it set to "**OAuth**." Once finished, click **Create**.

<figure><img src="https://3359028955-files.gitbook.io/~/files/v0/b/gitbook-x-prod.appspot.com/o/spaces%2F-Lh09fNwqqta5Vj6Wr8p%2Fuploads%2Fgit-blob-e049d91ff2626d85ae5ba6ad2edb39cc328fc6e5%2FuwYPe7RzuT1pBZ3kqqWt.jpg?alt=media" alt=""><figcaption></figcaption></figure>

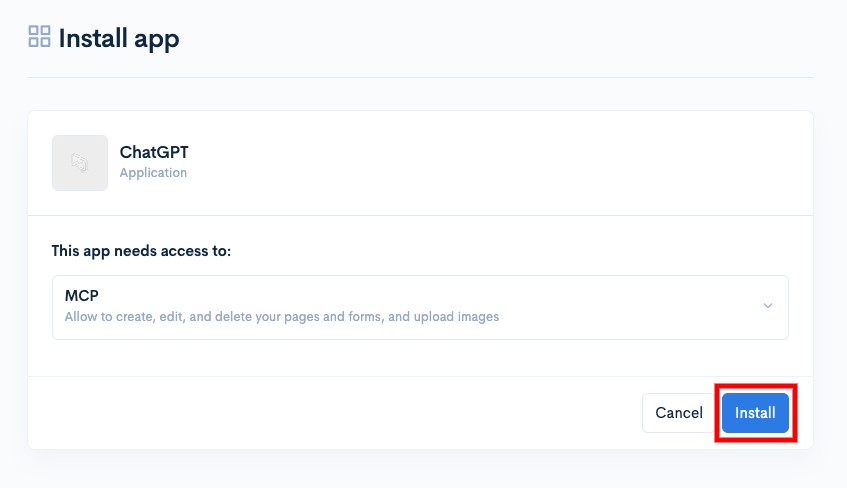
8. Later you will be taken to the Shoppego page for you to log in, select the store and approve the setting.

<figure><img src="https://3359028955-files.gitbook.io/~/files/v0/b/gitbook-x-prod.appspot.com/o/spaces%2F-Lh09fNwqqta5Vj6Wr8p%2Fuploads%2Fgit-blob-dd3ee972d6688750c78e7248854ef53a04dbe9e2%2FBivCk8r0wTjbWkboa4Tw.jpg?alt=media" alt=""><figcaption></figcaption></figure>

## How to Use It on ChatGPT

1. Log in to your ChatGPT account.

<figure><img src="https://3359028955-files.gitbook.io/~/files/v0/b/gitbook-x-prod.appspot.com/o/spaces%2F-Lh09fNwqqta5Vj6Wr8p%2Fuploads%2Fgit-blob-15748bf51fb81f55ef1a3ec224b5e99926ca9c96%2FNH2OL0cNlf1BRWmnrYsw.jpg?alt=media" alt=""><figcaption></figcaption></figure>

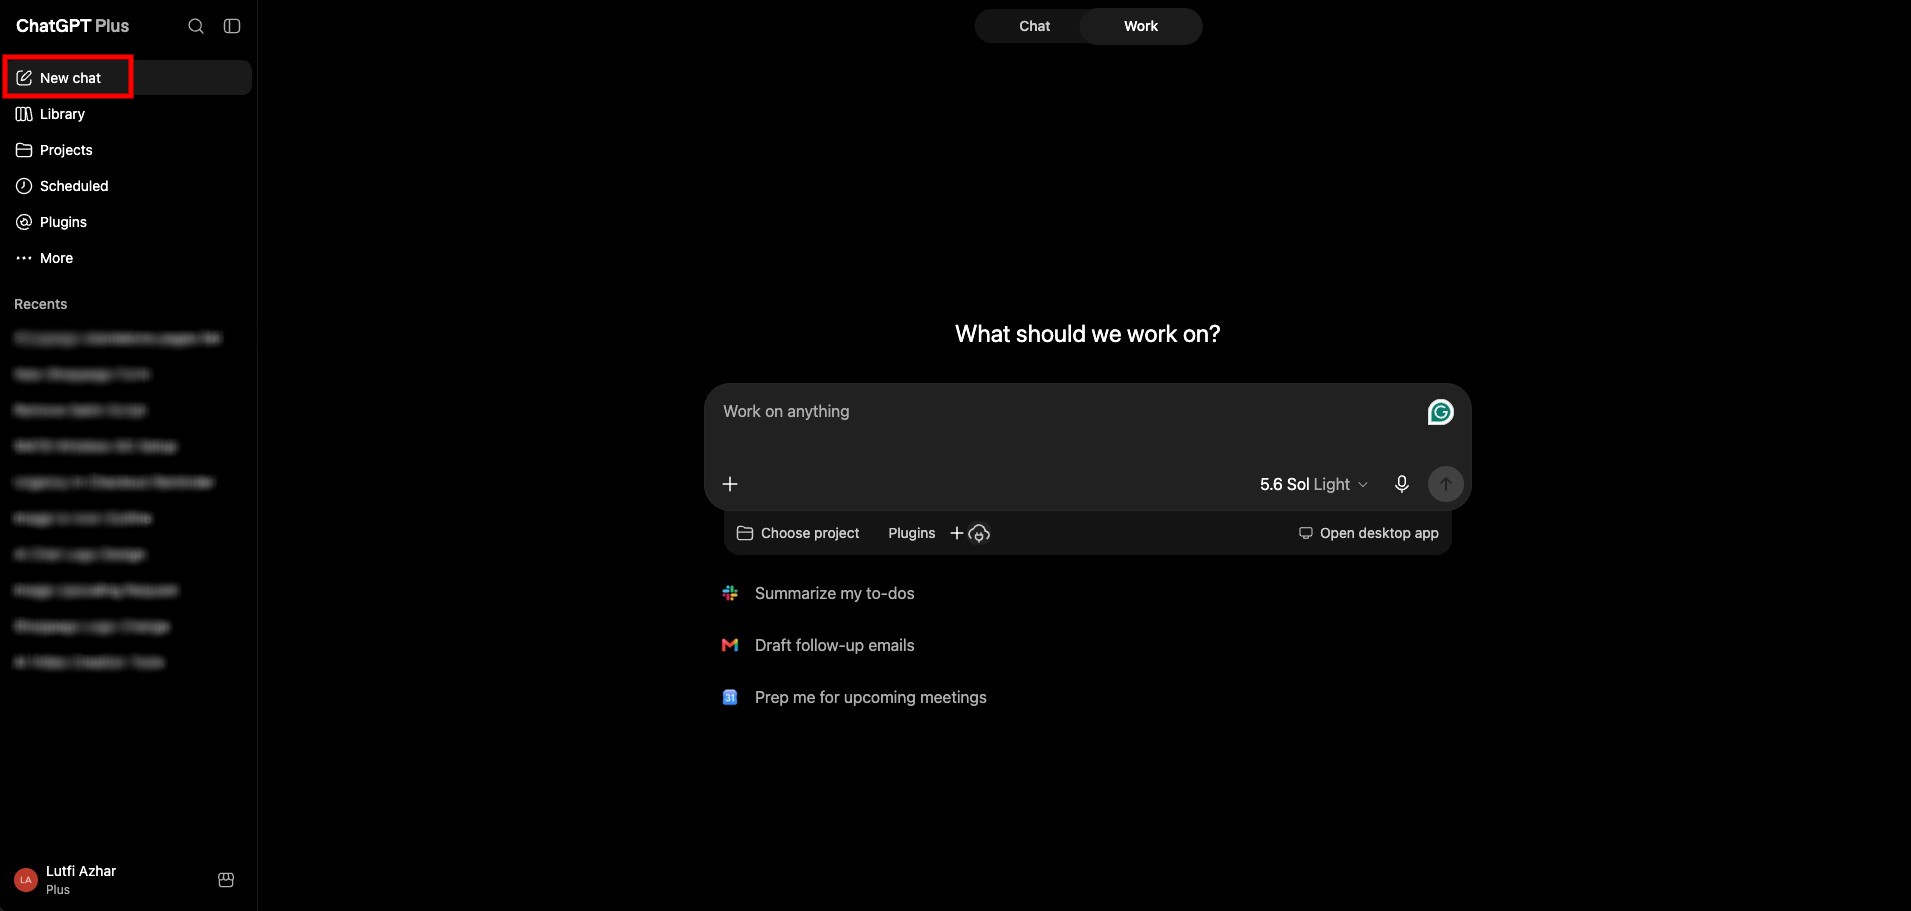
2. Click on "**New chat**"

<figure><img src="https://3359028955-files.gitbook.io/~/files/v0/b/gitbook-x-prod.appspot.com/o/spaces%2F-Lh09fNwqqta5Vj6Wr8p%2Fuploads%2Fgit-blob-0c68673602a0f416aef97df5f7f5b8b698e6219a%2FqslrVnyVZYSEOOiBdRft.jpg?alt=media" alt=""><figcaption></figcaption></figure>

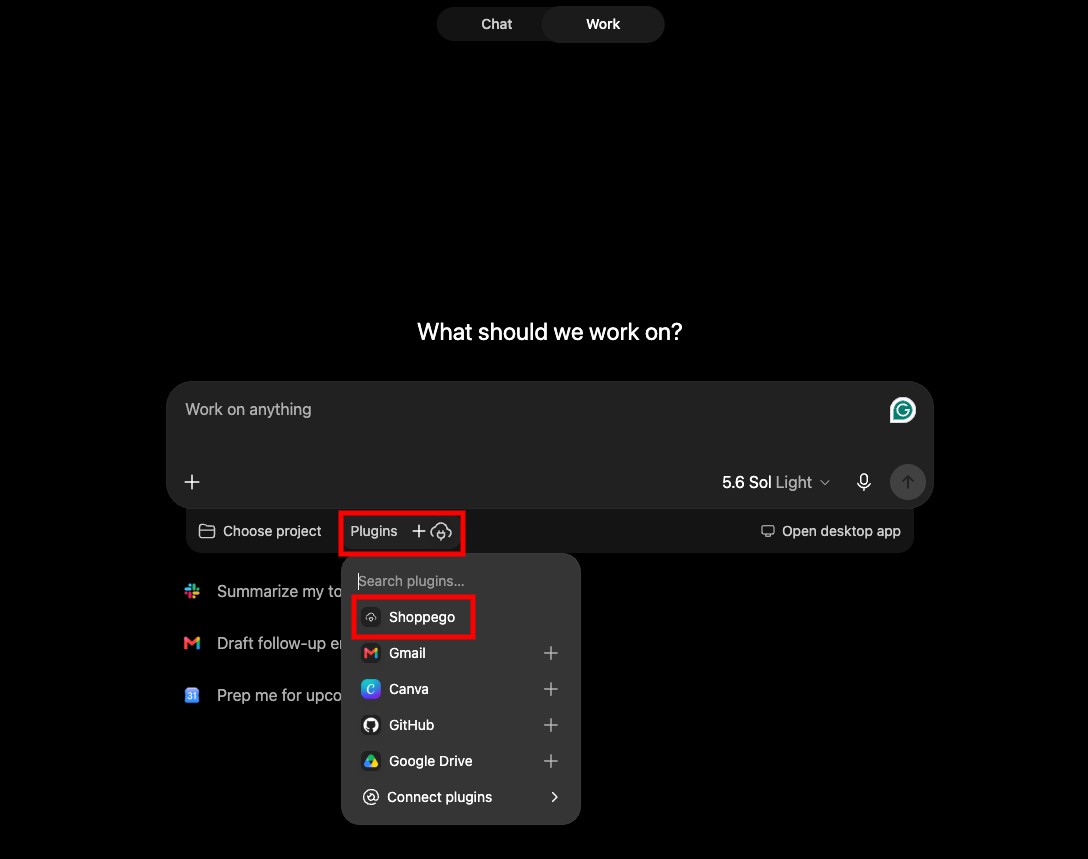
3. Then, you can click on "**Plugin**" and select the Shoppego plugin you just added.

<figure><img src="https://3359028955-files.gitbook.io/~/files/v0/b/gitbook-x-prod.appspot.com/o/spaces%2F-Lh09fNwqqta5Vj6Wr8p%2Fuploads%2Fgit-blob-ce3c1539394b541570f151d25aecba30c3e11d17%2FRK1t0T5bDGzxXNUW3r5b.jpg?alt=media" alt=""><figcaption></figcaption></figure>

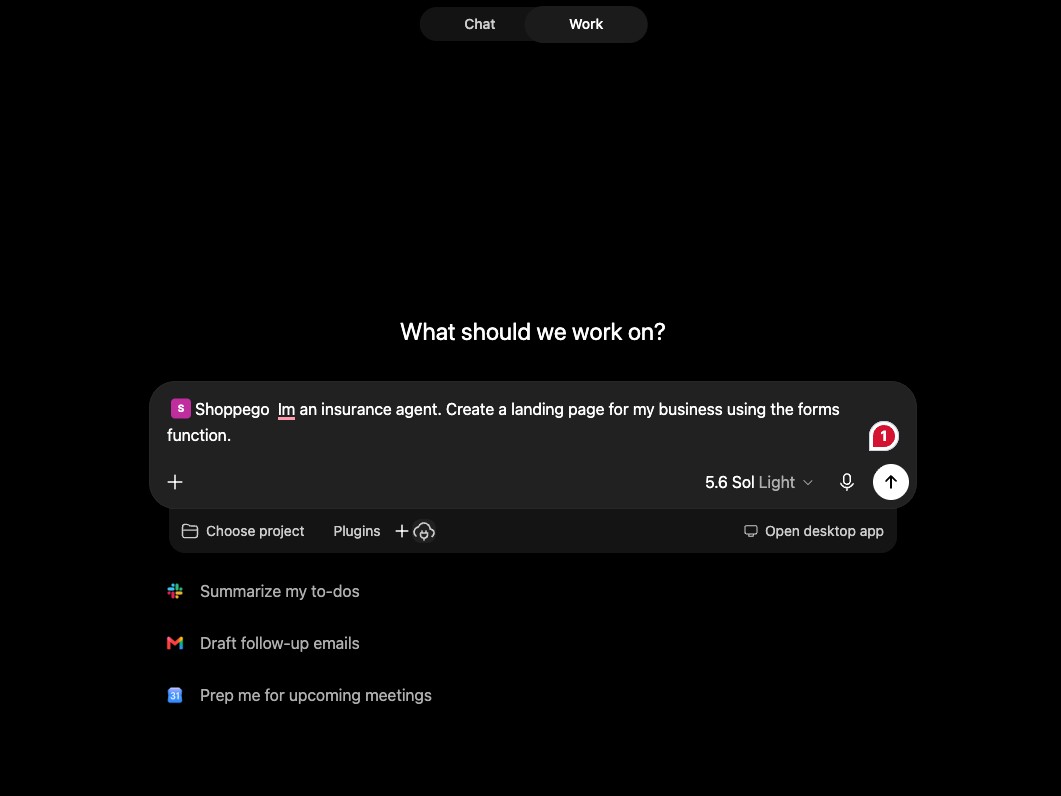
5. Once done, you can write your own prompt to have it make changes or manage your forms or pages.

#### Example Prompt:

<figure><img src="https://3359028955-files.gitbook.io/~/files/v0/b/gitbook-x-prod.appspot.com/o/spaces%2F-Lh09fNwqqta5Vj6Wr8p%2Fuploads%2Fgit-blob-99532e4f0f6a4a692b67f38e32a773bab1f42fb0%2F06k152mkQyCk8j8p907W.jpg?alt=media" alt=""><figcaption></figcaption></figure>

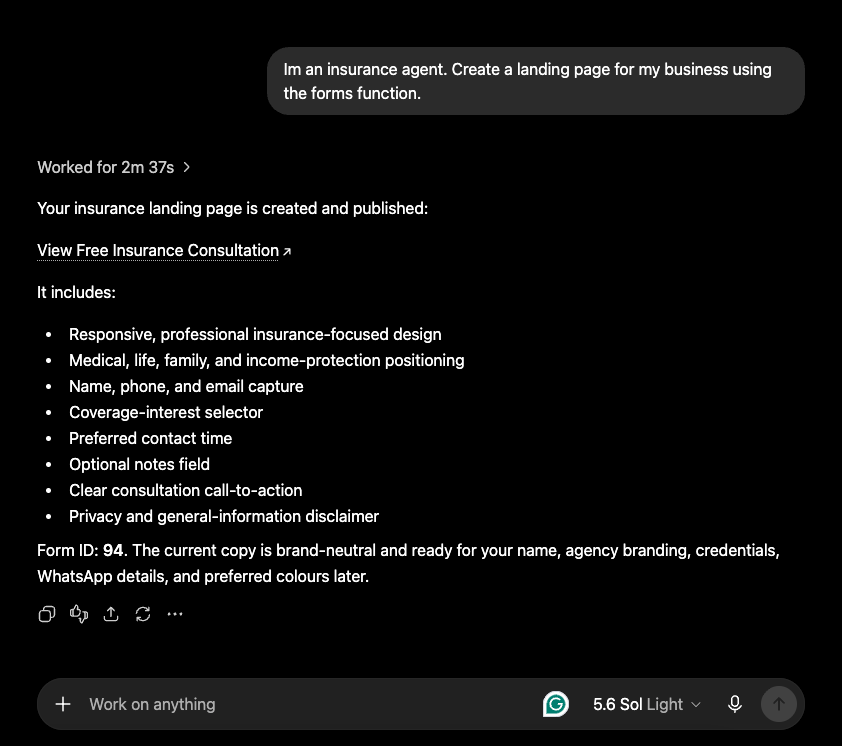
#### Prompt Result:

<figure><img src="https://3359028955-files.gitbook.io/~/files/v0/b/gitbook-x-prod.appspot.com/o/spaces%2F-Lh09fNwqqta5Vj6Wr8p%2Fuploads%2Fgit-blob-a2e6c3b1e94bb38519f225df98e47ef1305361a3%2FKbmk9icSMTnMioP4jygA.png?alt=media" alt=""><figcaption></figcaption></figure>

## Connecting Claude

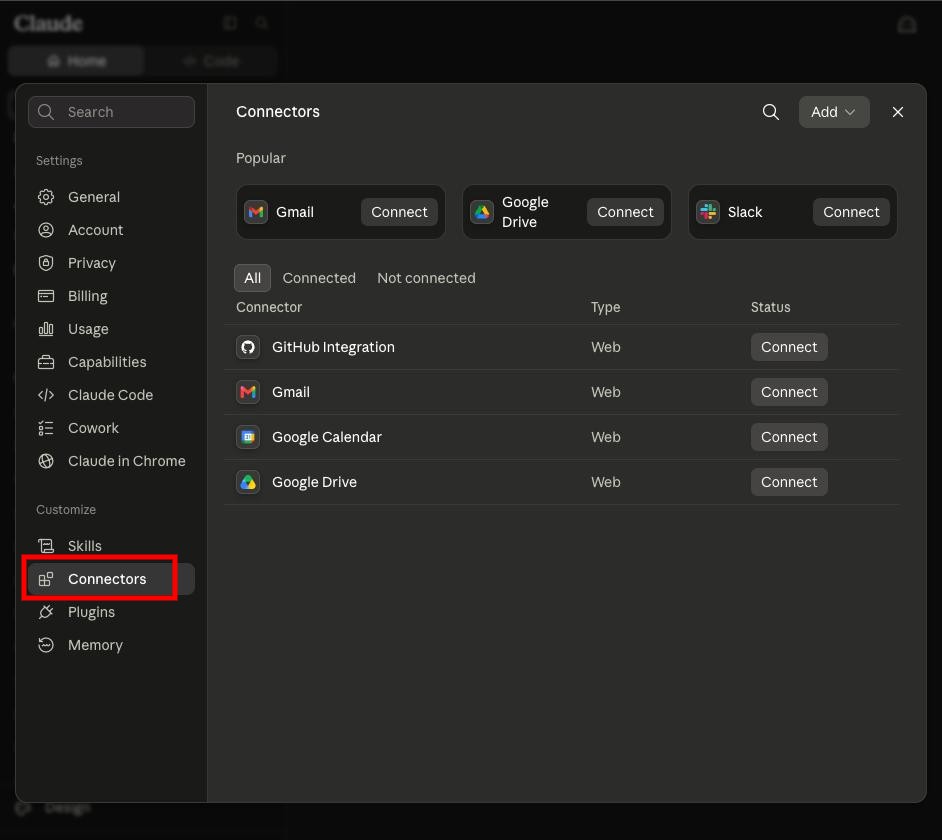
1. Log in to your Claude account and click on "**Settings**" > "**Connectors**".<https://claude.ai/customize/connectors>

<figure><img src="https://3359028955-files.gitbook.io/~/files/v0/b/gitbook-x-prod.appspot.com/o/spaces%2F-Lh09fNwqqta5Vj6Wr8p%2Fuploads%2Fgit-blob-4af03bc7b18764d149cf788d18b3b2cd5a3b3403%2FYtcVWQlUQqE3ja5URQyX.jpg?alt=media" alt=""><figcaption></figcaption></figure>

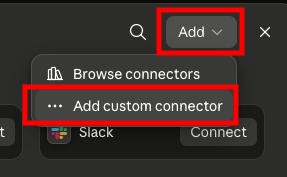
2. Click the "**Add**" button and select "**Add custom connector**".

<figure><img src="https://3359028955-files.gitbook.io/~/files/v0/b/gitbook-x-prod.appspot.com/o/spaces%2F-Lh09fNwqqta5Vj6Wr8p%2Fuploads%2Fgit-blob-86ad0152dd63a32271cf2748afe90fc714a0a15b%2FJ23ZuYqlrjhKcnB5T5Cb.jpg?alt=media" alt=""><figcaption></figcaption></figure>

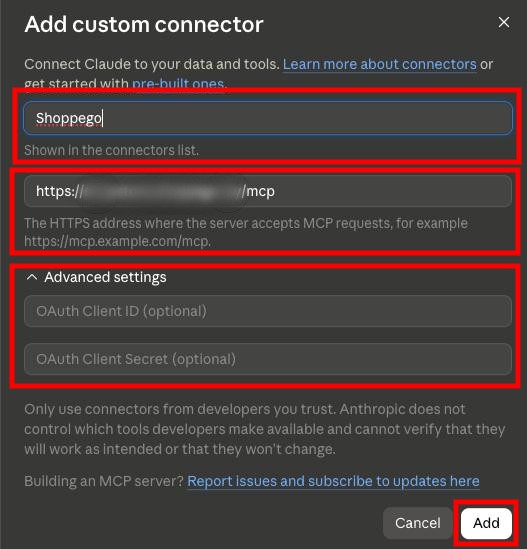
3. Once done, you can **enter your MCP information**. For the "**OAuth**" settings, you can **leave both fields blank**. After that, click **Add**.

<figure><img src="https://3359028955-files.gitbook.io/~/files/v0/b/gitbook-x-prod.appspot.com/o/spaces%2F-Lh09fNwqqta5Vj6Wr8p%2Fuploads%2Fgit-blob-216d416740fb6a4aa32f14b37e480e59052b3f68%2FkSbXGILi3tGa0H0efpvO.jpg?alt=media" alt=""><figcaption></figcaption></figure>

## Additional Information

For any pages or forms created using this MCP, you cannot make any custom changes to the page content via the builder editor or similar tools.