> For the complete documentation index, see [llms.txt](https://docs.shoppego.my/tutorials/llms.txt). Markdown versions of documentation pages are available by appending `.md` to page URLs; this page is available as [Markdown](https://docs.shoppego.my/tutorials/en/settings/shipping.md).

# Shipping

## Setup Shipping

1\. Login to your Commerce account.

![](https://3359028955-files.gitbook.io/~/files/v0/b/gitbook-x-prod.appspot.com/o/spaces%2F-Lh09fNwqqta5Vj6Wr8p%2Fuploads%2Fgit-blob-b853fc0189b34fb1d3990f5b1f53fa71deb9d384%2FlCN7aw3FznaFFoOAyya2.jpg?alt=media)

2\. Click on **Settings**

![](https://3359028955-files.gitbook.io/~/files/v0/b/gitbook-x-prod.appspot.com/o/spaces%2F-Lh09fNwqqta5Vj6Wr8p%2Fuploads%2Fgit-blob-9ae8b66b366958146673b78216b78ff0e8f12b90%2FVsK9zs6aZtUfKK1hcCiM.jpg?alt=media)

3\. Click on **Shipping**

![](https://3359028955-files.gitbook.io/~/files/v0/b/gitbook-x-prod.appspot.com/o/spaces%2F-Lh09fNwqqta5Vj6Wr8p%2Fuploads%2Fgit-blob-abafad50234595e0a8a076ce2796f04de843d085%2F-MBrUKa1PbOU0LOXUXxU.png?alt=media)

4. By default we have provided Shipping according to the zone, namely the :
   * **Peninsula (West Malaysia)**
   * **Sabah & Sarawak (East Malaysia).**

Click the **Edit** Button on any zone you want to set Shipping.

![](https://3359028955-files.gitbook.io/~/files/v0/b/gitbook-x-prod.appspot.com/o/spaces%2F-Lh09fNwqqta5Vj6Wr8p%2Fuploads%2Fgit-blob-00331dc6156f9714e4115643c46d6af7d093e965%2F-MkeCGQdRIH40lU1MYHu.jpg?alt=media)

5\. Click on whichever rates you want to set.

* **Weight-based rates -** Your shipping will be based on the weight of your product

(Example: buyer's cart weight 1kg so their shipping rates are RM8 by default.)

* **Price-based rates -** Your shipping will be based on the buyer's cart price

(Example: total buyer items in the cart is **RM50.00** so shipping rates will follow as you set.

* **Distance Based Rates** - Your shipping charges will be based on the distance between your store location and the customer's location. For a tutorial, click on the Page below. **This function is available only for Ultimate plan subscriptions and must be used in conjunction with the geolocation provider setting.**

(Example: The distance between the customer's location and your location is 10KM so the shipping rates will be as you set.

{% hint style="info" %} <mark style="color:red;">\*\*Attention\*\*</mark>: For \*\*Weight Based Rates, Price Based Rates and Distance Based Rates\*\*, you can \*\*modify them\*\* according to current shipping fees.
{% endhint %}

## **Weight Based Rates**

By default, we have provided rates according to the **Tab Weight Based Rates** in your store.

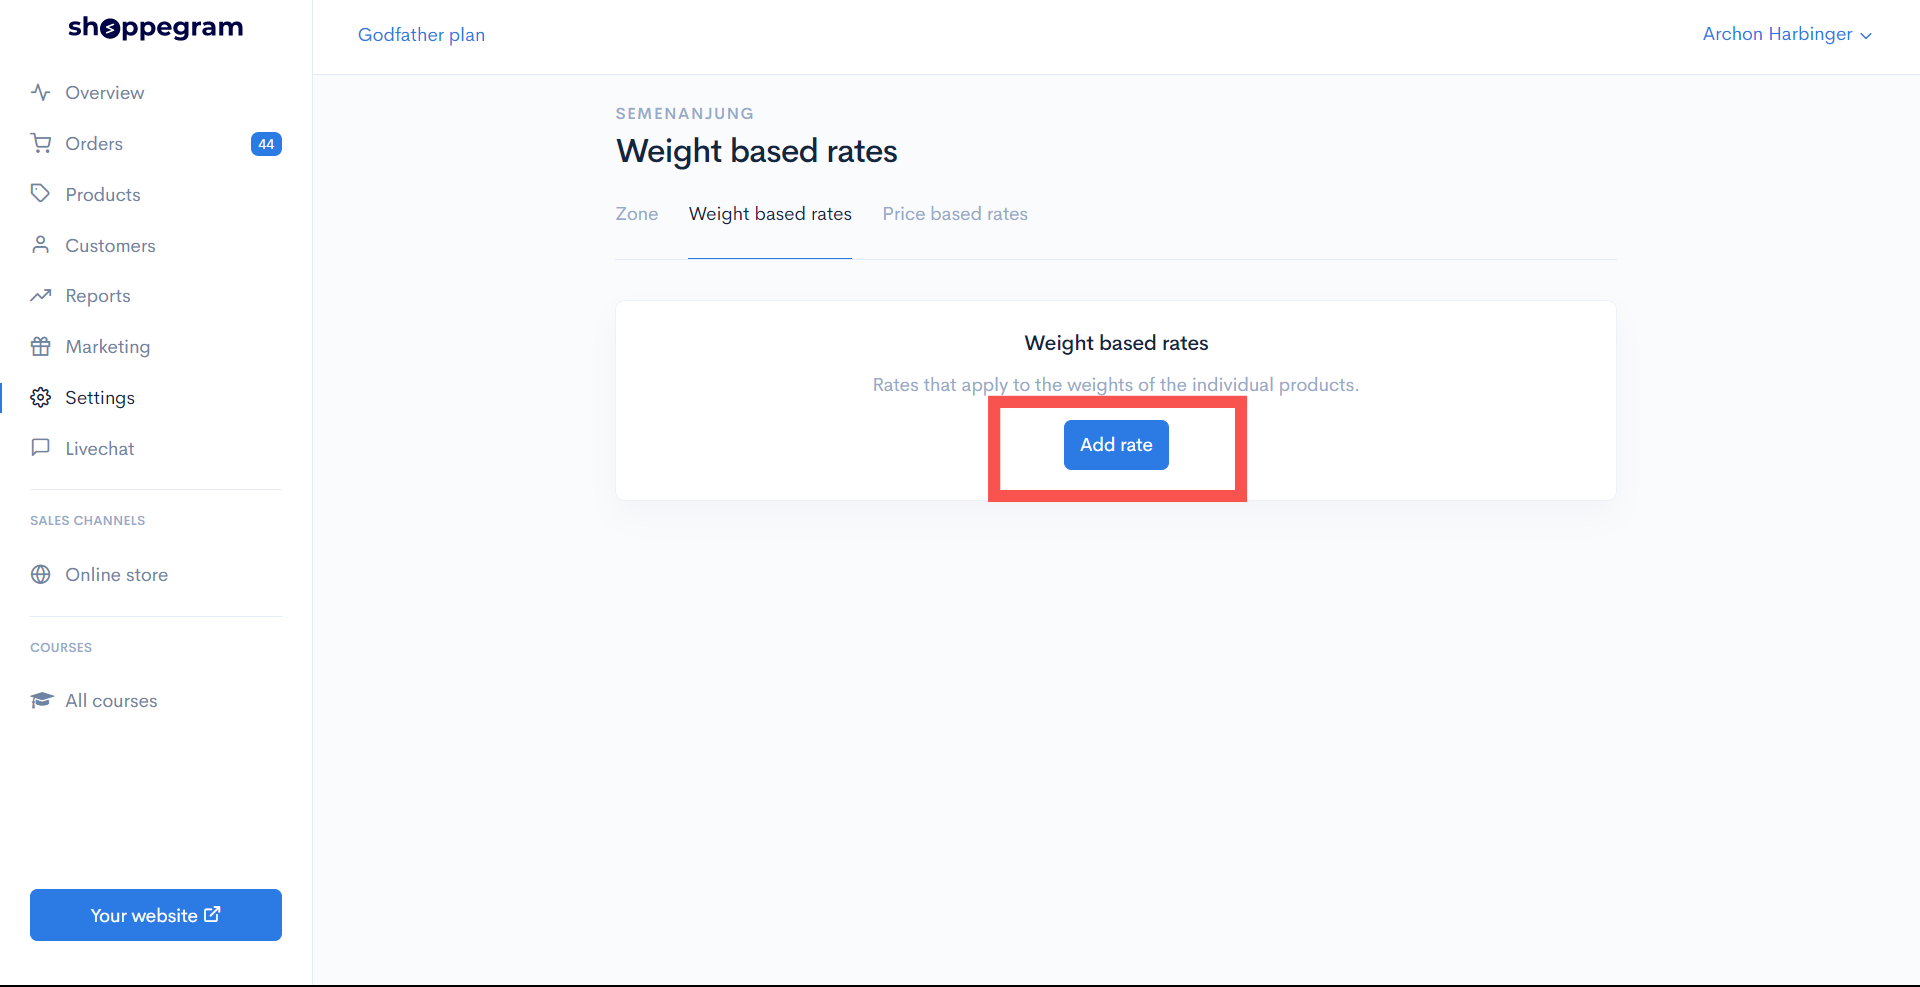
1. If you want to add new rates you can click on the **Add Rate** button.

<figure><img src="https://3359028955-files.gitbook.io/~/files/v0/b/gitbook-x-prod.appspot.com/o/spaces%2F-Lh09fNwqqta5Vj6Wr8p%2Fuploads%2Fgit-blob-4699df4fddf732a9c8cc34adbd6723b122851359%2F3aapluP7ZGZBxXFte8Wq.jpg?alt=media" alt=""><figcaption></figcaption></figure>

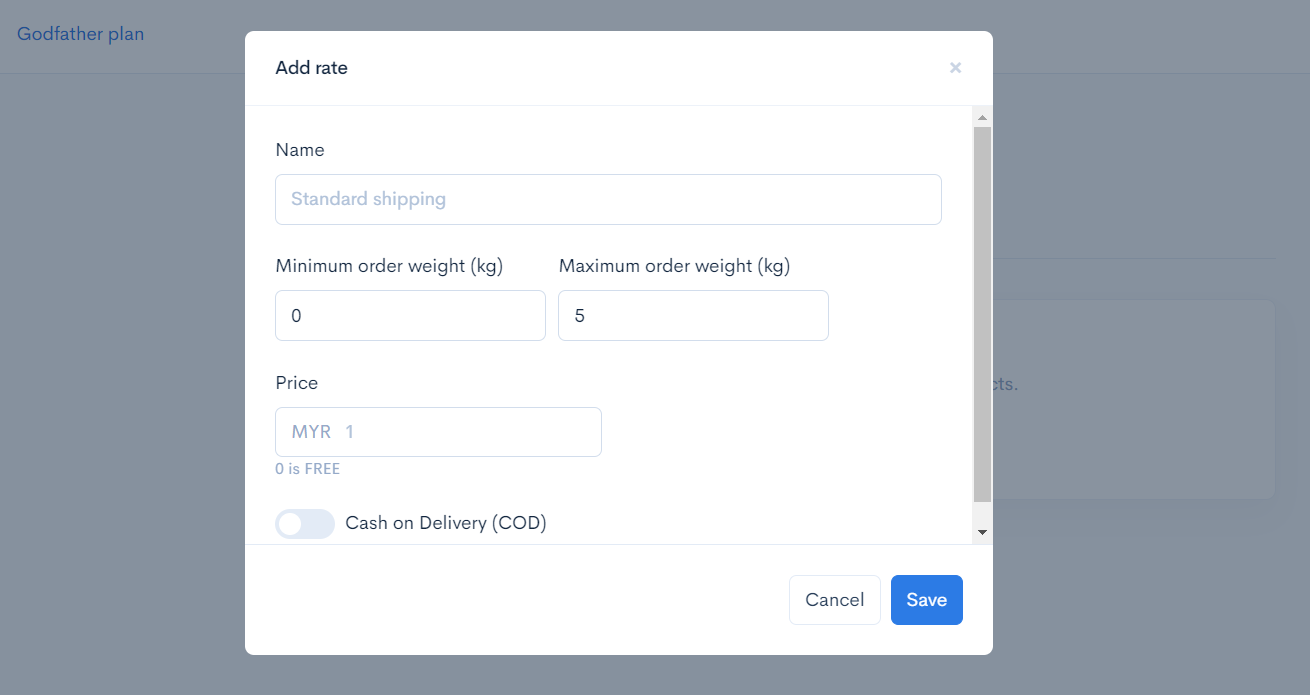
2. Then, a display will appear as below.

<figure><img src="https://3359028955-files.gitbook.io/~/files/v0/b/gitbook-x-prod.appspot.com/o/spaces%2F-Lh09fNwqqta5Vj6Wr8p%2Fuploads%2Fgit-blob-7b8fb91890b65e1f8f0dc7c89c3249b60f681a5c%2FYPU0uVULTfzd1LthhLhq.png?alt=media" alt=""><figcaption></figcaption></figure>

3\. You can enter the details you want according to your promo.

In the section:

<table><thead><tr><th width="275">Field</th><th>Description</th></tr></thead><tbody><tr><td><strong>Name</strong></td><td>Enter your Shipping name.</td></tr><tr><td><strong>Minimum Order Weight (KG)</strong></td><td>Enter the weight of the product that the customer needs to reach to get the Shipping rates.</td></tr><tr><td><strong>Maximum Order Weight (KG)</strong></td><td>Enter the maximum value for the Shipping rates price.</td></tr><tr><td><strong>Price</strong></td><td>Shipping Price</td></tr><tr><td><strong>Cash On Delivery (COD)</strong></td><td><strong>Turn on</strong> if your shipping method is using COD.</td></tr></tbody></table>

{% hint style="info" %} <mark style="color:red;">\*\*Notice\*\*</mark> : If you want to offer <mark style="color:red;">\*\*Free Shipping\*\*</mark> but using \*\*Weight Based Rates\*\*, you can refer to this tutorial.
{% endhint %}

{% content-ref url="/pages/Rg0eChCQ5vQahY8c0FCj" %}
[Weight Based Rates](/tutorials/en/settings/shipping/free-shipping/weight-based-rates.md)
{% endcontent-ref %}

### Display of Weight Price Based Rates

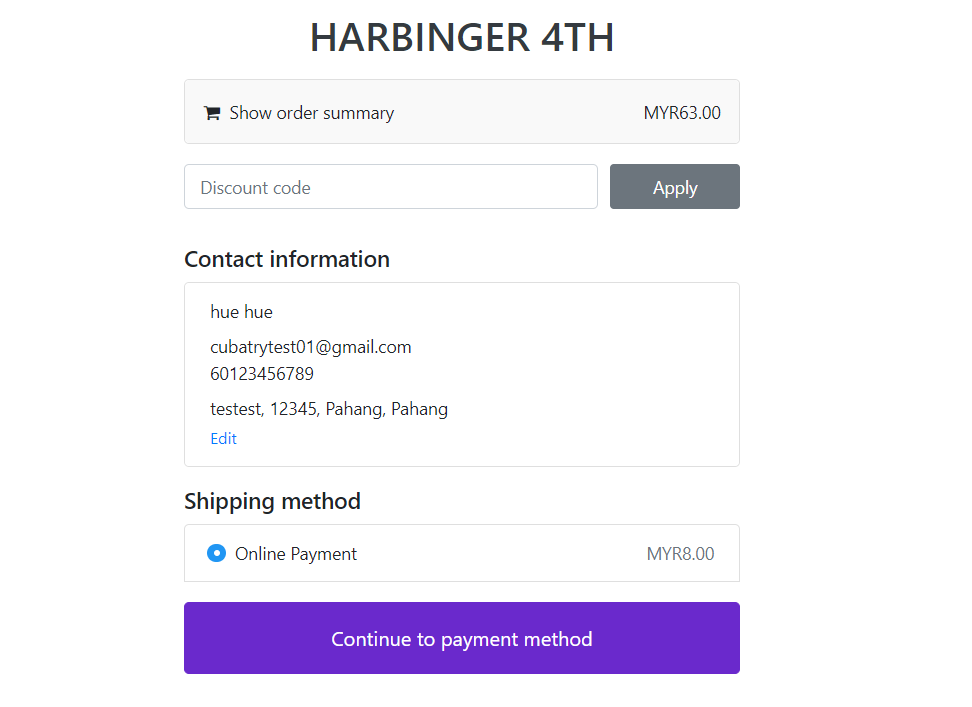
Upon completion of the display that will appear on your checkout section will be like the display below.

<figure><img src="https://3359028955-files.gitbook.io/~/files/v0/b/gitbook-x-prod.appspot.com/o/spaces%2F-Lh09fNwqqta5Vj6Wr8p%2Fuploads%2Fgit-blob-4aab04465b646d59ea281785b1b7bd8f00ae0bf9%2FQZxxcVa6fluIaBMa4eD6.png?alt=media" alt=""><figcaption></figcaption></figure>

## Setting Up Price Based Rates

By default, we have provided rates according to the **Tab Price Based Rates** in your store.

1. If you want to add new rates you can click on the **Add Rate** button.

![](https://3359028955-files.gitbook.io/~/files/v0/b/gitbook-x-prod.appspot.com/o/spaces%2F-Lh09fNwqqta5Vj6Wr8p%2Fuploads%2Fgit-blob-8c7456f26c37285a3133e8a39c66fadbeecb8866%2F-MkeE1dn5YslWNFFFckH.jpg?alt=media)

2. Click on the **Add Rate** button.

![](https://3359028955-files.gitbook.io/~/files/v0/b/gitbook-x-prod.appspot.com/o/spaces%2F-Lh09fNwqqta5Vj6Wr8p%2Fuploads%2Fgit-blob-c3206f39ce1cb739b445d86c6b7bc768339fdfce%2F-MkeEF8_DHMkNaBcw7m9.jpg?alt=media)

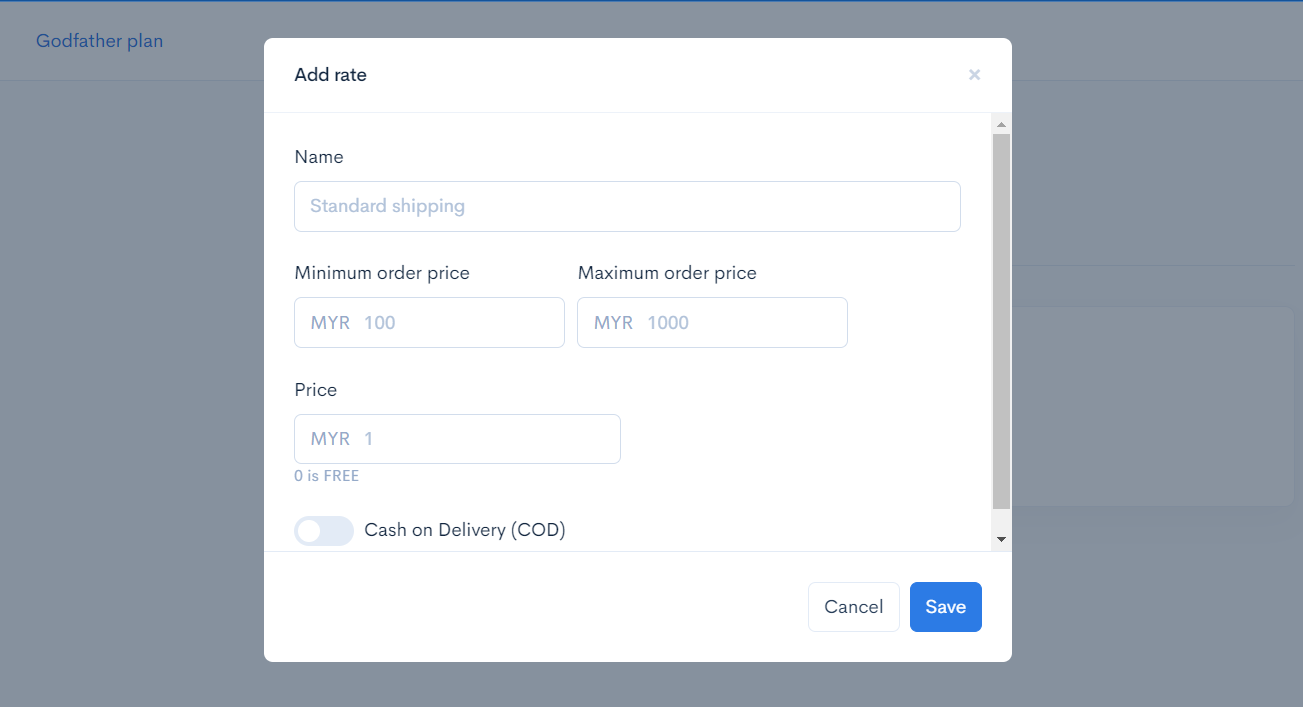
3. A popup will appear as shown below.

<figure><img src="https://3359028955-files.gitbook.io/~/files/v0/b/gitbook-x-prod.appspot.com/o/spaces%2F-Lh09fNwqqta5Vj6Wr8p%2Fuploads%2Fgit-blob-84ffff6be282c8bfb72dba552d8b44df720b9007%2FQeJkOAGL2KDDGLJCSC5w.png?alt=media" alt=""><figcaption></figcaption></figure>

4\. You can enter the details you want according to your promo.

In the section:

<table><thead><tr><th width="236">Field</th><th>Description</th></tr></thead><tbody><tr><td><strong>Name</strong></td><td>Enter your shipping name.</td></tr><tr><td><strong>Minimum Order Price</strong></td><td>Enter the value that the customer needs to reach to get the Shipping rates.</td></tr><tr><td><strong>Maximum Order Price</strong></td><td>Enter the maximum value for the rates.</td></tr><tr><td><strong>Price</strong></td><td>Shipping Price.</td></tr><tr><td><strong>Cash On Delivery (COD)</strong></td><td><strong>Turn on</strong> if your shipping method is using COD.</td></tr></tbody></table>

{% hint style="info" %} <mark style="color:red;">\*\*Notice\*\*</mark> : If you want to offer <mark style="color:red;">\*\*Free Shipping\*\*</mark> but using \*\*Price Based Rates\*\*, you can refer to this tutorial.
{% endhint %}

{% content-ref url="/pages/qcQZuvBu6cseiiMNifT2" %}
[Price Based Rates](/tutorials/en/settings/shipping/free-shipping/price-based-rates.md)
{% endcontent-ref %}

Once done, you can click the **Add** button and check the Free Shipping promotion that you have set earlier.

### Display of Price Based Rates <a href="#contoh-1" id="contoh-1"></a>

Upon completion of the display that will appear on your checkout section will be like the display below.

<figure><img src="https://3359028955-files.gitbook.io/~/files/v0/b/gitbook-x-prod.appspot.com/o/spaces%2F-Lh09fNwqqta5Vj6Wr8p%2Fuploads%2Fgit-blob-4aab04465b646d59ea281785b1b7bd8f00ae0bf9%2FQZxxcVa6fluIaBMa4eD6.png?alt=media" alt=""><figcaption></figcaption></figure>

## **Setting Up Distance Based Rates**

{% hint style="info" %}
**This "Distance by rates" function is available only for Ultimate plan subscriptions and must be used in conjunction with the geolocation provider setting.**
{% endhint %}

Essentially, we have already set up rates based on the prices in your store. If you wish to add new rates:

1. You can simply press the "**Add rate**" button on the "**Distance Based Rates**" tab.

![](https://3359028955-files.gitbook.io/~/files/v0/b/gitbook-x-prod.appspot.com/o/spaces%2F-Lh09fNwqqta5Vj6Wr8p%2Fuploads%2Fgit-blob-3a968e74db95a91eda8d6d48d7c836fe7184998e%2FrRZAMD5c3ukBYsA8EjgB.jpg?alt=media)

2. Click the **Add Rate** button.

![](https://3359028955-files.gitbook.io/~/files/v0/b/gitbook-x-prod.appspot.com/o/spaces%2F-Lh09fNwqqta5Vj6Wr8p%2Fuploads%2Fgit-blob-4aa6ab478c9e795050724b679f17e24d97b691b6%2FwBLjlWgRSs7xQgmoW3wA.jpg?alt=media)

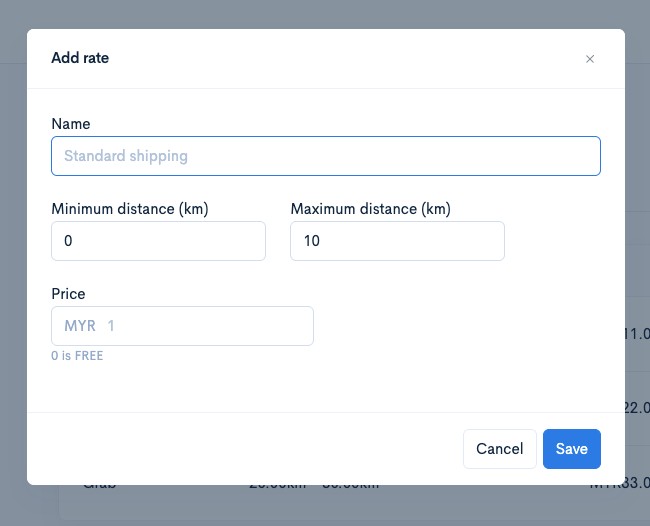
3. A popup will appear as shown below.

<figure><img src="https://3359028955-files.gitbook.io/~/files/v0/b/gitbook-x-prod.appspot.com/o/spaces%2F-Lh09fNwqqta5Vj6Wr8p%2Fuploads%2Fgit-blob-f4446996863038e2ab52e561ec8b93508dc7169d%2FnxUWCqnBHTSmgU5n5uuy.jpg?alt=media" alt=""><figcaption></figcaption></figure>

4. You can enter the details you want, in accordance with your promotion.

<table><thead><tr><th width="262">Parameter</th><th>Description</th></tr></thead><tbody><tr><td><strong>Name</strong></td><td>Shipping Name (Example: Grab)</td></tr><tr><td><strong>Minimum distance (RM)</strong></td><td>Enter the amount the customer needs to reach to qualify for those shipping rates.</td></tr><tr><td><strong>Maximum distance (RM)</strong></td><td>Enter the maximum value for the rates</td></tr><tr><td><strong>Price</strong></td><td>The shipping cost.</td></tr><tr><td><strong>Cash On Delivery (COD)</strong></td><td><strong>Enable</strong> this if your shipping method uses COD.</td></tr></tbody></table>

### Display of Distance Based Rates

Once completed, the display at the checkout section will look like the image below.

<figure><img src="https://3359028955-files.gitbook.io/~/files/v0/b/gitbook-x-prod.appspot.com/o/spaces%2F-Lh09fNwqqta5Vj6Wr8p%2Fuploads%2Fgit-blob-7b5c79f08c72bb194b3ac7ee52c170eb2e7fba85%2FPD8xFeMItz9ahPuh44wx.jpg?alt=media" alt=""><figcaption></figcaption></figure>

## Setting Up COD Shipping

For a tutorial on setting up COD shipping and payment methods, you can refer to the page below.

{% content-ref url="/pages/Pq3aovhsYzR6MMH9Sust" %}
[COD Shipping](/tutorials/en/settings/shipping/cod-shipping.md)
{% endcontent-ref %}

### Frequently Asked Questions:

1. Why can't I see the shipping options on my website checkout?\
   Answer: For that issue, you need to make sure that the "Shipping" setting for your product is set correctly. You can go to the section: Shoppego Dashboard (Overview) > Click on Products > Click on the product > Click on the Shipping tab > Make sure you tick the "Requires Shipping or Pickup" toggle and the "Global rates" toggle > After finishing, click Save. You can also repeat the steps above for other products that require shipping options.
2. Why doesn't my website checkout form have a space for customers to enter shipping information?\
   Answer: For that, you need to make sure that the "Shipping" setting for your product is set correctly. You can go to the section: Shoppego Dashboard (Overview) > Click on Products > Click on the product > Click on the Shipping tab > Make sure you tick the "Requires Shipping or Pickup" toggle > After finishing, click Save. You can also repeat the steps above for other products that require shipping.
3. Why aren't the shipping rates I created displayed on the shipping options on my website checkout page?\
   Answer: For that, you need to review your Shipping rates settings. Make sure that your minimum/maximum price/weight/distance based shipping rates settings can cover all orders that can be placed on your website. For further information regarding shipping settings, you can refer to this link: <https://my.shoppego.com/courses/ecommerce-game-on-fashion-founders-edition/125>