> For the complete documentation index, see [llms.txt](https://docs.shoppego.my/tutorials/llms.txt). Markdown versions of documentation pages are available by appending `.md` to page URLs; this page is available as [Markdown](https://docs.shoppego.my/tutorials/en/settings/shipping-providers/delyva.md).

# Delyva

This setup consists of 3 parts, namely:

{% hint style="success" %}
This feature is available for **Premium** and **Ultimate plans**.
{% endhint %}

* **Part 1**: On the Delyva platform
* **Part 2**: On the Shoppego platform
* **Part 3**: How to fulfill an order

## Part 1: Setting up Delyva

Please ensure that you already have a **Delyva account**.

{% hint style="info" %}
[Click here](https://my.delyva.app/customer/signup) to register for [Delyva](https://my.delyva.app/customer/signup). Delyva registration is free.
{% endhint %}

1. Please **log in** to your **Delyva** account.

![](https://3359028955-files.gitbook.io/~/files/v0/b/gitbook-x-prod.appspot.com/o/spaces%2F-Lh09fNwqqta5Vj6Wr8p%2Fuploads%2Fgit-blob-8f6d51e1cef4a912dec1890bd66a66e2597badb5%2F-MgdLFQeW5N0XczyliuB.png?alt=media)

2\. In the **Dashboard**, click on your Name in the top right corner.

![](https://3359028955-files.gitbook.io/~/files/v0/b/gitbook-x-prod.appspot.com/o/spaces%2F-Lh09fNwqqta5Vj6Wr8p%2Fuploads%2Fgit-blob-f51afe94b8a8d4a0f1b4cb0e4580edbc920d4f73%2F-Mgd8zqqdCshPUiMK6wV.jpg?alt=media)

3. Click on the **Settings** tab.

![](https://3359028955-files.gitbook.io/~/files/v0/b/gitbook-x-prod.appspot.com/o/spaces%2F-Lh09fNwqqta5Vj6Wr8p%2Fuploads%2Fgit-blob-aa4779fa90eb68b0071155faffb13d62e835f9e1%2F-Mgd9iQxlbwkQKSALX0_.jpg?alt=media)

3\. Click on the **API Integrations** tab.

![](https://3359028955-files.gitbook.io/~/files/v0/b/gitbook-x-prod.appspot.com/o/spaces%2F-Lh09fNwqqta5Vj6Wr8p%2Fuploads%2Fgit-blob-e63f5275e00dfce6b11c506b7d50007a155a2cee%2F-Mgd9az3DgHdRVycx74q.jpg?alt=media)

4. On the **API Integrations page**, you can obtain **all three keys required** to integrate with the Shoppego system.
   1. [Company ID](#1-company-id)
   2. [Customer ID](#2-customer-id)
   3. [API Key](#3-api-key)

### **1 : Company ID**

1\. In the API Integrations page, you can **find your Company ID** value. You can refer to the display below:

![](https://3359028955-files.gitbook.io/~/files/v0/b/gitbook-x-prod.appspot.com/o/spaces%2F-Lh09fNwqqta5Vj6Wr8p%2Fuploads%2Fgit-blob-5a9f9b96eecc68400f25a9fbe5ab1dd9b361cbe8%2F-MgdC6tg-mHtVokj0LHm.jpg?alt=media)

### **2 : Customer ID**

1\. On the **API Integrations** page, you can find your **Customer ID** value. You can refer to the display below:

![](https://3359028955-files.gitbook.io/~/files/v0/b/gitbook-x-prod.appspot.com/o/spaces%2F-Lh09fNwqqta5Vj6Wr8p%2Fuploads%2Fgit-blob-09e300181d61f63a823f13882408c48a94d944d7%2F-MgdEMDlxN9H5s_VaOH7.jpg?alt=media)

### **3 : API Key**

1\. On the **API Integrations** page, you can click the "**Add new key**" button.

![](https://3359028955-files.gitbook.io/~/files/v0/b/gitbook-x-prod.appspot.com/o/spaces%2F-Lh09fNwqqta5Vj6Wr8p%2Fuploads%2Fgit-blob-0c689a4bdc0422885707cb6126fb0265b7e57f0d%2F-MgdFXb97xtmQ44PDA9W.jpg?alt=media)

2\. Then a pop-up will appear for you to **enter a name** for your **API key**.

{% hint style="info" %}
You can just **enter any name** that you prefer as your reference.
{% endhint %}

![](https://3359028955-files.gitbook.io/~/files/v0/b/gitbook-x-prod.appspot.com/o/spaces%2F-Lh09fNwqqta5Vj6Wr8p%2Fuploads%2Fgit-blob-2a0cda4cb359082e325e2eb9f8c3f032f341adec%2F-MgdFbMrvwWrJlUbgQtC.png?alt=media)

3\. Once done, you can click on the "**Create & View**" button.

![](https://3359028955-files.gitbook.io/~/files/v0/b/gitbook-x-prod.appspot.com/o/spaces%2F-Lh09fNwqqta5Vj6Wr8p%2Fuploads%2Fgit-blob-56f8e4d24510a5a88c2470be515746101b242d5b%2F-MgdFkl2Dnl4kFXgkpT5.jpg?alt=media)

4.There will be a display showing your **API key**.

![](https://3359028955-files.gitbook.io/~/files/v0/b/gitbook-x-prod.appspot.com/o/spaces%2F-Lh09fNwqqta5Vj6Wr8p%2Fuploads%2Fgit-blob-99c7ce66853eeee75378cb081486e92639de79c7%2F-MgdFzFKCk9h3VHlF3uC.jpg?alt=media)

5.You can click on the **Copy button** to copy the **API key** and paste it into the Shoppego system.

![](https://3359028955-files.gitbook.io/~/files/v0/b/gitbook-x-prod.appspot.com/o/spaces%2F-Lh09fNwqqta5Vj6Wr8p%2Fuploads%2Fgit-blob-6a5b2c210fd5815d4214ed3b205b42d13f79ee64%2F-MgdG43WOjSVxXWpvML9.jpg?alt=media)

6\. Once you have entered or saved the **API key**, you can click **Done**.

![](https://3359028955-files.gitbook.io/~/files/v0/b/gitbook-x-prod.appspot.com/o/spaces%2F-Lh09fNwqqta5Vj6Wr8p%2Fuploads%2Fgit-blob-2ed6ea46fc56378056932c3fc3124e1bfa14a3e8%2F-MgdGHFp4tTyAB00Eyjy.jpg?alt=media)

## Part 2: Setup in Shoppego

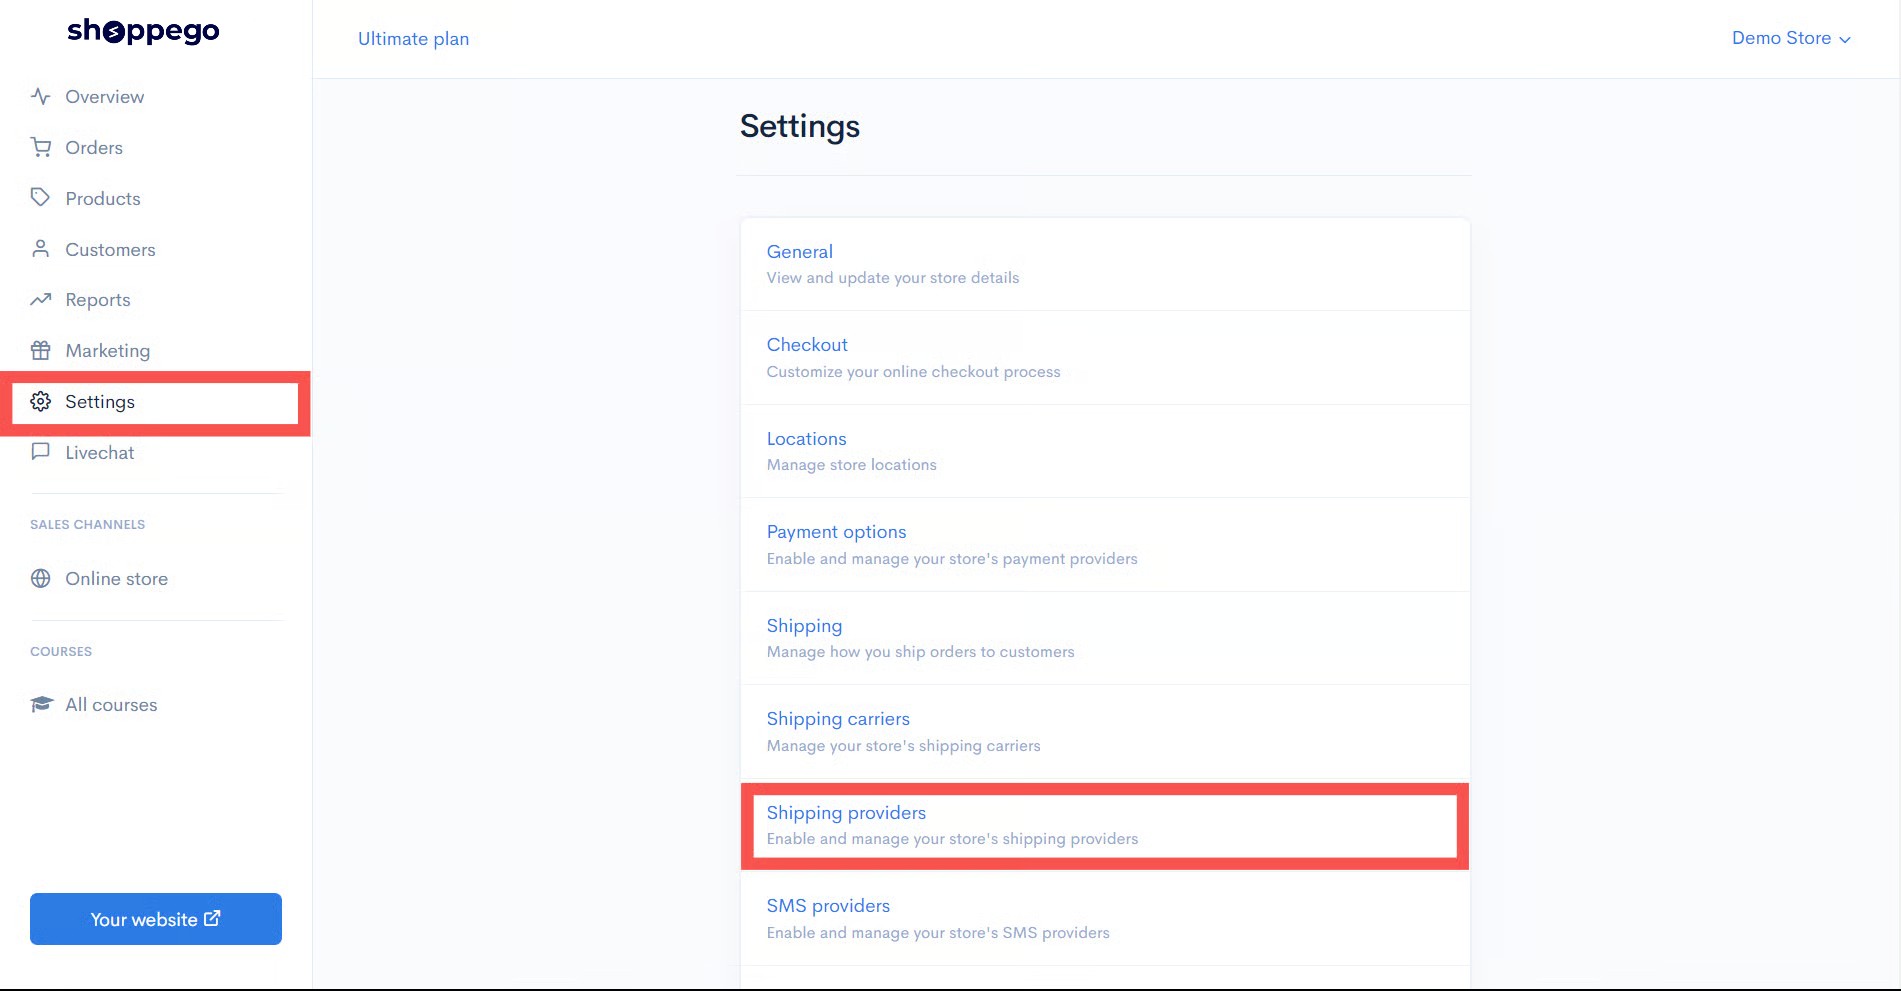
1\. Log in to your **Shoppego Dashboard**, then navigate to **Settings > Shipping Providers.**

<figure><img src="https://3359028955-files.gitbook.io/~/files/v0/b/gitbook-x-prod.appspot.com/o/spaces%2F-Lh09fNwqqta5Vj6Wr8p%2Fuploads%2Fgit-blob-4095daa4a890d41727ef599964e02ec910434e3f%2F6iS5SNhNJ70UnRj5VwHF.jpg?alt=media" alt=""><figcaption></figcaption></figure>

2. Click on the **Activate/Edit** button on the **Delyva** Shipping Provider section.

![](https://3359028955-files.gitbook.io/~/files/v0/b/gitbook-x-prod.appspot.com/o/spaces%2F-Lh09fNwqqta5Vj6Wr8p%2Fuploads%2Fgit-blob-a0a72af3b0f491fe82fa169b5f8683bc4982fe49%2FGBXIUwyGh8TJ4AlziBEn.jpg?alt=media)

3. Enter the **Company ID, Customer ID,** and **API key** that you obtained in the Setup step of[ Part 1.](#part-1-setting-up-delyva)

![](https://3359028955-files.gitbook.io/~/files/v0/b/gitbook-x-prod.appspot.com/o/spaces%2F-Lh09fNwqqta5Vj6Wr8p%2Fuploads%2Fgit-blob-8212efaf3b6ff5f4241763abcfdff2d2de1bb2ec%2Fbjhyk72RwJecx6Ra8OD7.jpg?alt=media)

4. Once you have entered all the information, click on the **Save** button. Please refer to the image below.

{% hint style="success" %}
Make sure to check the **Enable Delyva (Matdespatch)** box by clicking on it.
{% endhint %}

![](https://3359028955-files.gitbook.io/~/files/v0/b/gitbook-x-prod.appspot.com/o/spaces%2F-Lh09fNwqqta5Vj6Wr8p%2Fuploads%2Fgit-blob-84d096bb5ff349af389a07d917e1e72b3e7bc6d7%2F-MgdKuYBguyt7MrLiEgu.jpg?alt=media)

Now your Shoppego platform is <mark style="color:green;">**ready to be connected**</mark> with the Delyva platform.

{% hint style="success" %}
Make sure your account has **enough credit** to use the **Delyva** system.
{% endhint %}

## Part 3: How to Fulfill an Order

Guide to setting up order management in the Shoppego platform to **generate an Airway Bill** on Delyva without needing to log in.

1. Log in to the **Shoppego Dashboard** and click on **Orders** in the left panel.

![](https://3359028955-files.gitbook.io/~/files/v0/b/gitbook-x-prod.appspot.com/o/spaces%2F-Lh09fNwqqta5Vj6Wr8p%2Fuploads%2Fgit-blob-0b477509f1f865d1bad2a9f4995903e61f57704d%2FlasUUilnpBxcaM16QKJd.png?alt=media)

2. **Select** and click on the order that was made for delivery using **Delyva** and the display will appear as below. Click on the '**Arrange Shipment**' button.

![](https://3359028955-files.gitbook.io/~/files/v0/b/gitbook-x-prod.appspot.com/o/spaces%2F-Lh09fNwqqta5Vj6Wr8p%2Fuploads%2Fgit-blob-c8dee66872154e360bb761376fd144e1c870475d%2F8iFJZK2k86EUe0IDT4eN.jpg?alt=media)

3. Click the blue '**Create Shipment**' button in the upper right corner. Click on '**Select Shipment Provider**' and choose **Delyva**.

![](https://3359028955-files.gitbook.io/~/files/v0/b/gitbook-x-prod.appspot.com/o/spaces%2F-Lh09fNwqqta5Vj6Wr8p%2Fuploads%2Fgit-blob-f630934deda440c39285c43e163a149643095b31%2FSnrqd2SFXavpmDkJNkAO.jpg?alt=media)

4\. Click on '**Choose Services**'. **Click** on any courier service you want to use. The price has been determined according to the address provided in the order.

![](https://3359028955-files.gitbook.io/~/files/v0/b/gitbook-x-prod.appspot.com/o/spaces%2F-Lh09fNwqqta5Vj6Wr8p%2Fuploads%2Fgit-blob-1fc5bd50d6f526f48056db27a5ea6c208f7b42f9%2FdL3zOiXfkmN22agi99V7.jpg?alt=media)

5.Next, click on '**Method**' and choose '**Dropoff**' or '**Pickup**'.

{% hint style="info" %}
**Method** :

* **Dropoff** - You will personally go to the nearby post office and send the item.
* **Pickup** - The courier will send a vehicle to pick up the item at the location specified in your Location settings
  {% endhint %}

![](https://3359028955-files.gitbook.io/~/files/v0/b/gitbook-x-prod.appspot.com/o/spaces%2F-Lh09fNwqqta5Vj6Wr8p%2Fuploads%2Fgit-blob-c6e4ce295661dd458e90f9e0009693e15ec9e36f%2FvNNJgWxQMXlok1HCGm2z.jpg?alt=media)

{% hint style="info" %}
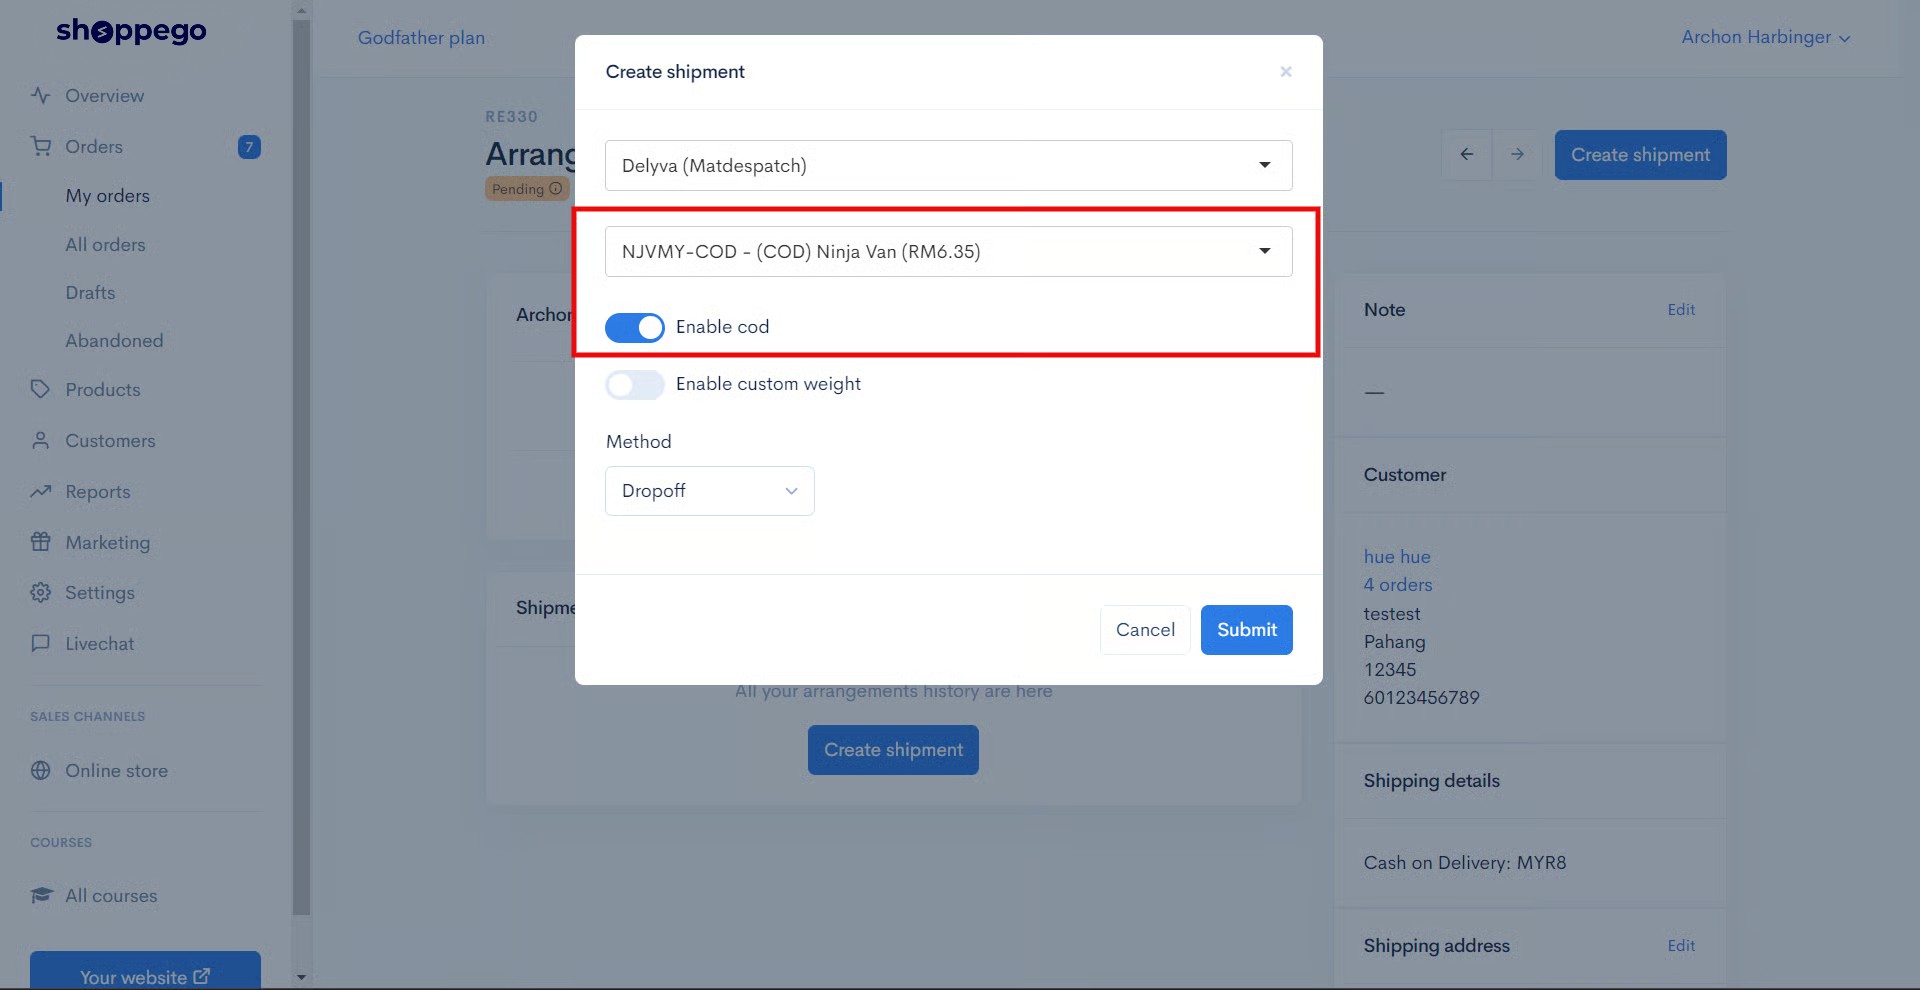
**Note**: If you are using **Cash On Delivery (COD)** delivery, make sure you have selected the COD service type and turned on the '**Enable COD**' toggle.
{% endhint %}

<figure><img src="https://3359028955-files.gitbook.io/~/files/v0/b/gitbook-x-prod.appspot.com/o/spaces%2F-Lh09fNwqqta5Vj6Wr8p%2Fuploads%2Fgit-blob-a3dbebb9ea89f205cb3ad8b2bd325d91bde20757%2FWhMewIhW0XYkCKHoNP3V.jpg?alt=media" alt=""><figcaption></figcaption></figure>

{% hint style="success" %}
Usually, the **Pickup method** will be selected to make it easier for sellers.
{% endhint %}

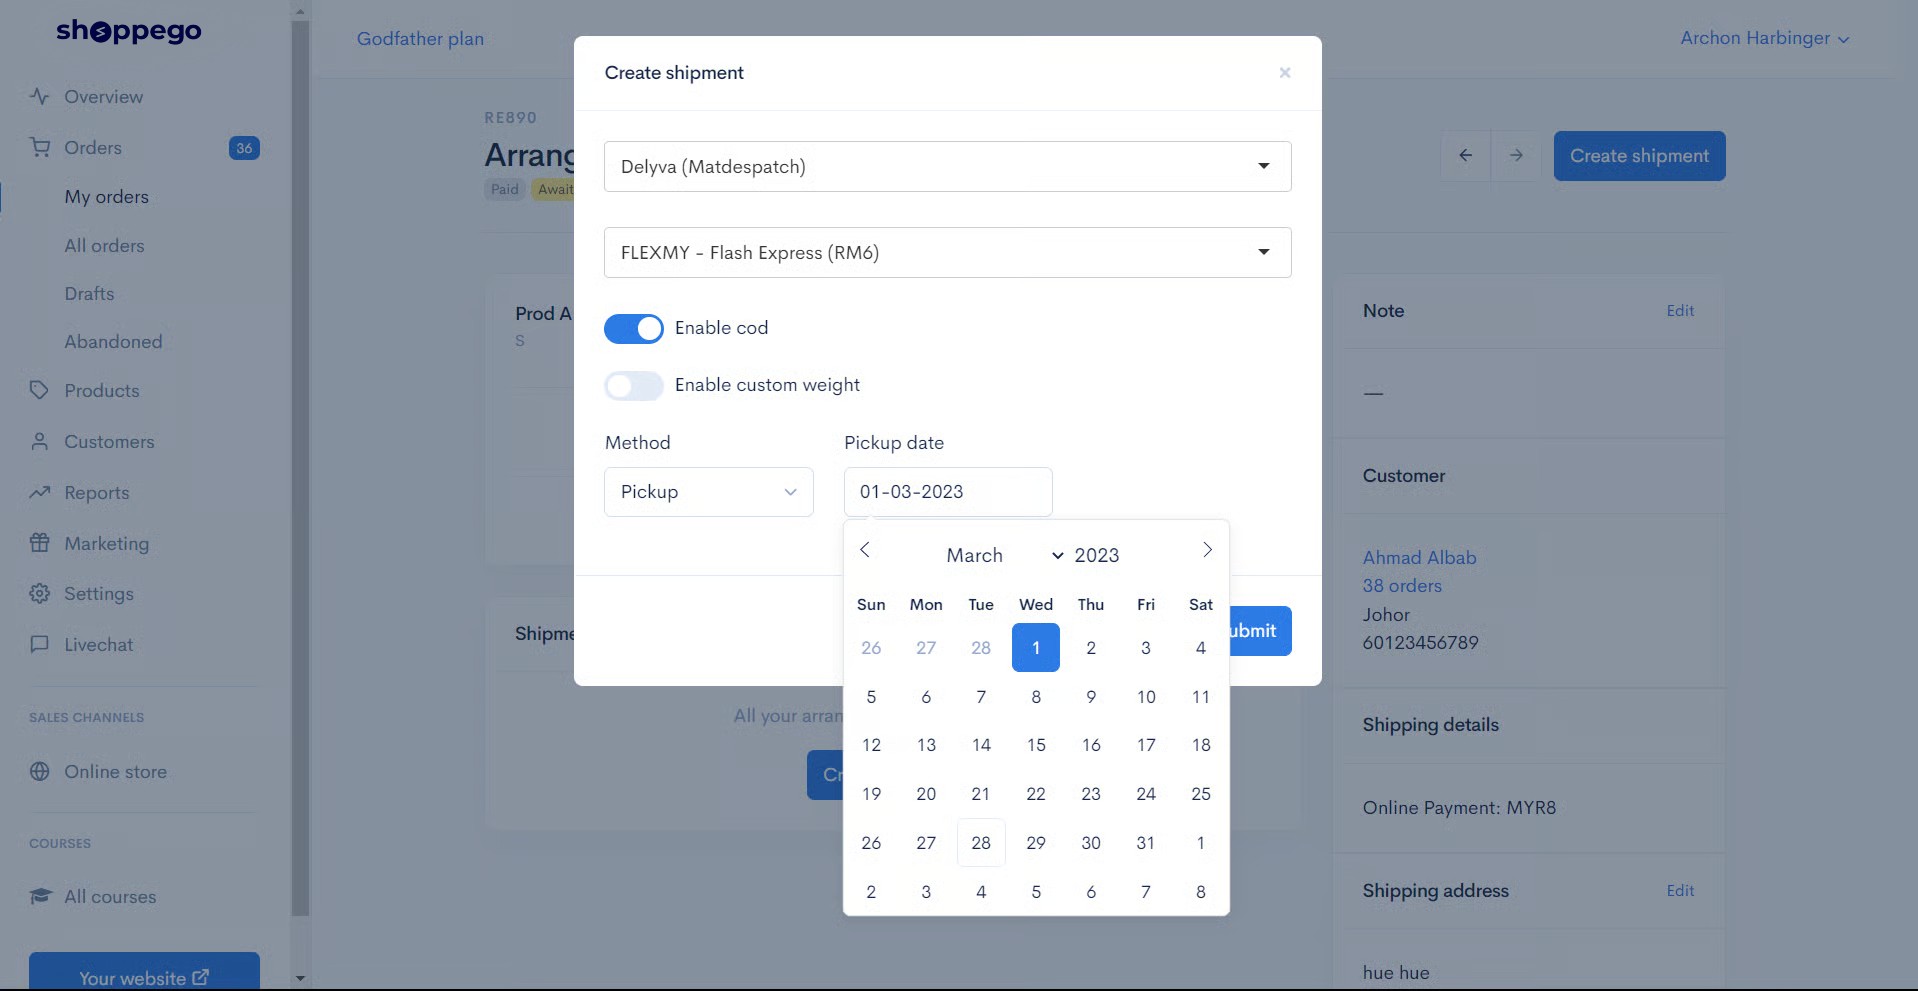
6. When the **Pickup method** is selected, a schedule will be displayed for choosing the date of pickup by the courier. Click on the desired date and then click the '**Submit**' button. Refer to the image below.

<figure><img src="https://3359028955-files.gitbook.io/~/files/v0/b/gitbook-x-prod.appspot.com/o/spaces%2F-Lh09fNwqqta5Vj6Wr8p%2Fuploads%2Fgit-blob-8fc1ff297bdea826f5983c59d8d527c32314cb24%2FLmBo0DYgwr9lUYZ68hpu.jpg?alt=media" alt=""><figcaption></figcaption></figure>

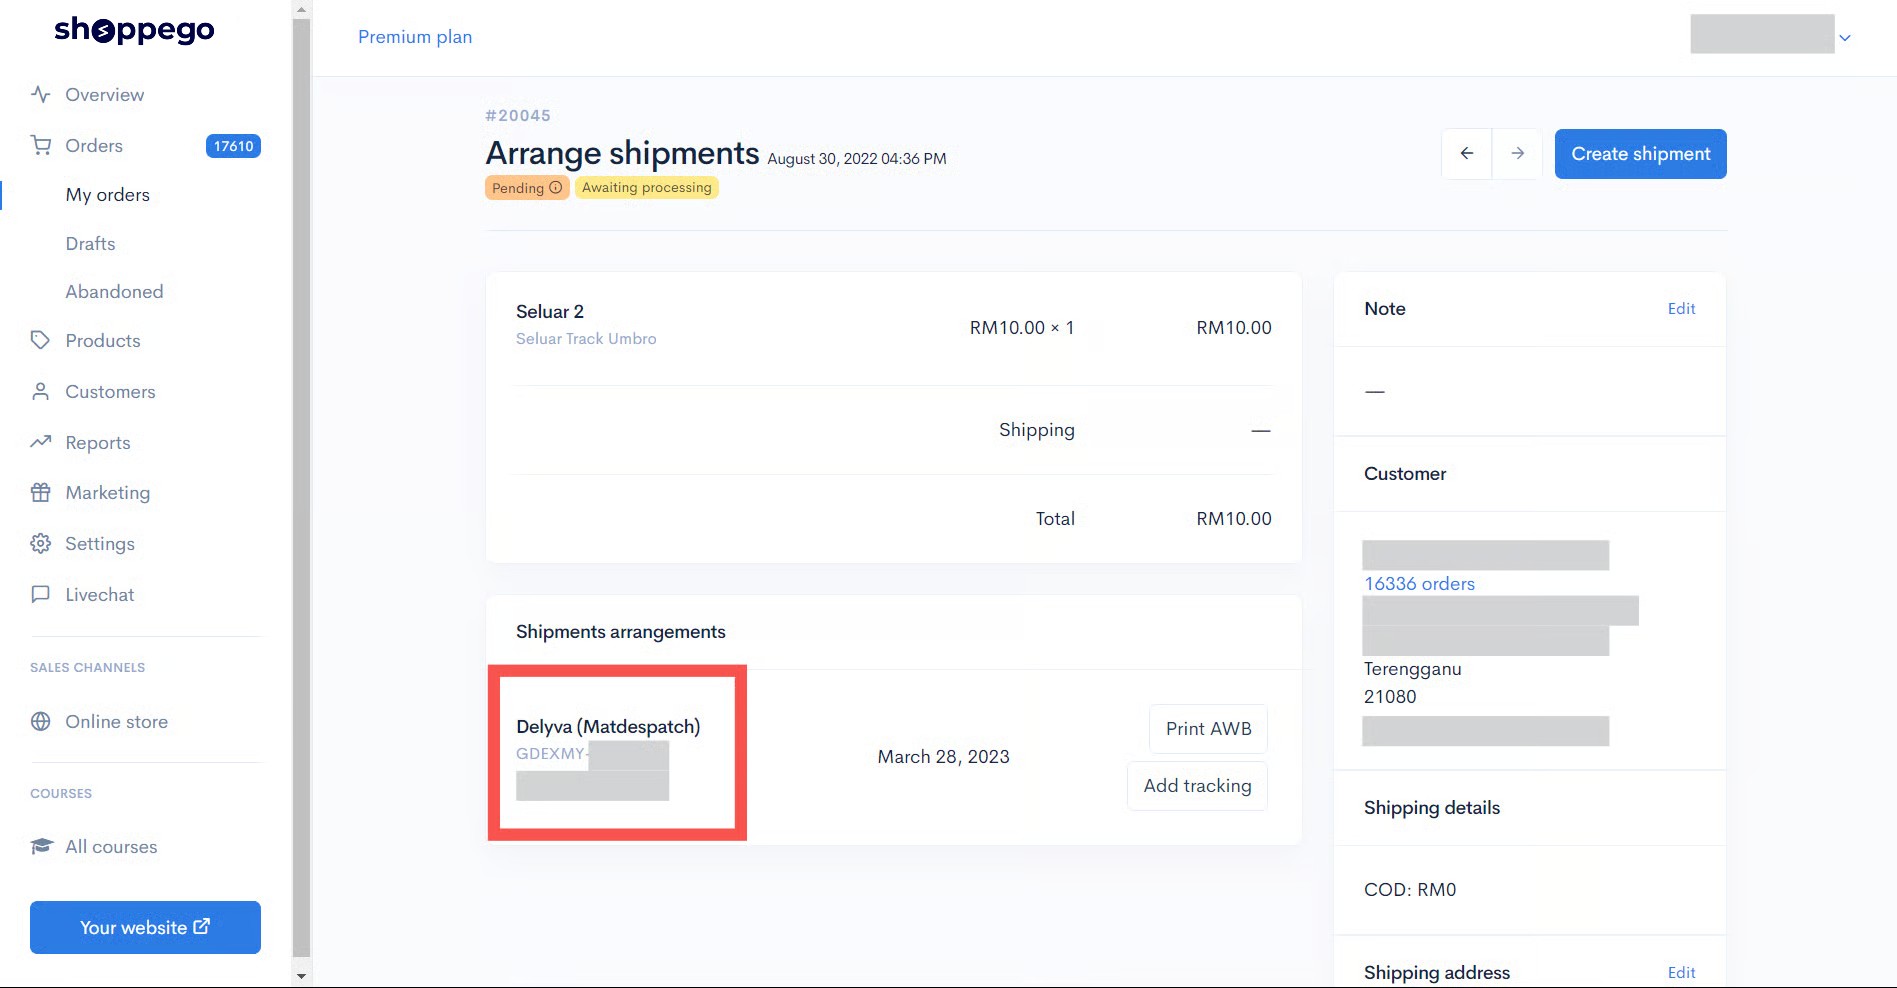
7. After clicking the '**Submit**' button, your order will automatically receive a tracking number as shown in the image below.

{% hint style="info" %}
An **Airway Bill (AWB)** for this order has been automatically generated, and you only need to print the **AWB** from the **Delyva** platform.
{% endhint %}

<figure><img src="https://3359028955-files.gitbook.io/~/files/v0/b/gitbook-x-prod.appspot.com/o/spaces%2F-Lh09fNwqqta5Vj6Wr8p%2Fuploads%2Fgit-blob-2d1974732f97be30253bfc67e3a32c97fd43b9d0%2Fo21IcxEDTN7Sf7g0Qk7Y.jpg?alt=media" alt=""><figcaption></figcaption></figure>

8. After completing the '**Add Shipment**' process, check the **Delyva Dashboard** to ensure that the information that appears is the same.

![](https://3359028955-files.gitbook.io/~/files/v0/b/gitbook-x-prod.appspot.com/o/spaces%2F-Lh09fNwqqta5Vj6Wr8p%2Fuploads%2Fgit-blob-faf2c73491bdc5edef7e45a38af5cad220253246%2F-MBlPjueEZZL-DnOIsfS.jpg?alt=media)

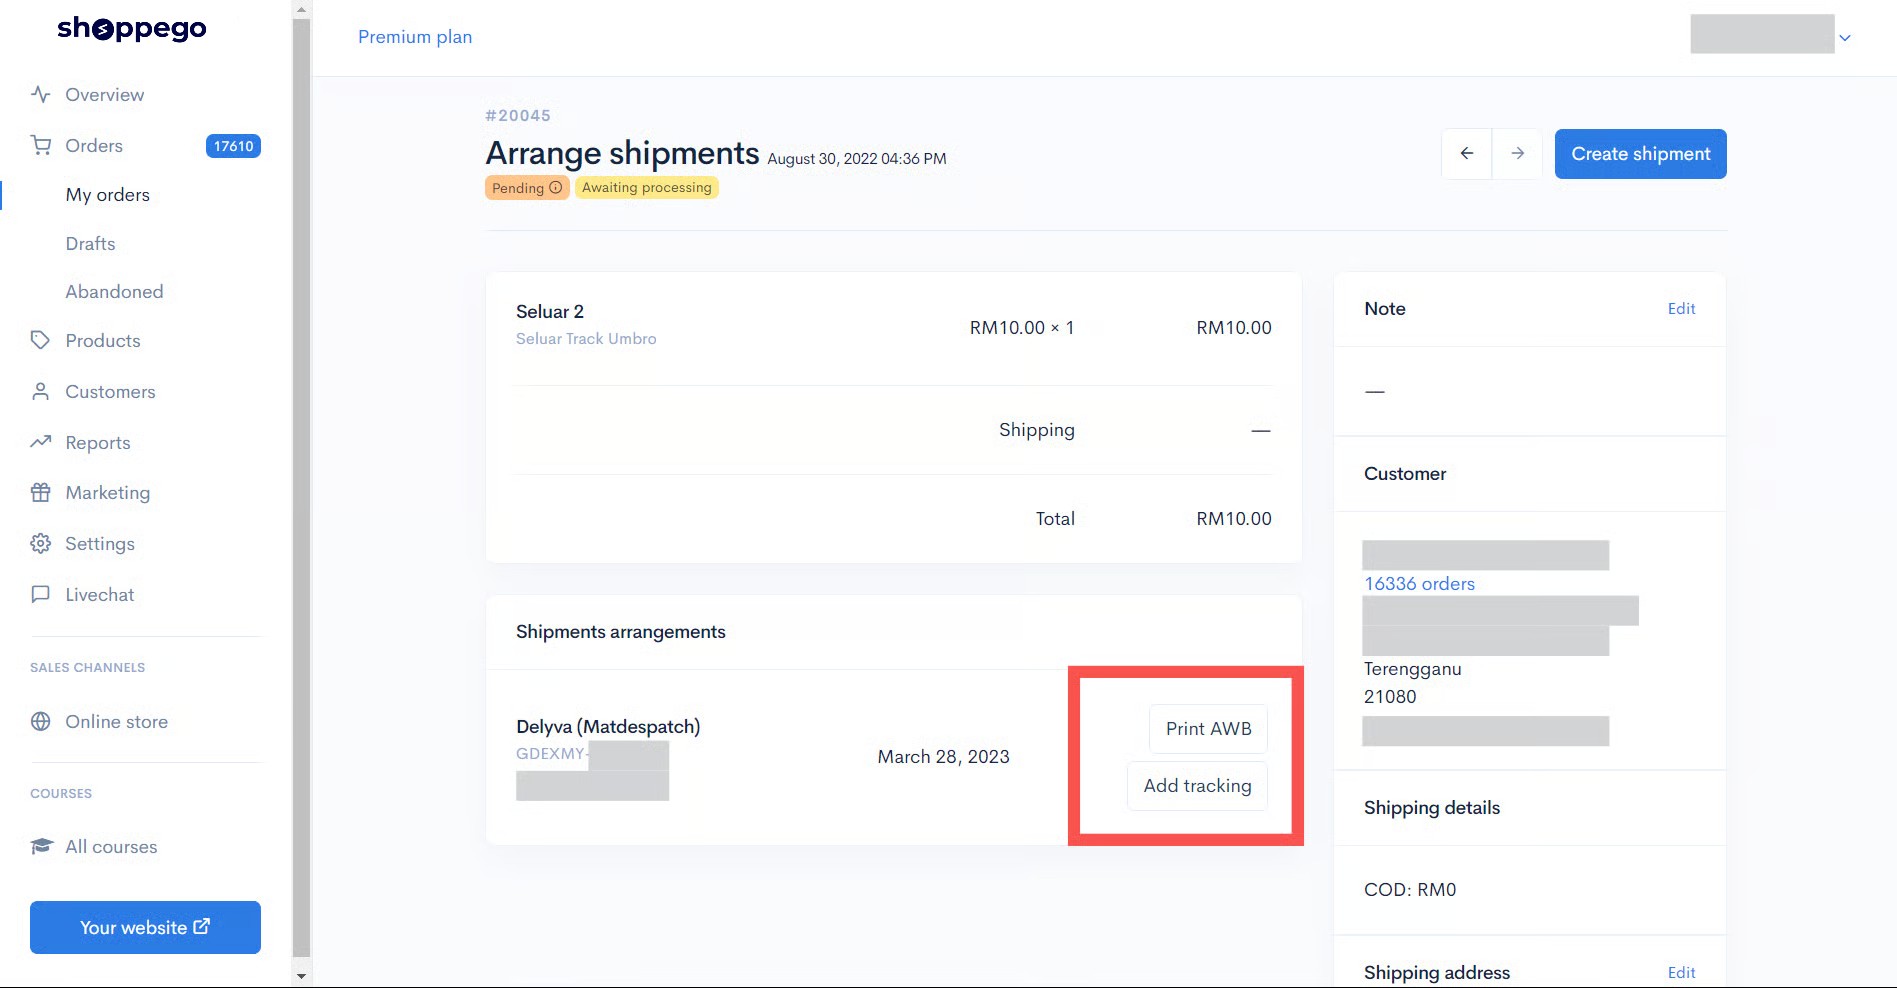
9. **Update the tracking information** to the customer after the courier has picked up the item. **Click** on that order, and the display will be as shown in the image below. Next, click on '**Add Tracking'.**

<figure><img src="https://3359028955-files.gitbook.io/~/files/v0/b/gitbook-x-prod.appspot.com/o/spaces%2F-Lh09fNwqqta5Vj6Wr8p%2Fuploads%2Fgit-blob-c7ba83e5de38a2cd5790712e86540d83a7471e95%2FaTPJ6KaspOVaZY2GIL59.jpg?alt=media" alt=""><figcaption></figcaption></figure>

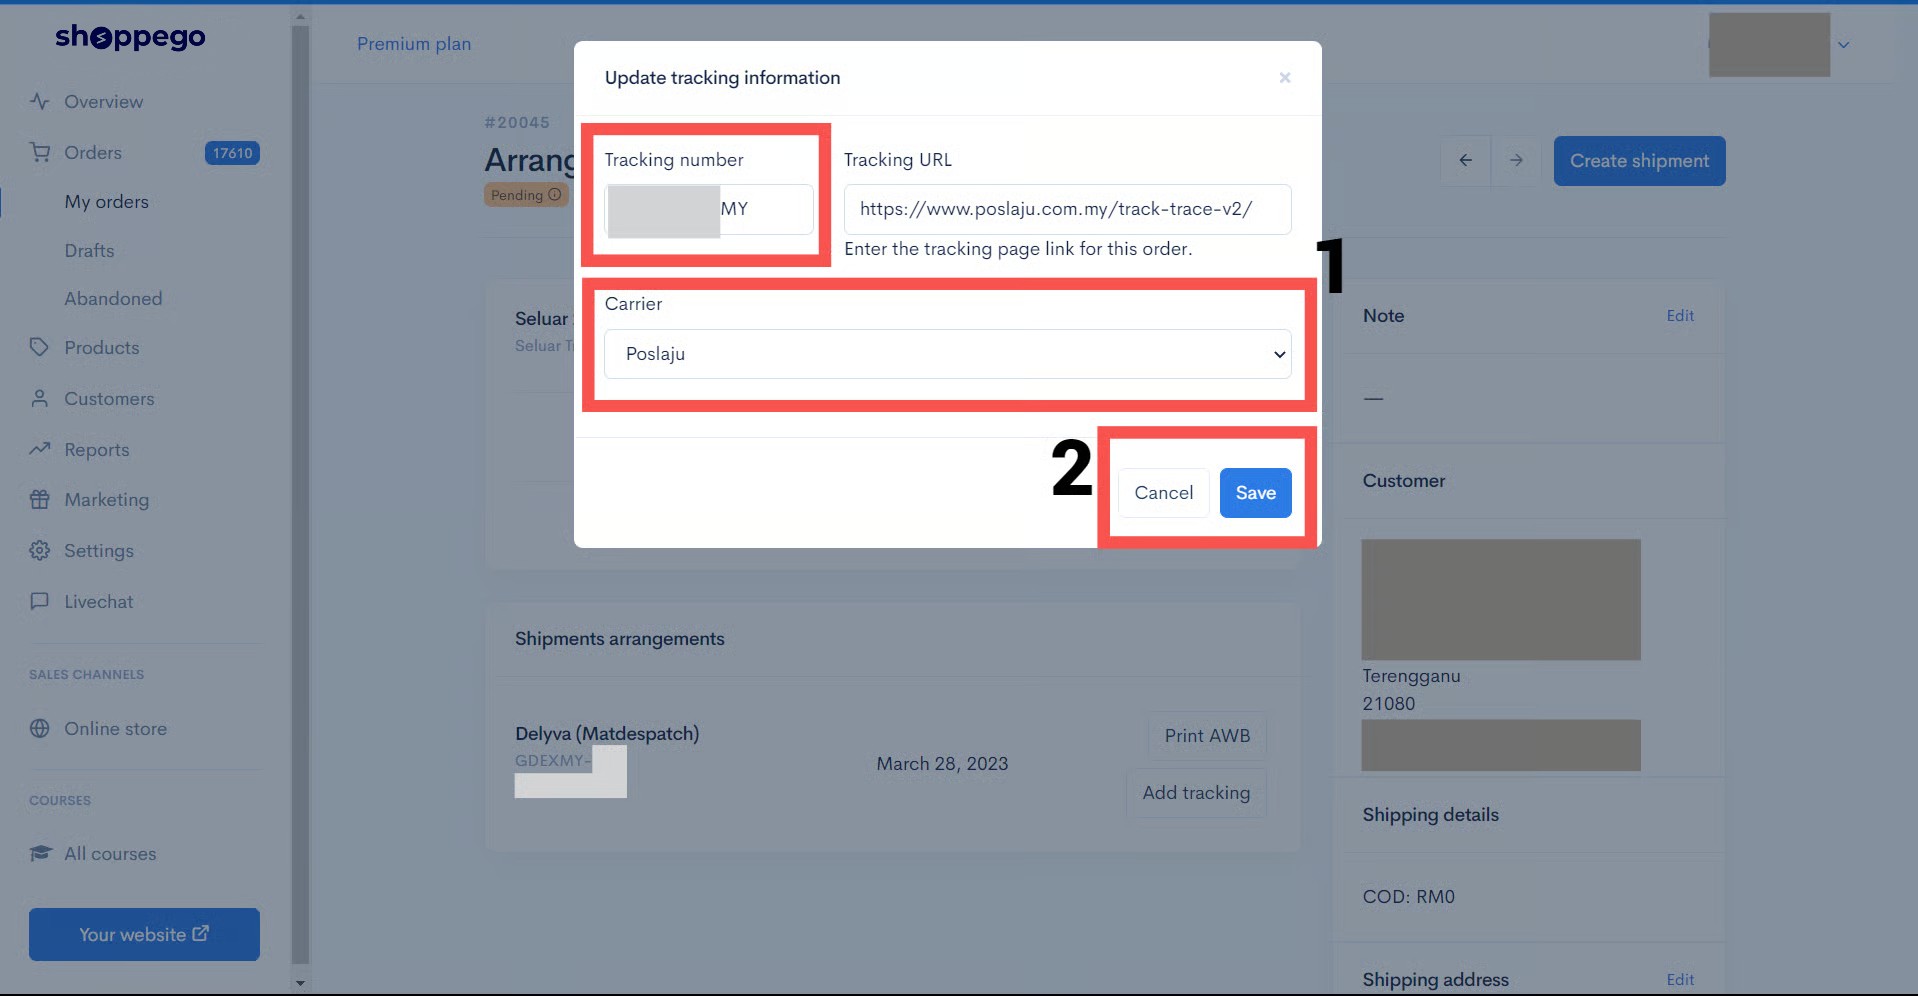
10. Click on '**Carrier**' and select the name of the **Carrier(1)** for that order, which was set during the Add Shipment process. Click the '**Save' button(2)**.

<figure><img src="https://3359028955-files.gitbook.io/~/files/v0/b/gitbook-x-prod.appspot.com/o/spaces%2F-Lh09fNwqqta5Vj6Wr8p%2Fuploads%2Fgit-blob-9b50fbfd42f0681450911833846a14125d15f48e%2FL6y2edTzdQi6Ox49ixM7.jpg?alt=media" alt=""><figcaption></figcaption></figure>

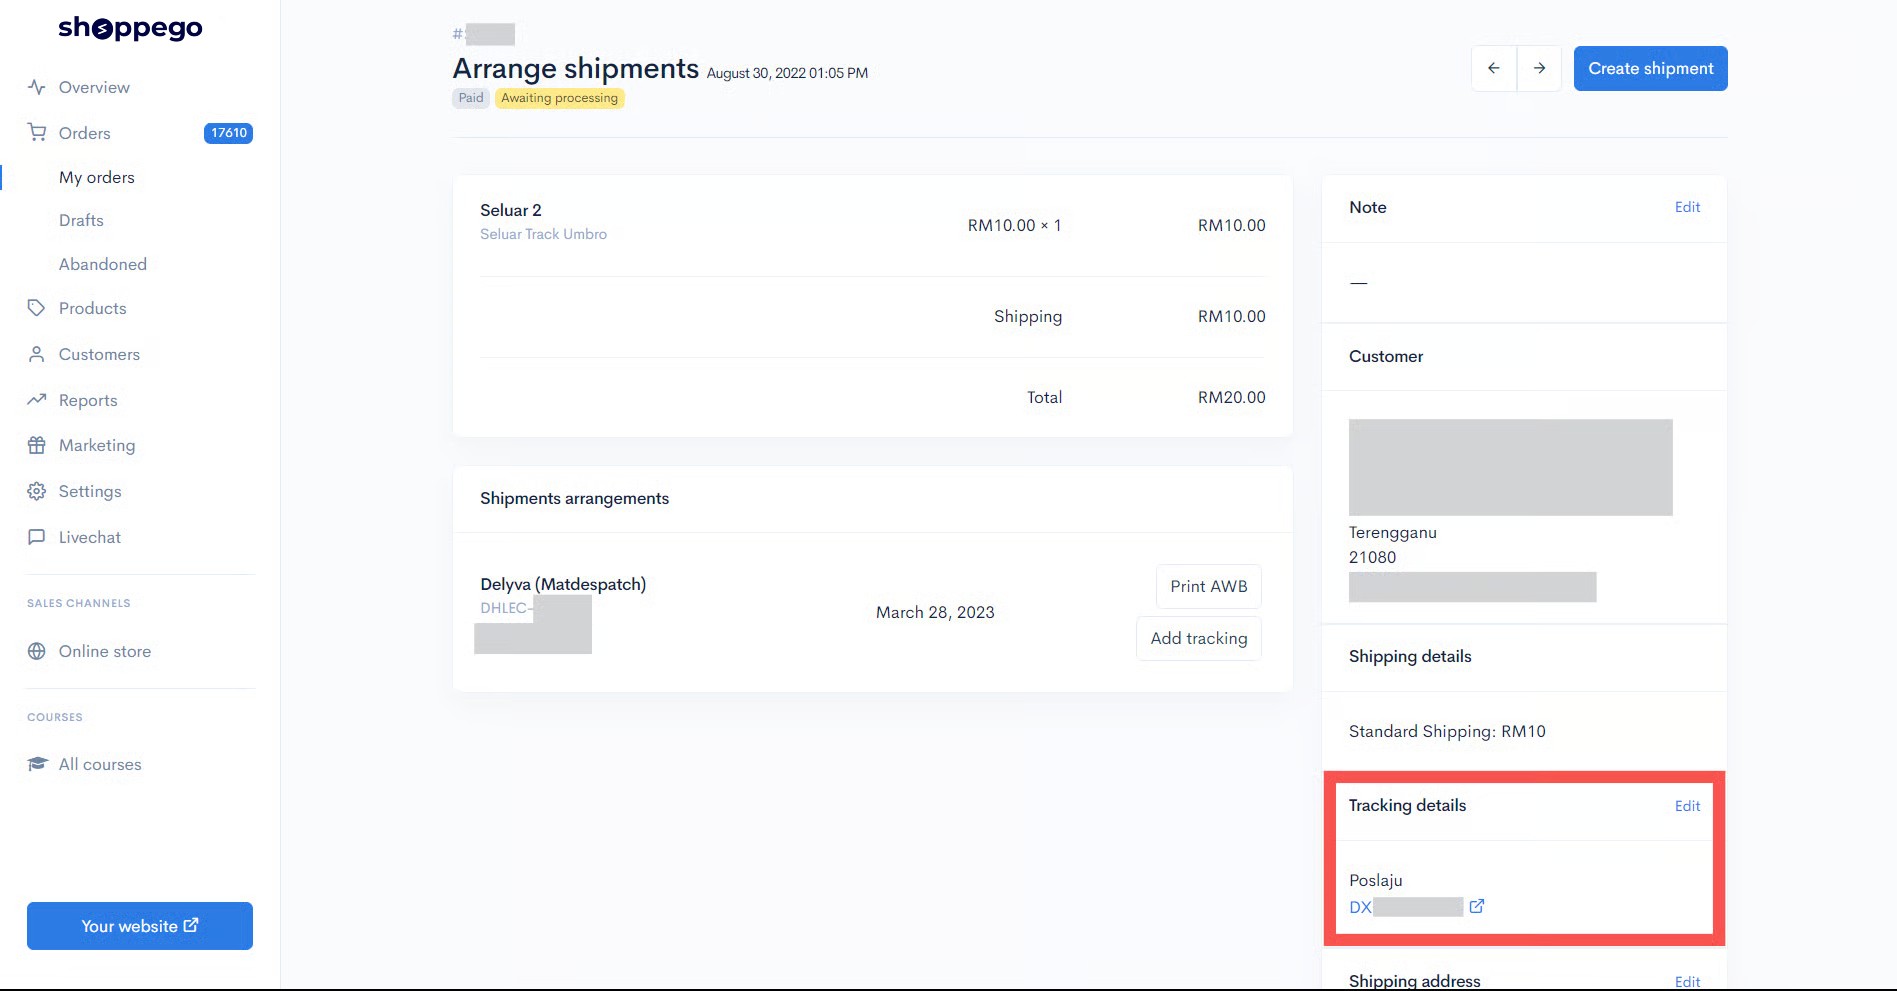
11. When the '**Save**' button is pressed, your customers will **automatically receive their tracking number via email** from the Shoppego system. This tracking number will **also appear** on the **right side of your order** when it is saved.

<figure><img src="https://3359028955-files.gitbook.io/~/files/v0/b/gitbook-x-prod.appspot.com/o/spaces%2F-Lh09fNwqqta5Vj6Wr8p%2Fuploads%2Fgit-blob-b6020f74fcf6c9ac569fb2e2a5f7a9ec5616ae08%2FY1xJmZiu7VwK8wIwyXwj.jpg?alt=media" alt=""><figcaption></figcaption></figure>

12. You can also check the orders list to see that **the tracking number has been assigned** to that order.

{% hint style="info" %}
Click on the **'i'** icon in the Fulfillment to **check the tracking number** for that order.
{% endhint %}

<figure><img src="https://3359028955-files.gitbook.io/~/files/v0/b/gitbook-x-prod.appspot.com/o/spaces%2F-Lh09fNwqqta5Vj6Wr8p%2Fuploads%2Fgit-blob-cae4a7007fd129a0f395dbe9c682ab7e2c86ff86%2FdB6BJxLn7QIPN2RzeJcs.jpg?alt=media" alt=""><figcaption></figcaption></figure>

13. **To print the Airwaybill (AWB)**, you need to **log in to your Delyva account** and click on the printer icon to print the AWB.

![](https://3359028955-files.gitbook.io/~/files/v0/b/gitbook-x-prod.appspot.com/o/spaces%2F-Lh09fNwqqta5Vj6Wr8p%2Fuploads%2Fgit-blob-faf2c73491bdc5edef7e45a38af5cad220253246%2F-MBlPjueEZZL-DnOIsfS.jpg?alt=media)

14. Click on the **print icon** to **print this Airwaybill (AWB)** and display it on your parcel.

![](https://3359028955-files.gitbook.io/~/files/v0/b/gitbook-x-prod.appspot.com/o/spaces%2F-Lh09fNwqqta5Vj6Wr8p%2Fuploads%2Fgit-blob-c9ca5d5a8b86117310595aaa5209ade20e06dd7a%2F-MBlPoIT8xIsmEUcxDMN.jpg?alt=media)