> For the complete documentation index, see [llms.txt](https://docs.shoppego.my/tutorials/llms.txt). Markdown versions of documentation pages are available by appending `.md` to page URLs; this page is available as [Markdown](https://docs.shoppego.my/tutorials/en/settings/shipping-providers/easyparcel.md).

# Easyparcel

This setting contains 3 parts, namely:

{% hint style="success" %}
This feature is available for **Premium** and **Ultimate** plans.
{% endhint %}

* **Part 1**: On the Easyparcel platform
* **Part 2**: On the Shoppego platform
* **Part 3**: How to use

{% hint style="info" %}
For Easyparcel shipping provider you <mark style="color:red;">**cannot use the Pickup**</mark> function during the **Arrange shipment process**.
{% endhint %}

## Part 1: On the Easyparcel platform

1. Make sure you have registered your **Easyparcel** account first.

{% hint style="info" %}
You can register your account here: <https://easyparcel.com/my/en/signup/>​
{% endhint %}

2. Once you have successfully registered you can see your **Dashboard** as shown below.

![](https://3359028955-files.gitbook.io/~/files/v0/b/gitbook-x-prod.appspot.com/o/spaces%2F-Lh09fNwqqta5Vj6Wr8p%2Fuploads%2Fgit-blob-acd30f098bdf614d16fb4ba4df15a9aa2447eef0%2F-MKYk7HNlDueVP2NX67M.png?alt=media)

3\. To get the **Integration ID** you can click on **Integrations** -> **Add New Store.**

![](https://3359028955-files.gitbook.io/~/files/v0/b/gitbook-x-prod.appspot.com/o/spaces%2F-Lh09fNwqqta5Vj6Wr8p%2Fuploads%2Fgit-blob-7161a83ff80125768a5946675fa3746a70d9cf7a%2F-MKYkgI90a9x42p5G_Ca.png?alt=media)

4\. You will be taken to the Integration page. On that page, you can scroll down to click on the **Shoppego icon.**

![](https://3359028955-files.gitbook.io/~/files/v0/b/gitbook-x-prod.appspot.com/o/spaces%2F-Lh09fNwqqta5Vj6Wr8p%2Fuploads%2Fgit-blob-fb6f47a17fa1307f8851366d0607db6e2a94fc73%2F-Mhl4wE2fWYobwz5H9nD.png?alt=media)

5\. Next, on the same page you will be asked to enter information as shown below.

![](https://3359028955-files.gitbook.io/~/files/v0/b/gitbook-x-prod.appspot.com/o/spaces%2F-Lh09fNwqqta5Vj6Wr8p%2Fuploads%2Fgit-blob-3cb9be9220b60204a1185b5e1d5e767bae327b23%2F-Mhl6efTJwaAV-996F09.jpg?alt=media)

<table><thead><tr><th width="164">Field</th><th>Description</th></tr></thead><tbody><tr><td><strong>Shop Name</strong></td><td>Enter the name of your Shoppego store</td></tr><tr><td><strong>Integration ID</strong></td><td>You can save the text in this field to be included in your Easyparcel integration settings in Shoppego in the API key field later.</td></tr><tr><td><strong>Shop URL</strong></td><td>Enter your Shoppego store link</td></tr></tbody></table>

{% hint style="info" %}
You need to **save the Integration ID** for use in the next step.
{% endhint %}

6. Once you have entered all the information, you can click **Submit.**

![](https://3359028955-files.gitbook.io/~/files/v0/b/gitbook-x-prod.appspot.com/o/spaces%2F-Lh09fNwqqta5Vj6Wr8p%2Fuploads%2Fgit-blob-45fbc72bc8b2bca9a070f9e6efd029cdf8b9a5e6%2F-Mhl7qub0jjnIgrIbLPE.png?alt=media)

7. After you click the button, you will be taken to a page as shown below. It indicates that your setup has been successful.

![](https://3359028955-files.gitbook.io/~/files/v0/b/gitbook-x-prod.appspot.com/o/spaces%2F-Lh09fNwqqta5Vj6Wr8p%2Fuploads%2Fgit-blob-09c35be702fe3ce94ed06012bb37b6599aa525e4%2F-Mhl97XgsmWrquFQqKpb.jpg?alt=media)

8. You need to make sure the toggle on your setting is colored green it indicates this setting is in active state.

## Part 2: On the Shoppego platform

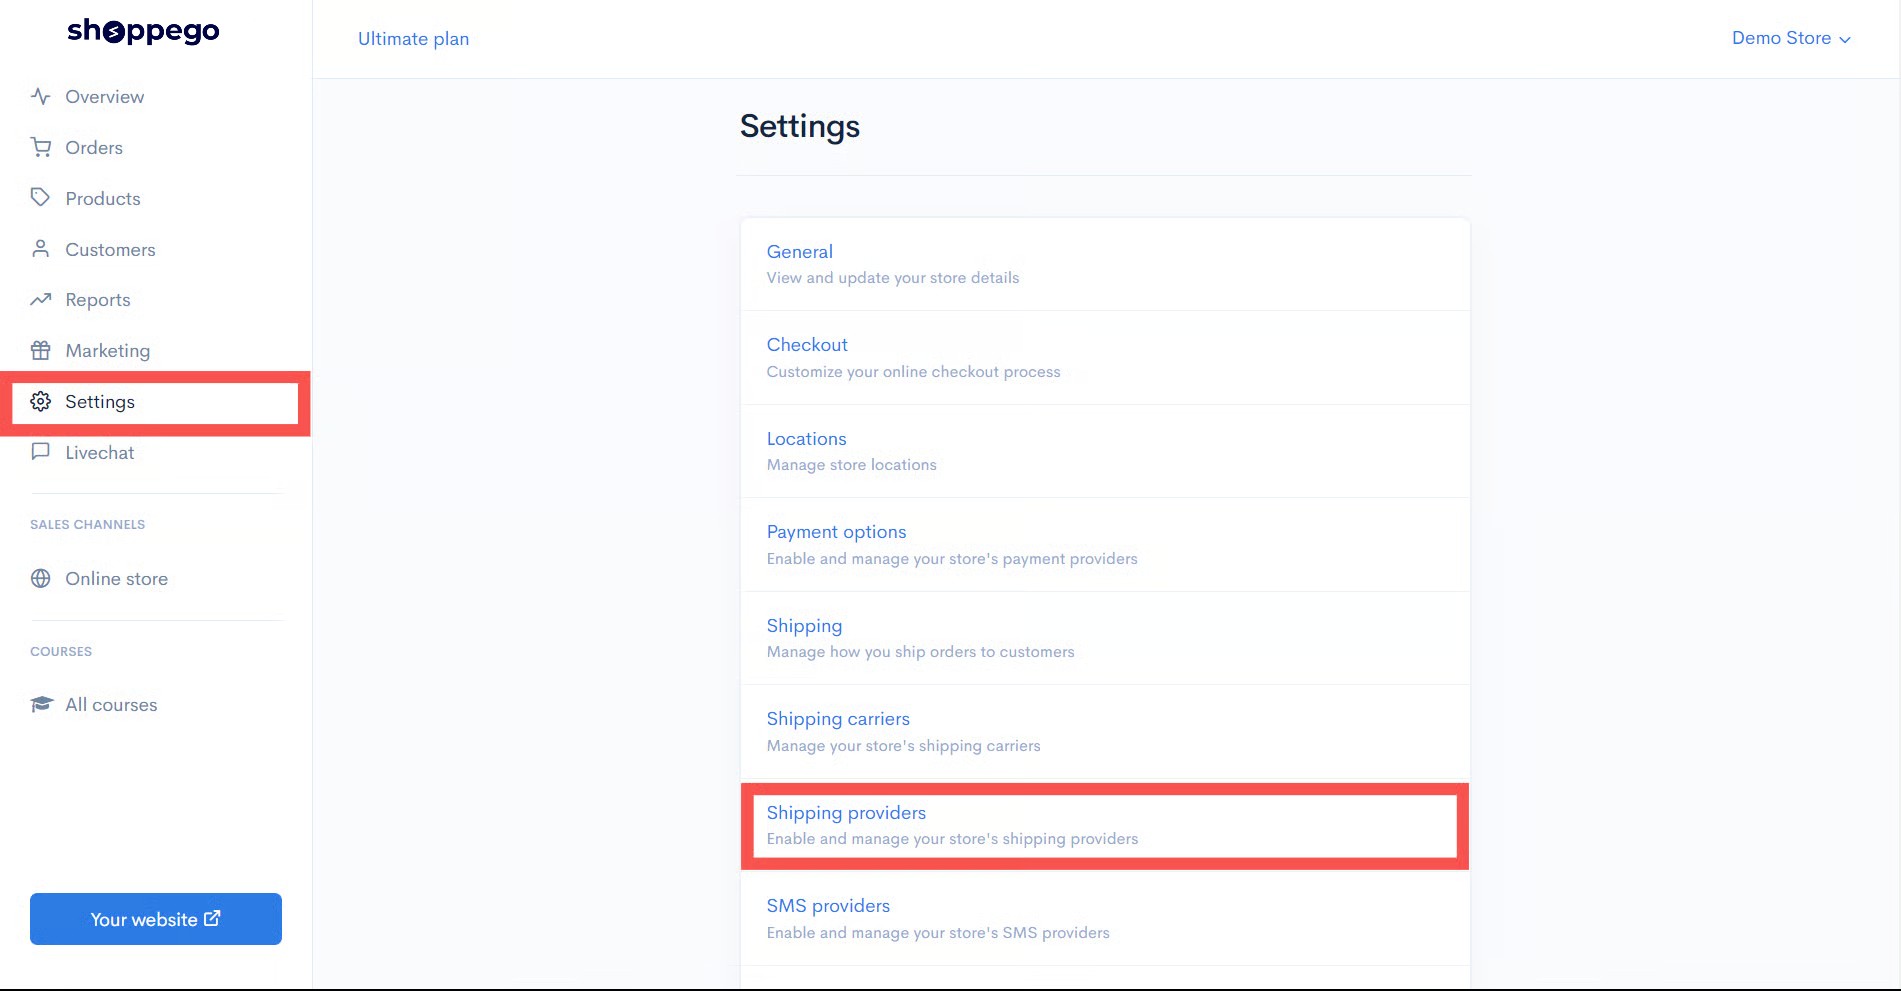
1\. Log in to your Shoppego Dashboard, then navigate to **Settings > Shipping Providers.**

<figure><img src="https://3359028955-files.gitbook.io/~/files/v0/b/gitbook-x-prod.appspot.com/o/spaces%2F-Lh09fNwqqta5Vj6Wr8p%2Fuploads%2Fgit-blob-4095daa4a890d41727ef599964e02ec910434e3f%2F6iS5SNhNJ70UnRj5VwHF.jpg?alt=media" alt=""><figcaption></figcaption></figure>

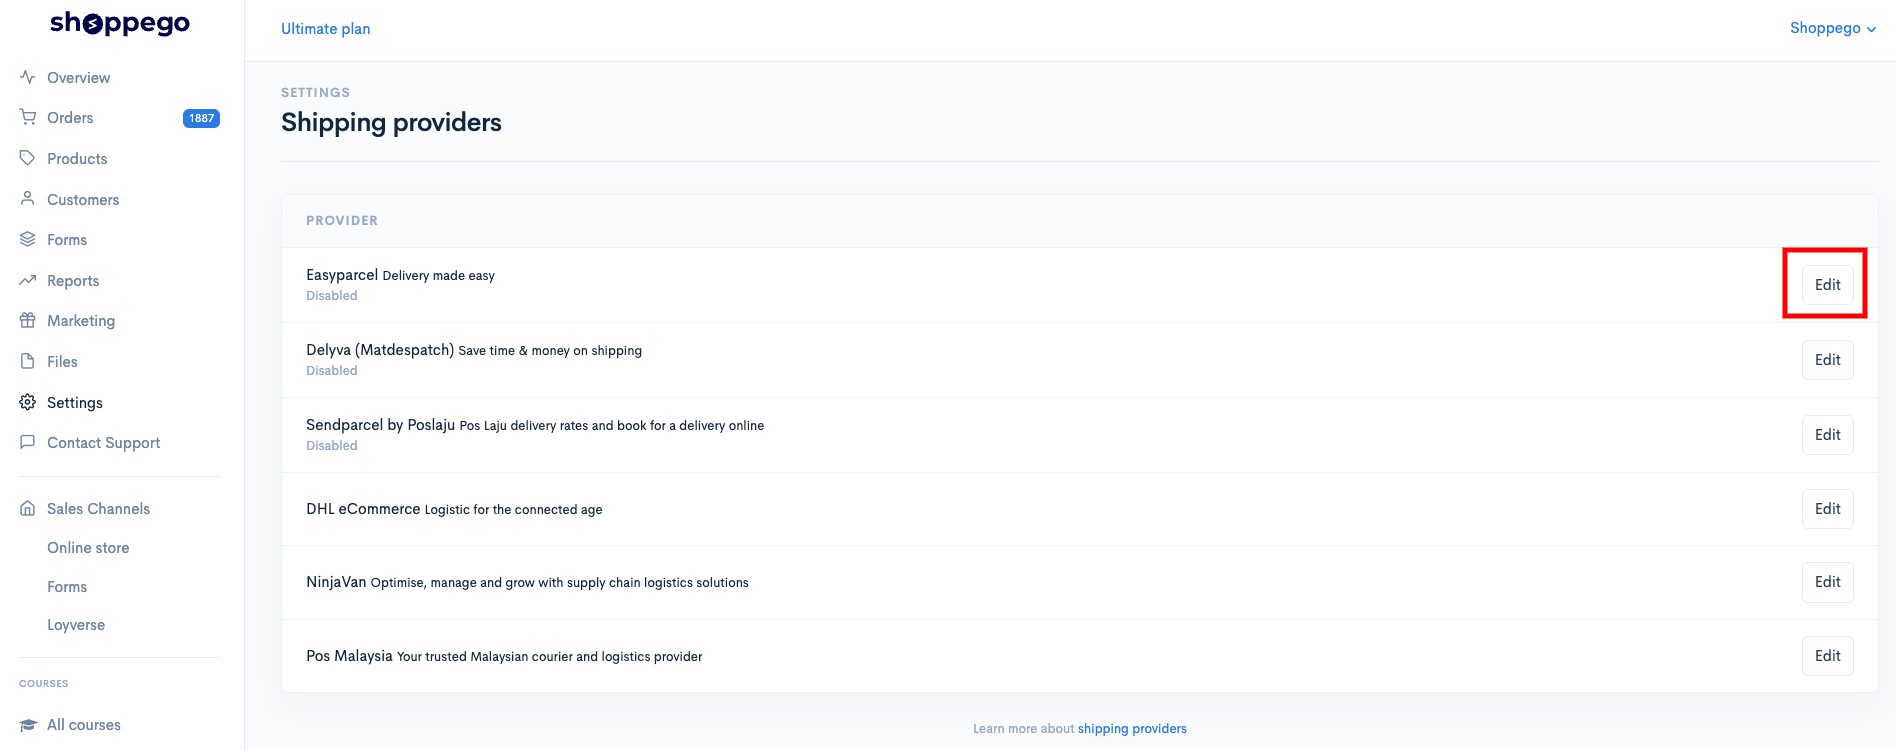
2. Click on the **Activate/Edit** button on the **Easyparcel** Shipping Provider section.

<figure><img src="https://3359028955-files.gitbook.io/~/files/v0/b/gitbook-x-prod.appspot.com/o/spaces%2F-Lh09fNwqqta5Vj6Wr8p%2Fuploads%2Fgit-blob-557b9caa1fe6805ea56ac01eda5e11062ce0e2ef%2Fn0KzbOmFYnJvfhKrxHuj.jpg?alt=media" alt=""><figcaption></figcaption></figure>

5\. Once you click the button, you will be taken to a page for you to enter the **Integration ID** you just got in step in part 1 before. You can enter the Integration ID in the **API Key** section.

{% hint style="success" %}
You can also tick on **Enable content** to make sure that in your AWB section there is the name of the product purchased by your customers.
{% endhint %}

![](https://3359028955-files.gitbook.io/~/files/v0/b/gitbook-x-prod.appspot.com/o/spaces%2F-Lh09fNwqqta5Vj6Wr8p%2Fuploads%2Fgit-blob-f0b2608494ee919eaed9ff82308c79184f01ed61%2F-MgYtUKcfwkWFOAKvA7X.png?alt=media)

<table data-header-hidden><thead><tr><th width="197"></th><th></th></tr></thead><tbody><tr><td><strong>Test mode</strong></td><td>You can untick this setting to make sure you can use shipping provider Easyparcel. This setting can be used if you are a developer.</td></tr><tr><td><strong>API Key</strong></td><td>You can enter the <strong>Integration ID</strong> you have already obtained from your Easyparcel account.</td></tr><tr><td><strong>Enable content</strong></td><td>You can activate this toggle to make sure the details of the product purchased by the customer are on the AWB order.</td></tr><tr><td><strong>Enable Easyparcel</strong></td><td>You need to activate this toggle to make sure you can use this Easyparcel shipping provider.</td></tr></tbody></table>

6\. Once you have entered all the data, you can click **Save** and the process of setting up your Easyparcel shipping provider is now successful.

![](https://3359028955-files.gitbook.io/~/files/v0/b/gitbook-x-prod.appspot.com/o/spaces%2F-Lh09fNwqqta5Vj6Wr8p%2Fuploads%2Fgit-blob-27f5c6cef5c9c67fabc275cd9a5cde89670a33a9%2F-MhlAk2NiUQUhNtVyqHt.jpg?alt=media)

## Part 3: How to use

1\. You can go back to your **Shoppego Dashboard** section.

![](https://3359028955-files.gitbook.io/~/files/v0/b/gitbook-x-prod.appspot.com/o/spaces%2F-Lh09fNwqqta5Vj6Wr8p%2Fuploads%2Fgit-blob-b853fc0189b34fb1d3990f5b1f53fa71deb9d384%2FlCN7aw3FznaFFoOAyya2.jpg?alt=media)

2\. Click on **Orders.**

![](https://3359028955-files.gitbook.io/~/files/v0/b/gitbook-x-prod.appspot.com/o/spaces%2F-Lh09fNwqqta5Vj6Wr8p%2Fuploads%2Fgit-blob-430ef58f77dd3f572d4177d48bc97c5b06bc82c5%2F3GH71QI9UtN2dyOxtc9r.jpg?alt=media)

3\. Click on any order you want to arrange the shipment.

![](https://3359028955-files.gitbook.io/~/files/v0/b/gitbook-x-prod.appspot.com/o/spaces%2F-Lh09fNwqqta5Vj6Wr8p%2Fuploads%2Fgit-blob-0b477509f1f865d1bad2a9f4995903e61f57704d%2FlasUUilnpBxcaM16QKJd.png?alt=media)

4\. Click on the **Arrange shipment** button.

![](https://3359028955-files.gitbook.io/~/files/v0/b/gitbook-x-prod.appspot.com/o/spaces%2F-Lh09fNwqqta5Vj6Wr8p%2Fuploads%2Fgit-blob-c8dee66872154e360bb761376fd144e1c870475d%2F8iFJZK2k86EUe0IDT4eN.jpg?alt=media)

5\. Click on **Create shipment.**

![](https://3359028955-files.gitbook.io/~/files/v0/b/gitbook-x-prod.appspot.com/o/spaces%2F-Lh09fNwqqta5Vj6Wr8p%2Fuploads%2Fgit-blob-dd501a63aa622d663809984643d1e9dc76d4bb1f%2FQ20cobeJSMXU7EOnh1kh.png?alt=media)

6\. Next you will be able to see the capital/pop up as shown below.

![](https://3359028955-files.gitbook.io/~/files/v0/b/gitbook-x-prod.appspot.com/o/spaces%2F-Lh09fNwqqta5Vj6Wr8p%2Fuploads%2Fgit-blob-552157a9ba3d3047b2e68ecf75ab9fb28d00b525%2FeijwKIp7loSpaSpKqnwj.jpg?alt=media)

7\. You can select the Shipping courier you want to use in the **Choose service column.**

![](https://3359028955-files.gitbook.io/~/files/v0/b/gitbook-x-prod.appspot.com/o/spaces%2F-Lh09fNwqqta5Vj6Wr8p%2Fuploads%2Fgit-blob-e98ca0dc9ce084a90b94abe37c5536483776c430%2F7UgrpIvA3lGlaK5MfKmY.png?alt=media)

8\. Once done click **Submit.**

![](https://3359028955-files.gitbook.io/~/files/v0/b/gitbook-x-prod.appspot.com/o/spaces%2F-Lh09fNwqqta5Vj6Wr8p%2Fuploads%2Fgit-blob-562eaac2c93ff6173657e6890bb6989c9e613a06%2FlzXjLIWwTGoazq0u1UB8.png?alt=media)

9\. If you want to send a tracking number to the customer, you can click on the **Add tracking** button.

![](https://3359028955-files.gitbook.io/~/files/v0/b/gitbook-x-prod.appspot.com/o/spaces%2F-Lh09fNwqqta5Vj6Wr8p%2Fuploads%2Fgit-blob-4862d54681bf09862bf82ea4094ee0a7fcfbc7ab%2FP0pahq2oeam4KV7xjxgb.png?alt=media)

## Additional Info

For the **Ultimate** plan, setting your shipping provider will have 2 additional inputs to set.

You can refer to the display below for information that you can fill in and how to set it.

![](https://3359028955-files.gitbook.io/~/files/v0/b/gitbook-x-prod.appspot.com/o/spaces%2F-Lh09fNwqqta5Vj6Wr8p%2Fuploads%2Fgit-blob-5a3dd98761faff69aa0a64221aac962c06fc8e71%2FuDkNagmZM02DDNEY616O.png?alt=media)

<table data-header-hidden><thead><tr><th width="170.6999364904824"></th><th></th></tr></thead><tbody><tr><td><strong>Default Courier</strong></td><td><p>You can enter the Courier ID for the shipping courier that you want to use to process the delivery of the customer's order. Among the Courier IDs you can use:</p><ol><li>EP-CR0X for SF Global Express</li><li>EP-CR0B for EMS (Pos Malaysia Berhad)</li><li>EP-CR0A for Poslaju National Courier</li><li>EP-CR05 for Skynet Express (M) Sdn. Bhd.</li><li>EP-CR0Z for CJ Century Logistics Sdn Bhd.</li><li>EP-CR0DE for ZTO</li><li>EP-CR0H for ABX Express (M) Sdn Bhd.</li><li>EP-CR0DP for J&#x26;T Express (Malaysia) Sdn. Bhd.</li></ol></td></tr><tr><td><strong>Auto add tracking code</strong></td><td>You can activate this toggle to ensure that when you Arrange shipment for the customer's order, the <strong>tracking number for the order will be automatically sent</strong> <strong>to your customer</strong> without you having to click on the Add tracking button.</td></tr></tbody></table>